
🧬 Clicks + Deterministic Views (C+DV)
Understanding Northbeam's most innovative attribution model.
What is Clicks + Deterministic Views?
Northbeam’s C+DV model is a transformative shift in attribution.With C+DV, you can see the true, proven impact of your ads—even on platforms that are more impression-focused. This helps you capture the real value of awareness-driven ads and move beyond the limitations of last-click attribution.
Watch this video for the full tour and explanation!
Today’s marketing landscape is more fragmented than ever, and we know that different ad platforms drive different user behavior. On view-heavy platforms, users often don’t click directly through an ad to purchase.
However, research shows that users have high brand recall from ads they’ve seen on these platforms—and we know that brand recall ultimately helps drive conversions. So how do we connect the two?
The solution: Clicks + Deterministic Views
Clicks + Deterministic Views is Northbeam’s next-generation multi-touch attribution (MTA) model. It builds on our Clicks-Only model by layering in verified impression & view data directly from participating ad platforms.
These platform events are combined with Northbeam’s industry-leading, first-party pixel and order data to provide a complete and accurate view of how marketing actually drives conversions. Unlike traditional “view-through” attribution, Northbeam links views deterministically, meaning every impression tied to a conversion is verified, not inferred.
Deterministic? What's that?
Attribution models differ in how they connect ads to conversions:
- Deterministic attribution: Matches conversions to ads using exact identifiers (like order ID, hashed email, or phone). Every link is verified and certain.
- Probabilistic attribution: Uses models and assumptions (like device type, IP, or behavior patterns) to guess which ad drove a conversion.
How does Clicks + Deterministic Views work?
Northbeam integrates directly with each participating ad platform to match verified impression and view events to real orders. This is not modeled or inferred — every view tied to a conversion is proven via exact identifiers like order ID or hashed email.
- Clicks and views share credit. First-party click data from Northbeam's pixel is combined with verified view data from participating platforms. Both contribute to the final attribution.
- Credit is assigned at the event level. Each touchpoint — whether a click or a view — is evaluated individually and assigned credit based on the platform pooling logic below.
- Safeguards are built in. Data quality checks prevent credit dilution, unfair shifts between platforms, and attribution based on bad or unverified signals.
Jump to the "How CDV Attributes Credit" section to see the logic.
Why is Clicks + Deterministic Views useful?
- See beyond clicks. Capture both verified views and clicks to understand the full impact of your ads.
- True upper-funnel visibility. Quantify how awareness and prospecting campaigns actually influence downstream purchases.
- Deterministic accuracy. Every impression tied to a conversion is proven—not modeled—so attribution is grounded in reality.
- Smarter budget allocation. Know which campaigns drive downstream revenue and confidently scale what works.
- Cross-platform clarity. Combine verified impression data with Northbeam’s pixel + order data for a single source of truth.
- Privacy-preserving measurement. Data is processed in Northbeam’s clean room, ensuring compliance and security.
- Reduce wasted spend. Eliminate over-crediting of last clicks and avoid underspending on top-of-funnel channels.
How does Clicks + Deterministic Views attribute credit?
C+DV unifies click and view data across platforms to give the most complete measurement of marketing performance.
- How we divide credit for a single purchase
- Paid clicks and paid views take full precedence over touchpoints with the following
Category (Northbeam)labels:DirectOrganicOrganic SearchPaid - Branded SearchEmailSMS
- Credit between paid clicks and paid views is split as follows:
- Each first-party (i.e. Northbeam observed) paid click touchpoint receives a share of credit.
- For each participating C+DV partner platform, the remaining share of credit is distributed equally across all view touchpoints from that platform using the following methodology:
- Views are grouped by platform and credit is divided within each platform “pool.” For example, if there is 1 view on Platform A and 10 views on Platform B, Platform B will receive more total credit, but each individual view will have less weight than the 1 view on Platform A.
- We do not weight views from different platforms differently; the amount of credit assigned to each platform is dependent on how many views are in that platform’s “pool.”
- Credit is not assigned based on where each touchpoint falls in the funnel; for example, if a customer views an ad on Snap, and later views an ad on Pinterest, the Pinterest ad does not earn less credit.
- Paid clicks and paid views take full precedence over touchpoints with the following
Worked Examples
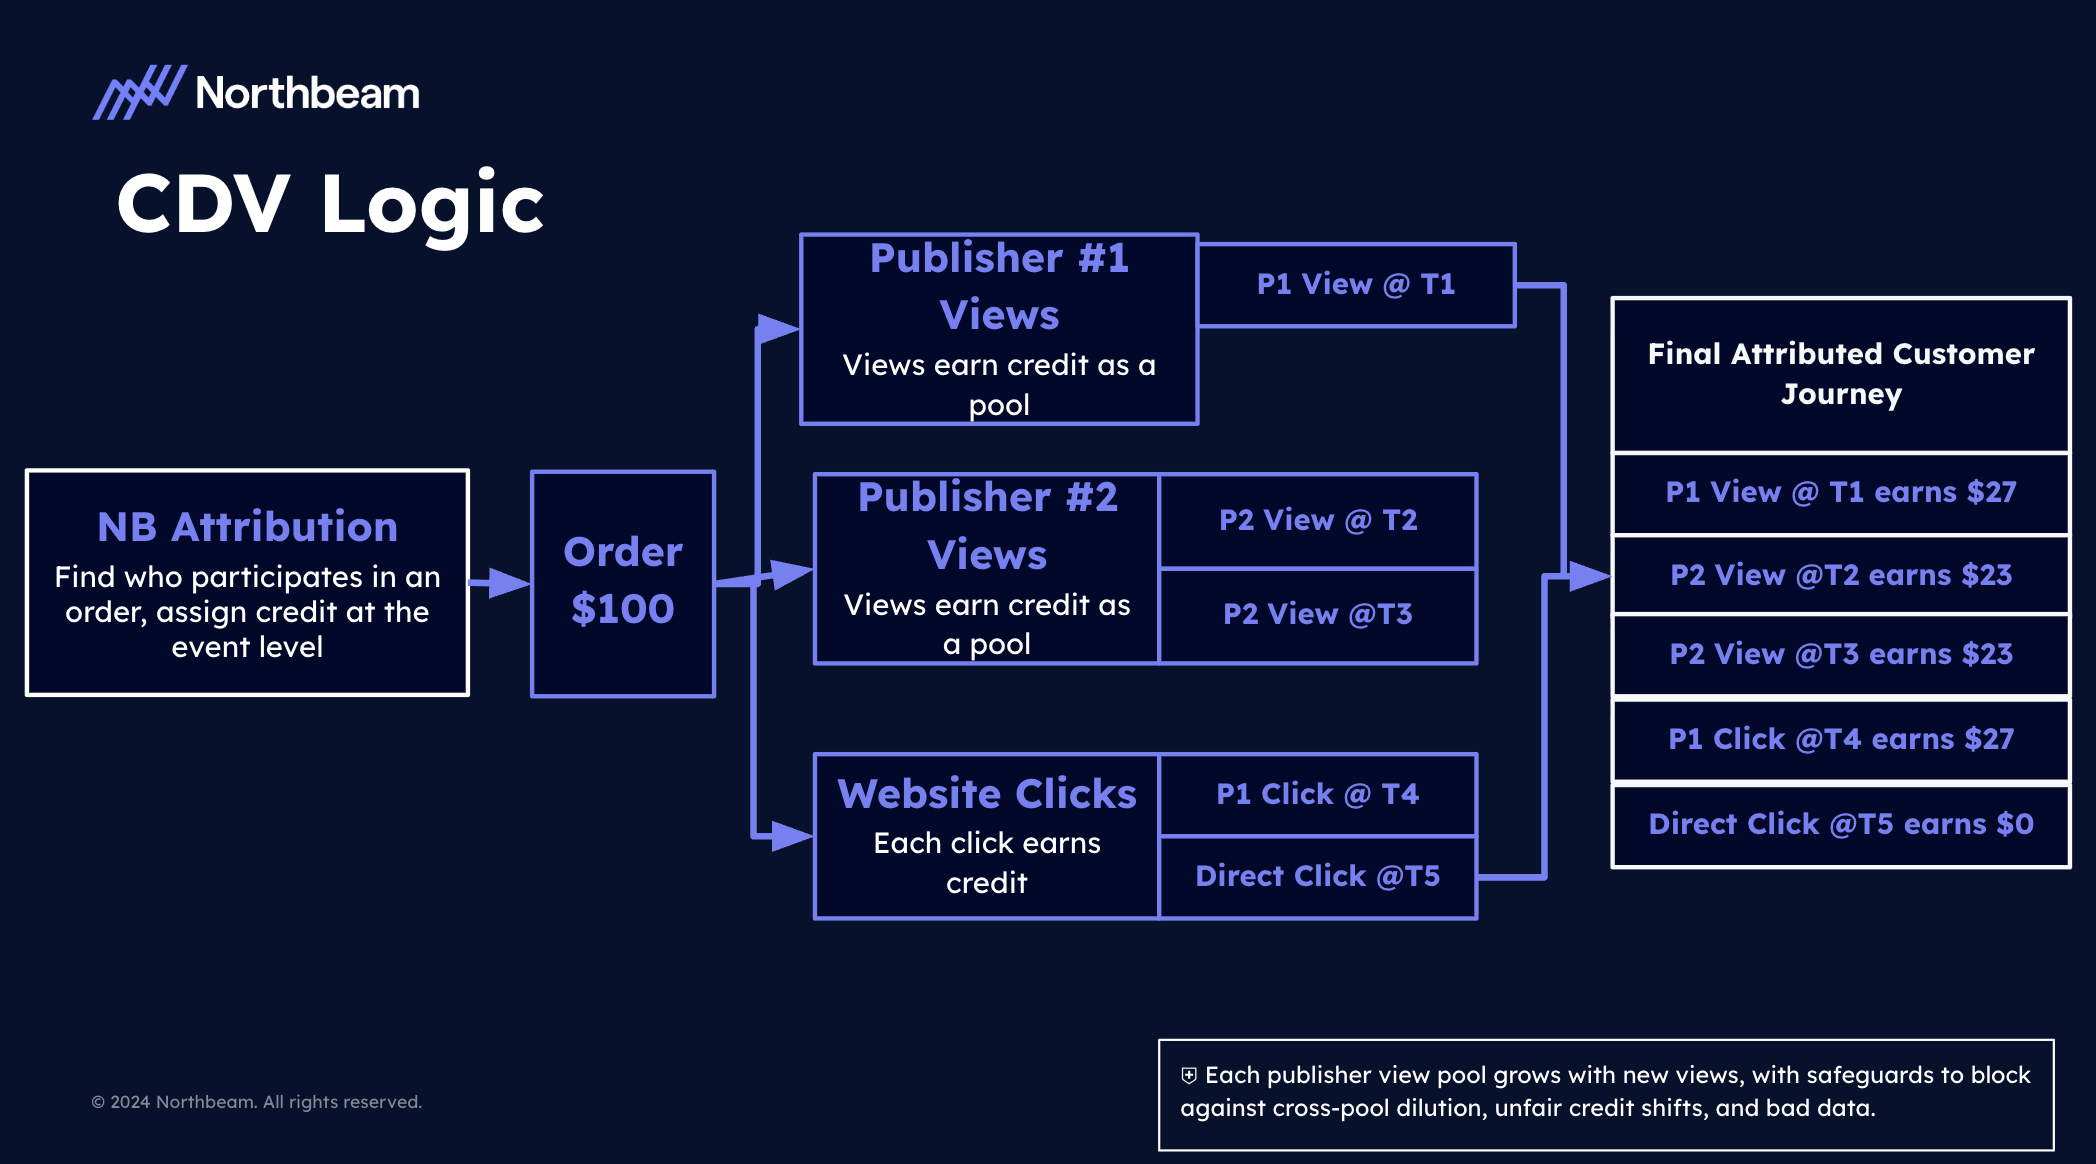
Example 1: Clicks and Views Across Two Publishers
Journey: A customer is exposed to ads across two platforms before making a $100 purchase.
- T1 — Publisher 1 (P1) View
- T2 — Publisher 2 (P2) View
- T3 — Publisher 2 (P2) View
- T4 — Publisher 1 (P1) Click
- T5 — Direct Click
| Touchpoint | Type | Platform | Credit Earned |
|---|---|---|---|
| T1 | View | Publisher 1 | $27 |
| T2 | View | Publisher 2 | $23 |
| T3 | View | Publisher 2 | $23 |
| T4 | Click | Publisher 1 | $27 |
| T5 | Direct Click | Direct | $0 |
| Total | $100 |
Why does credit split this way?
Clicks and views both earn credit. Direct is excluded as a lower funnel touchpoint when upper funnel touchpoints exist in the journey.
The $100 is divided between the two publisher pools — Publisher 1 (1 view + 1 click) and Publisher 2 (2 views). Within each publisher, credit is shared equally across that publisher's touchpoints. Publisher 1 has 2 touchpoints so each earns $27. Publisher 2 has 2 views so each earns $23.
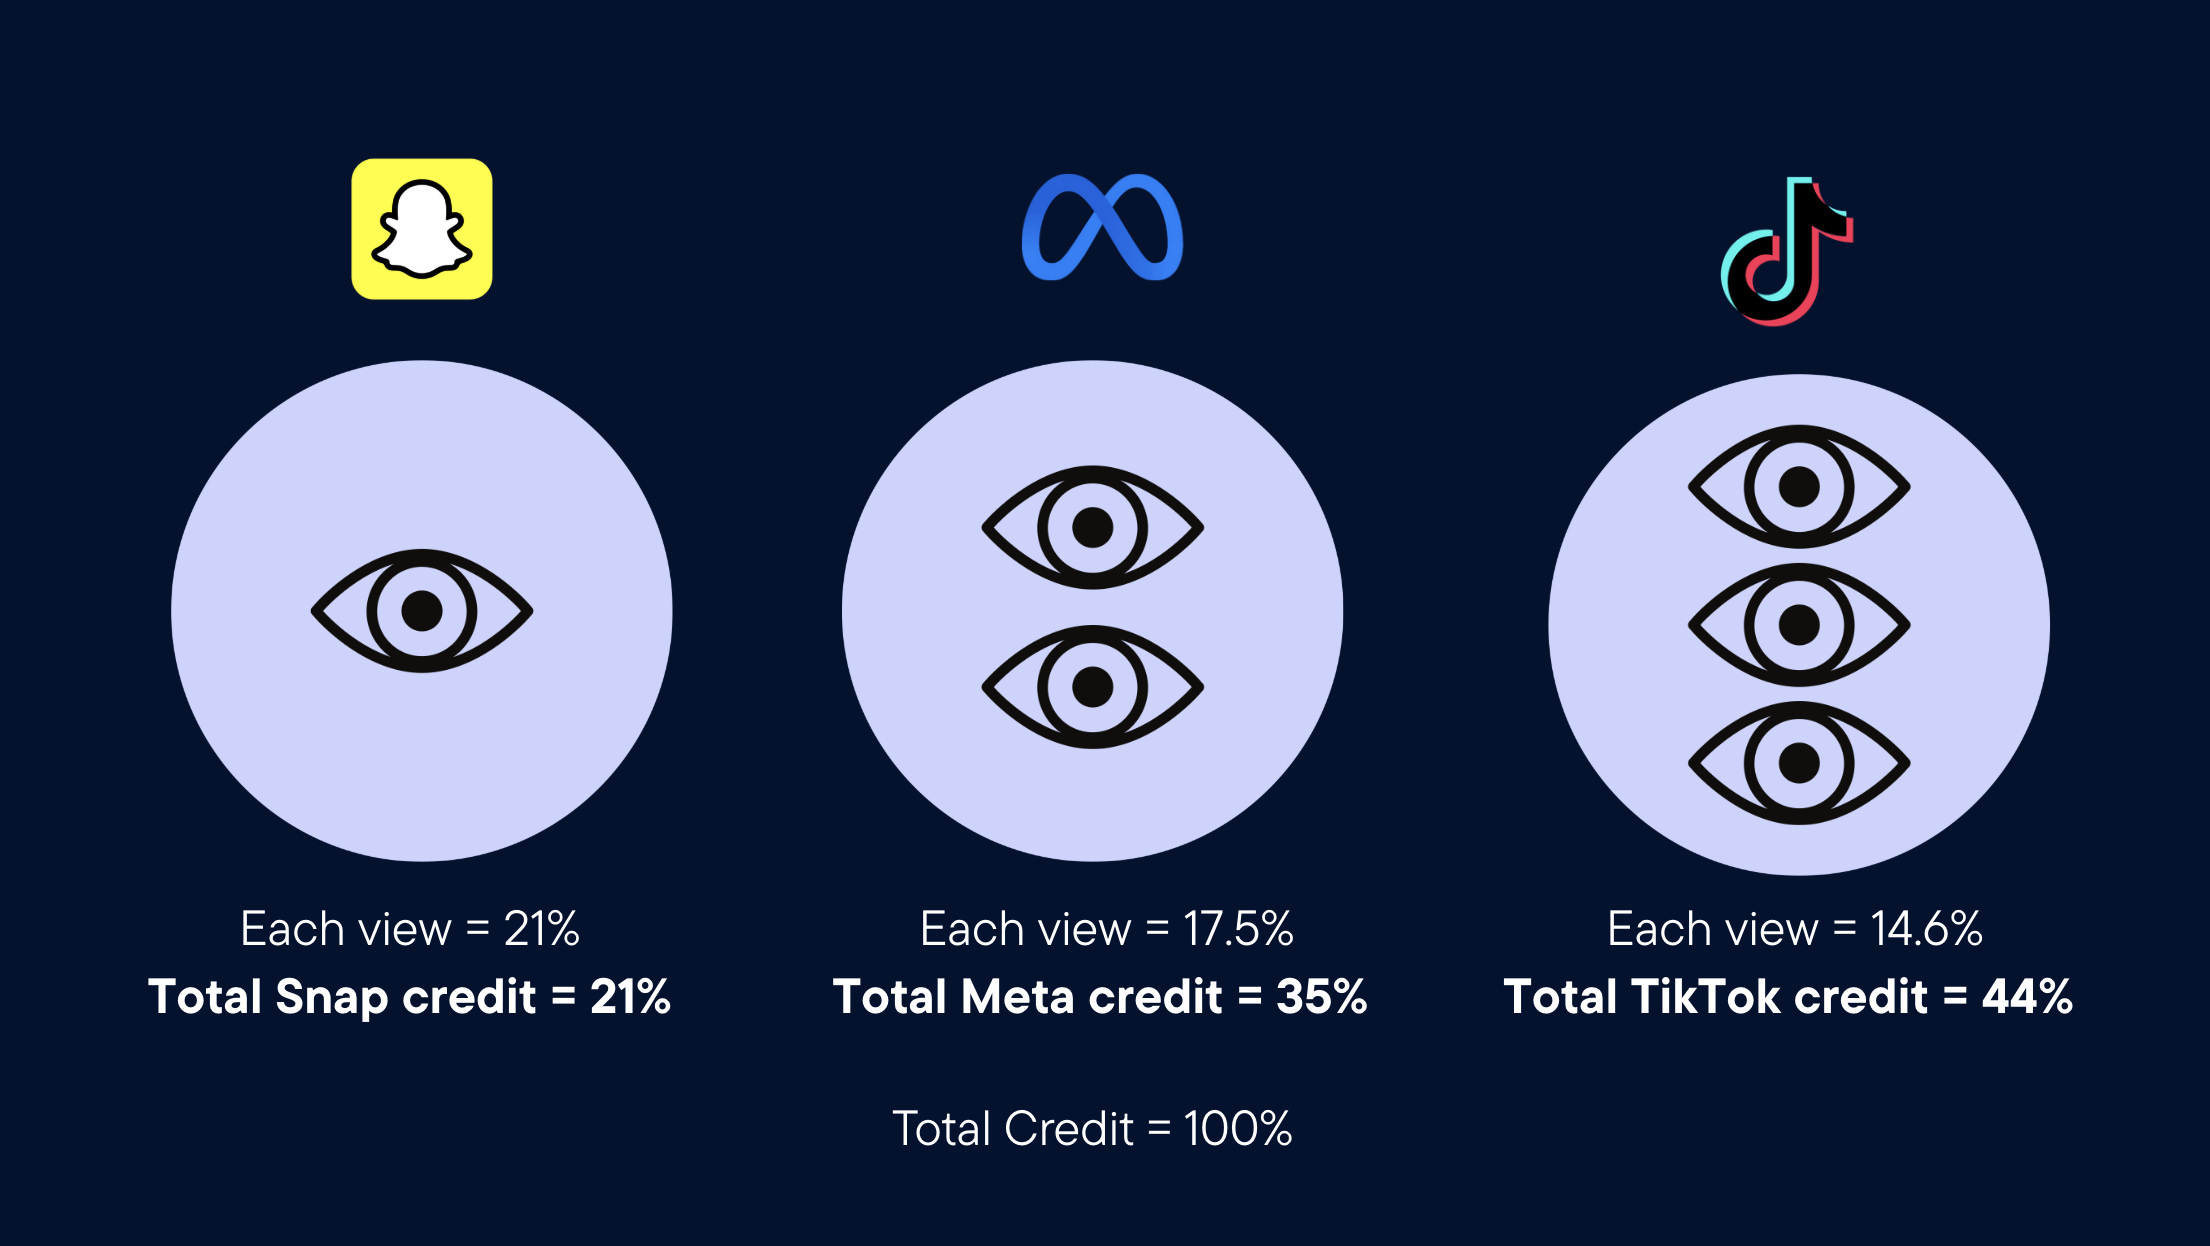
Example 2: View-Only Journey Across Three Platforms
Journey: A customer sees ads on three platforms but never clicks before making a $100 purchase. No paid clicks exist in the journey.
- 1 Snap view
- 2 Meta views
- 3 TikTok views
| Platform | Views | Each View Earns | Total Platform Credit |
|---|---|---|---|
| Snap | 1 | 21% ($21) | 21% ($21) |
| Meta | 2 | 17.5% ($17.50) | 35% ($35) |
| TikTok | 3 | 14.6% ($14.60) | 44% ($44) |
| Total | 6 | 100% ($100) |
Why does credit split this way?
Each platform starts with an equal share of total credit regardless of how many views it has. Snap, Meta, and TikTok each begin with a 1/3 pool. Within each platform, that pool is divided equally across all views from that platform.
- Snap has 1 view so it earns the full pool = 21% per view
- Meta has 2 views so each earns half of its pool = 17.5% per view
- TikTok has 3 views so each earns a third of its pool = 14.6% per view
This protects against one platform dominating credit simply by serving more impressions.
Note: These percentages are rounded for illustration. Actual credit values in your dashboard may vary slightly based on the number of participating platforms and touchpoints in each journey.
C+DV Demo
Watch below for a full demo of Clicks + Deterministic Views, including how to enable it and how to interpret the data.
Enabling Clicks + Deterministic Views in your account
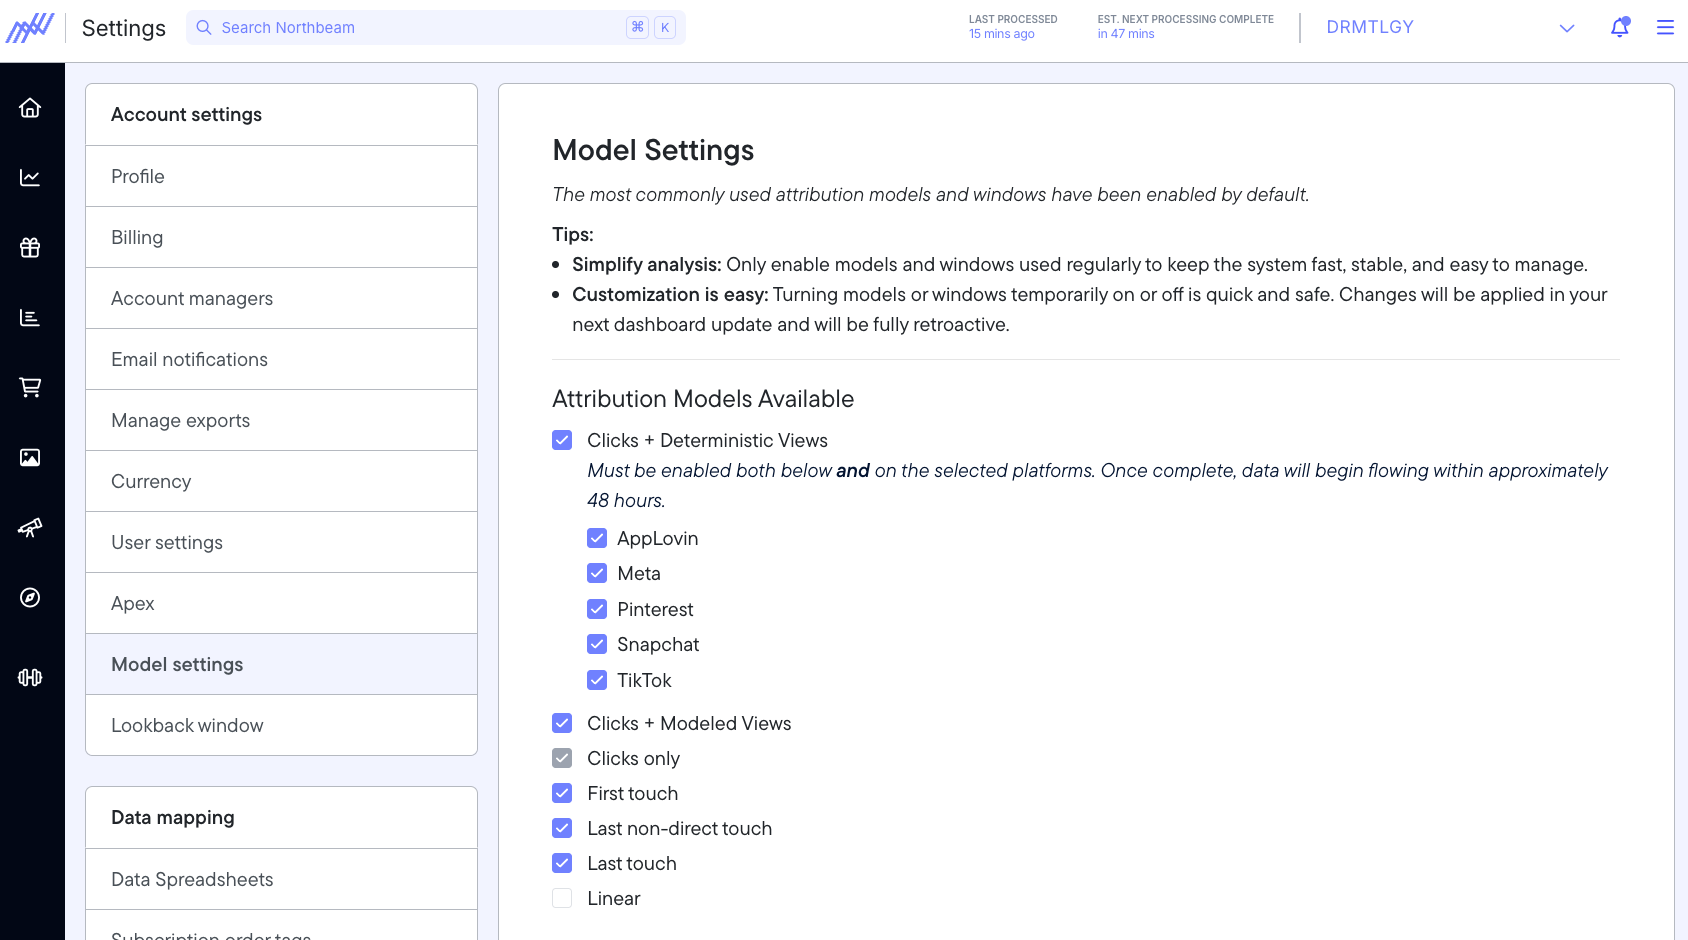
- Go to Account settings > Model settings > Attribution models.
- Select Clicks + Deterministic Views, checking each platform you want to track.
- Note: By selecting a platform, you are consenting to share impression data from the platform to Northbeam. For this reason, only admins are able to change these settings.
- Wait 24-48 hours until we have processed your data. It could be shorter, so stay tuned to your dashboard.
⚠️ Pinterest opt-in instructions
Step 1:
- The account owner will need to log into Northbeam’s dashboard
- Go to the Settings page
- Click on APEX
- Select Pinterest from the list of platforms
- Note: Enabling APEX for Pinterest is necessary for optimal data quality–it does NOT affect your Pinterest campaigns.
Step 2:
- Head to the Model Settings page
- Select Pinterest under the Clicks + Deterministic Views section
Step 3 (Important):
- Please disconnect and reconnect your Pinterest account in Northbeam.
⚠️ MNTN opt-in instructions
- MNTN customers will need to follow additional steps to properly opt in to C+DV.
- Instructions here
FAQs
1. Why does Clicks + Deterministic Views data not match up to my Clicks + Modeled Views data?
C+MV is probabilistic and does not observe the ad platform events directly. C+DV is deterministic the same way that CO is deterministic. It is a model based on events that we or the ad platform KNOWS have happened.
2. Why are certain ad channels not getting C+DV credit for conversions?
Clicks + Deterministic Views is deterministic, so if an ad platform is not participating in the program they will not receive any additional view credit.
3. Are all views weighted equally?
Views are grouped by platform and credit is divided within each platform "pool." We do not weight views from different platforms differently; the amount of credit assigned to each platform is dependent on how many views are in that platform's pool. Currently, we do not specifically use the platform of the view, or the type of ad that displayed the view, as factors in determining credit. This is consistent with the behavior of our current Clicks-Only attribution model.
4. Why can't I see in-app views on the order details page?
This level of tracking is not permitted under privacy law.
5. How often is C+DV data refreshed?
Currently, 3x per day.
6. How should I compare C+DV performance to Clicks + Modeled Views or Clicks-Only?
Look for directional differences between C+DV vs. Platform reporting, C+DV vs. Clicks-Only data. These differences will show you where C+DV is unlocking value, and new insights.
7. How should I use C+DV?
Use it to make better optimization decisions within each channel. For example, when gauging "what campaigns/audience/ads are impactful?" it should give you a more precise signal than Modeled Views or Clicks-Only. You can also use it to get directional data points for cross-channel investment — for example, is this channel having an impact beyond what we see on a last-click basis?
8. Since clicks are always preceded by views, how do you de-dupe between clicks and views?
Views + click pairs that happen within 30 seconds of each other are deduplicated.
9. Why don't I have access to C+DV?
Most likely, we do not have enough order IDs to match with impression data. This is often the case for advertisers who fall into 'sensitive' categories, such as health & wellness. For questions around this, please reach out to your Media Strategist, Customer Success Manager, or contact Support.
10. Does C+DV support international traffic?
Yes. C+DV supports international traffic across all participating integrated partners. For eligible customers, this is enabled automatically and no additional setup is required.
Northbeam has backfilled available historical data where applicable, but C+DV models are incremental and will apply moving forward once data is available in the model.
11. I've turned on C+DV, but I'm not seeing any data. Why?
It can take up to 48 hours after providing consent to see C+DV data in the dashboard. If you are still not seeing data after 48 hours, reach out to your Northbeam rep or contact Support.
12. Why do I see “withheld” in C+DV reporting?
“Withheld” means Northbeam is hiding certain low-volume C+DV rows for privacy reasons.
For Meta C+DV, this typically happens when the slice you’re looking at does not meet the minimum threshold of 1,000 impressions at that level of reporting.
In practice, that means an ad, ad set, campaign, or daily row can be withheld if that specific row has fewer than 1,000 impressions. Because the threshold is applied at the level of the report, detailed rows may appear lower than aggregate totals, even though the aggregate can still include that underlying value once there is enough volume to safely show it.
13. Does C+DV support custom events?
No. C+DV does not support custom events or custom conversion events as a replacement for the standard Meta Purchase event.
Meta C+DV requires the standard Purchase event to fire with an order_id that matches the corresponding order ID in Northbeam. If purchases are tracked through a custom event instead of the standard Purchase event, C+DV may not work as expected, even if that custom event is visible in Meta Events Manager.
14. I'm not seeing C+DV data for Meta specifically.
Meta CDV works by matching the order_id in your Meta Purchase events to the order_id tied to orders in Northbeam.
We look for at least an 80% match rate — meaning if Meta records 100 purchases, at least 80 of those order_ids must exist in Northbeam.
If you fall below this 80% threshold, you'll see a red banner at the top of your dashboard:
If your dashboard has this banner, follow the steps below to find and fix the mismatch.
Low or missing Meta C+DV data is almost always caused by one of three things:
- Meta isn't receiving an
order_idat all - Meta is receiving a different
order_idthan what Northbeam has on file - Your store is in a restricted category where Meta limits order-level identifiers regardless of your setup.
Step 1 — Check what order_id Meta is actually receiving
order_id Meta is actually receivingBefore changing anything, confirm what Meta is getting today. There are two ways to check.
Option A: Test Events
Place a test purchase on your store and inspect the order_id coming through.
- Go to Meta Events Manager → your pixel or CAPI data source
- Click the Test Events tab
- Trigger a test purchase on your site
- Find the
Purchaseevent and expand it - Look for the
order_idfield in the event parameters

Option B: Sampled Activities
Inspect the order_id of your past Purchase Events.
- Go to Meta Events Manager → your Purchase event → Sampled Activities
- This shows raw parameters from real purchases in the last 24 hours
- Hover over any Purchase event and look for
order_idororderIdin the parameter list
Once you know what Meta is receiving, compare it to a recent order in Northbeam (e.g. from the Orders page). The two values must be an exact string match for CDV to work.
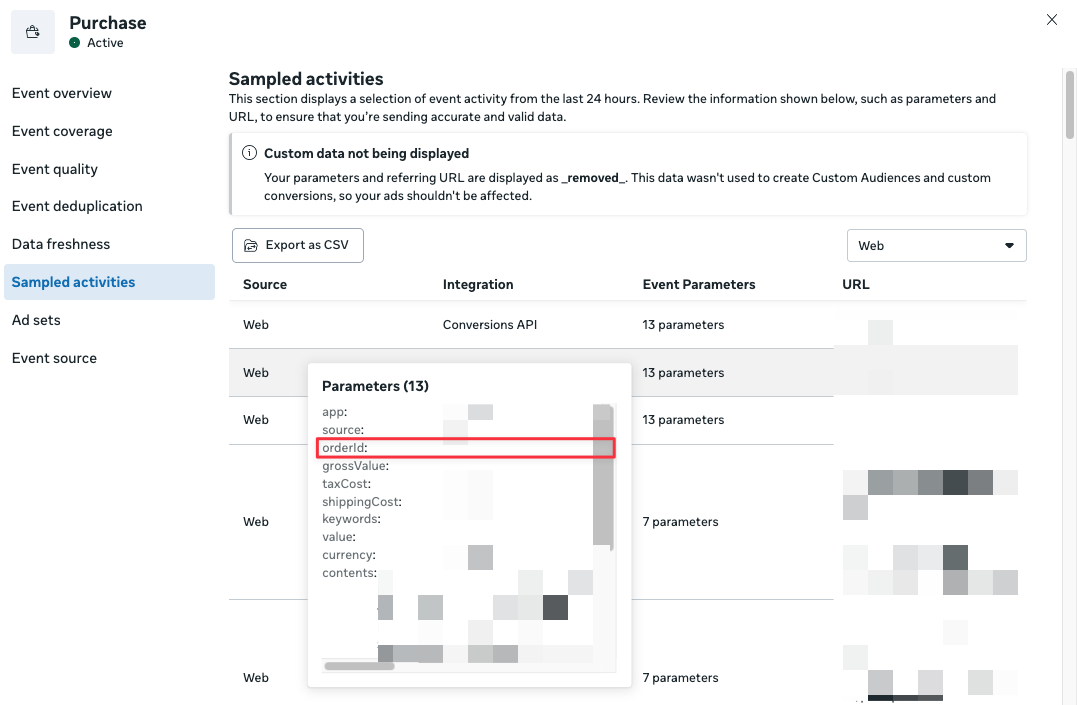
Events Manager > Select Pixel/CAPI > Purchase > View Details > Sampled Activities
✅ order_id is present and matches the order number in Northbeam (e.g. 10045)
❌ order_id is blank, missing, or shows a cart/checkout token instead of a final order number
Step 2A — Fix: order_id missing or wrong in Meta CAPI (server-side or GTM Server)
order_id missing or wrong in Meta CAPI (server-side or GTM Server)This step is for CAPI only — the server-side connection between your store and Meta. If you're only using the Meta Pixel (browser-side tracking), skip to Step 2B or 2C.
This is the most common source of low Meta CDV coverage. The fix depends on how your CAPI is set up — find your setup below. If you're not sure which applies to you, check with your developer or agency.
In all cases, your final CAPI Purchase payload must include order_id at the top level like this:
{
  "event_name": "Purchase",
  "order_id": "10045",
  "custom_data": {
    "value": 99.00,
    "currency": "USD"
  }
}
Setup 1: Shopify Native Integration
If you enabled CAPI directly in Shopify via Facebook & Instagram by Meta sales channel, theorder_id is passed automatically — you likely don't need to change anything here.
If you're still seeing mismatches, the most likely cause is a custom script overriding the native event. Check with your developer to confirm nothing is conflicting with Shopify's native CAPI integration.
Not sure if CAPI is enabled? Go to Meta Events Manager → your Pixel → Settings and check whether Conversions API is listed as Active.
Setup 2: Third-party app (Blotout, Elevar, Littledata, Analyzify, Fueled, or similar)
These apps handle the server-side CAPI connection and manage field mapping on your behalf. To fix order_id:
- Log into your app's dashboard
- Find the Meta CAPI or Meta destination settings
- Locate the Purchase event configuration
- Confirm
order_idis mapped to your Shopify order number — not a checkout token, cart ID, or session ID - Save and trigger a test purchase to confirm
If you don't see a field mapping UI, or your app is fully managed (e.g. Blotout, Elevar's managed tier), please contact the app's support team.
Setup 3: GTM Server-Side container
- Open your GTM Server container
- Find the Meta CAPI tag
- Look for the
order_idfield — it may be blank, missing, or pointing to the wrong variable - Map it to the data layer variable that holds the final confirmed order number (e.g.
order_id,transaction_id, ororder.name— check with your developer if unsure) - Use GTM Preview mode to trigger a test purchase and confirm the correct value is being sent
- Publish the container
Setup 4: Custom server-side code
Your developer needs to update the Purchase event payload in your backend code to explicitly include order_id, set to the final confirmed order number — the same ID that appears in Northbeam's Orders page.
Step 2B — Fix: order_id missing in Meta Pixel (Shopify)
order_id missing in Meta Pixel (Shopify)This step is for the browser-side Meta Pixel only — not CAPI. If you're also running CAPI alongside your pixel, make sure you've completed Step 2A first.
For Shopify stores using the Facebook & Instagram by Meta sales channel, order_id is captured automatically on the purchase confirmation page — you likely don't need to change anything here.
The exception is if you've added custom Purchase tracking scripts that fire their own pixel event and override the native one. In that case, please do one of the following:
- Remove the custom script if it isn't also passing
order_id - Update it to explicitly include the Shopify order number and ensure it doesn't fire alongside the native event
Step 2C — Fix: order_id missing in Meta Pixel (non-Shopify custom pixel)
order_id missing in Meta Pixel (non-Shopify custom pixel)This step is for non-Shopify stores manually firing the browser-side Meta Pixel — not CAPI. If you're running CAPI, see Step 2A instead.
If you're manually firing the Meta pixel, your Purchase event must include order_id. Update your snippet to:
fbq('track', 'Purchase', {
  value: 99.00,
  currency: 'USD',
  order_id: '10045'  // must match the order_id Northbeam receives
});
The order_id value must come from the same source your backend uses for the final confirmed order number.
Step 3 — Confirm the fix worked
After making changes, trigger a test purchase and check Events Manager → Test Events to confirm event_name = Purchase and order_id exactly matches the corresponding order in Northbeam. Over the next 24–48 hours, Meta CDV order coverage should improve in your Northbeam dashboard.
Once you've waited 24–48 hours, check your Northbeam dashboard to confirm the red banner is no longer showing. If the banner is gone, your order ID coverage has met the 80% threshold and CDV is working correctly. If you'd like us to double-check your coverage rate, reach out to your Media Strategist, Customer Success Manager, or contact Support.
Still seeing low coverage after fixing?
If your setup looks correct, order_id values are matching, and the banner is still showing, your store may be in a restricted or sensitive category where Meta limits the order-level identifiers they expose. In those cases, CDV coverage may remain limited even with a correct implementation — this is a Meta policy constraint, not a fixable configuration issue.
Restricted health category in Meta
If your store falls into a restricted health or wellness category, Meta may limit the impression-level data they share with third parties, including Northbeam. When this restriction is active, Meta cannot send Northbeam the view data required for C+DV, so Meta will not receive view credit regardless of your pixel or CAPI setup.
This is a Meta policy constraint, not a configuration issue.
To request access, submit an appeal directly to Meta: Appeal a restricted category decision
The most effective path is to contact your Meta rep directly — they can confirm whether a restriction applies to your account, advise on appeal eligibility, and escalate internally if needed.
Best practice: Use CAPI or Shopify's native pixel integration for the most reliable
order_idcoverage and highest C+DV eligibility.
Updated 16 days ago