
Tracking for Meta Ads
Table of Contents
- Introduction
- Step 1: Connect Your Meta Ad Account
- Step 2: Insert Northbeam UTM Parameters
- How to Confirm Your Meta Ads Are Tracking Properly
- Meta Ads FAQ
- How do I connect an extra account or remove an account?
- Will my Meta Ads be reset to the learning phase?
- Can Northbeam ingest UTMs from other tracking platforms?
- Can you track conversions from Meta Shops?
- How can I see Meta Shops credit?
- Why do I see a data discrepancy?
- Why doesn't Meta-reported Purchases in Northbeam match in-platform?
- I think there's an issue with tracking. Please help!
Introduction
This guide will show you how to set up tracking for the following Meta metrics in Northbeam:
- Spend, impressions, visits and all conversion-based metrics attributed to Meta Ads
- Creative metrics imported from Meta Ads’ in-platform reporting
| Input | Output | If Input is missing... |
|---|---|---|
| Meta Integration | The following data is pulled into your dashboard:
| Campaign, Adset, Ad Names will be missing, along with Spend, Impressions, and Meta-reported metrics. |
| Northbeam UTM Parameters | Revenue, Transactions, and Visit attribution to your Campaigns, Adsets, and Ads. | Northbeam UTM Parameters create the linkage between your Ads and the conversions they drive. If missing, your ad spend and your revenue will be reported on different line-items, making it very difficult to draw insights. |
Advertise on Meta Shop?
- Shopify Stores - Make sure your store is connected to Meta and Instagram by Meta
- Custom Stores - Make sure to label your Meta Shop orders with an
order_tag(Server API) and reach out to our team with the name of the tag.For more information,learn about Meta Shops (and TikTok Shops) here.
Step 1: Connect Your Meta Ad Account
What does the connection do?
Northbeam natively integrates with the Meta Ads API. By doing so, we pull all your current and historical Campaigns, Adsets, and Ads from your account, along with a list of useful metrics. Notably, we pull impressions, which fuel our view model and unlock our Clicks + Modeled Views attribution model. We also pull ad spend and list of in-platform conversion & creative metrics to help you with decision making.
How to connect your Ad Account
How to connect:
- Onboarding Flow - If you're in our onboarding flow, please navigate to Integrations
- Activated Dashboard - If your dashboard is activated, please go to Settings > Connections
Note: The credentials used must have admin access to the Ad Account.
Additional Meta Permission RequirementsThe user connecting must have both
ads_readandads_managementpermissions enabled in their Meta Business Manager.These permissions fall under Advanced Access, which is required for third-party integrations like Northbeam to read and manage ad data.
To verify or request these permissions, go to:
Meta Business Manager → App Dashboard → App Review → Permissions and FeaturesFor more information, visit Meta’s documentation:
https://developers.facebook.com/docs/marketing-api/get-started/authorization/#permissions-and-features
For a visual walkthrough, reference the video below.
Step 2: Insert Northbeam UTM Parameters
Please add two custom UTM parameters in the Build a URL menu for all new and existing Meta Ads:
| Parameter Name | Value |
|---|---|
| nbt | nb:fb:{{site_source_name}}:{{campaign.id}}:{{adset.id}}:{{ad.id}} |
| nb_placement | {{placement}} |
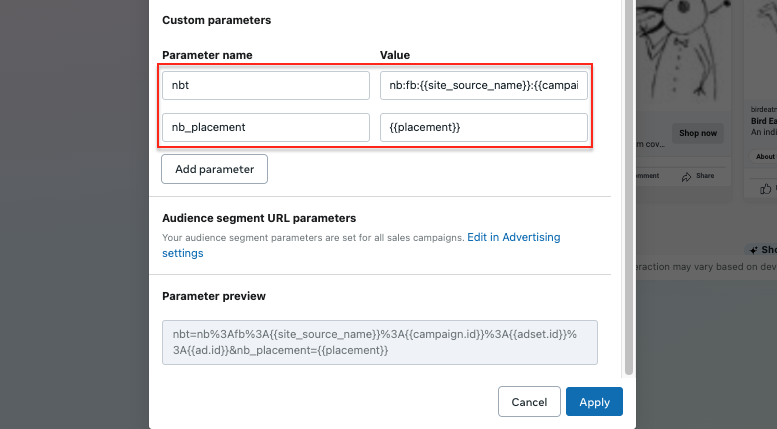
Build a URL Parameter > Custom Parameters
Step-By-Step Guide:
For a visual walkthrough of setting up UTM parameters, reference the video below.
- In your Ad settings, click Build a URL parameter
- Click Add parameter twice and all the two custom parameters listed above.
- Click Apply.
How To VerifyIn the Parameter preview, you should see:
nbt=nb%3Afb%3A{{site_source_name}}%3A{{campaign.id}}%3A{{adset.id}}%3A{{ad.id}}&nb_placement={{placement}}
- This is expected — Meta automatically encodes colons (:) into %3A.
- Do not encode colons yourself — entering
%3Adirectly in the Value will result in double encoding (%253A) and break tracking.- It’s fine if other parameters appear — Northbeam UTMs can coexist with others.
UTM Auto-AppendingIf you would like Northbeam to automatically append UTM parameters to newly created Meta ads from ad accounts connected to your dashboard, please reach out to our Support team to enable this feature.
✅ How to Confirm Your Meta Ads Are Tracking Properly
To be confident that your Meta ads are tracking correctly in Northbeam, two things need to happen:
- Northbeam UTMs must be captured
- The Northbeam pixel must fire on the landing page
The easiest way to test both is by using a Live Preview Link from Meta Ads Manager and verifying in your browser.
🔍 Step-by-Step: Verify UTMs + Pixel with a Live Ad Preview
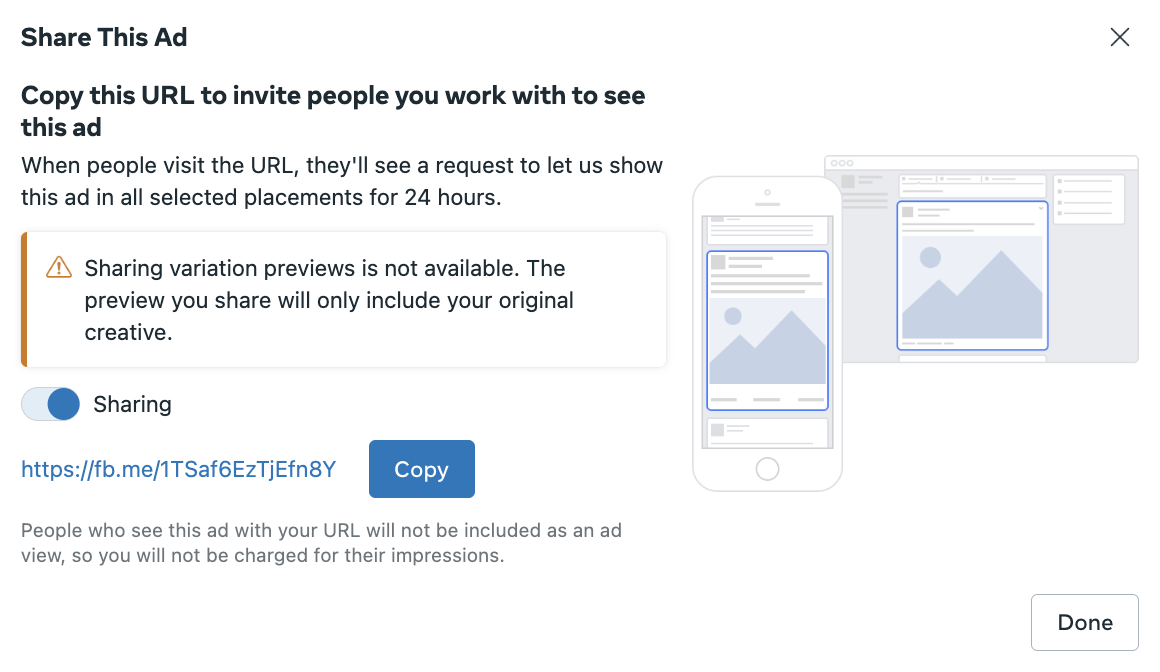
1. Get a Live Preview Link
- Log into Meta Ads Manager
- Find your ad and click Preview
- Click Share → Share a link
- You’ll get a short link like:
https://fb.me/1TSaf6EzTjEfn8K
2. Test the Link
- Paste the link into your browser (it’ll load your Newsfeed)
- Find the ad in your feed and click on it
Don't see the ad?Sometimes it doesn't appear right at the top of the feed, so be sure to scroll down a bit.
3. Verify UTMs and Pixel via Developer Tools
UTM Validation:
Once you're on the landing page...
- Accept any cookie banners (scripts won't fire until cookies are accepted)
- Go to Developer Tools --> Network:
- Chrome / Edge / Brave / Opera
- Right-click → Inspect
- Or press
Cmd+Option+I(Mac) /Ctrl+Shift+I(Windows) - Go to the Network tab
- Firefox
- Right-click → Inspect
- Or press
Cmd+Option+E/Ctrl+Shift+E - Go to the Network tab
- Safari (Mac)
- Enable Dev Tools: Safari → Settings → Advanced → check "Show Develop menu"
- Then go to Develop → Show Web Inspector
- Click the Network tab
- Chrome / Edge / Brave / Opera
- Refresh the page
- Click the first request (should be labeled as a UTM string (ex. '
?nbt=nbnbt=nb%3Afb%3A...') - Click on the Payload tab
- You should see UTMs listed — look for something like:
nbt: nb:fb:fb:XXXXXXXXX:XXXXXXXXXX:XXXXXXXXXXX

Click the first 'Network' request, then look in the 'Payload'
✅ If those are populated → UTMs are confirmed
Pixel Validation:
- Still in the Network tab
- Search for a request called
nb-collectorortp2 - Look for the one with
pvin the Payload
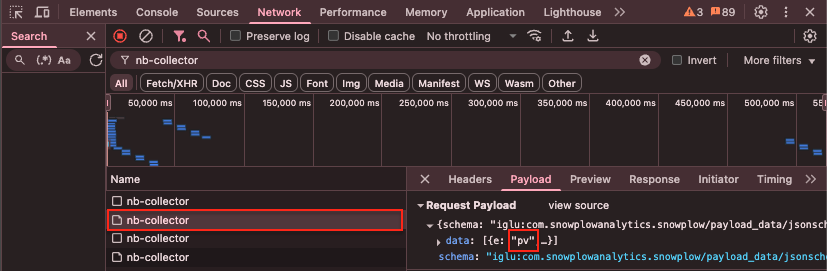
Note: It's completely normal to see multiple requests. Look for the one with 'pv' in the Payload.
✅ If you see PV in a nb-collector request → Pixel is confirmed
🎯 What This Means
Once both UTMs and the pixel are confirmed, Northbeam has successfully recognized the session ("Visit"). This means any conversions (like purchases) that happen during the session will be tied back to the correct ad in Northbeam.
Meta Ads FAQ
1. How do I connect an extra account or remove an account?
Reference our step-by-step guide below:
2. Will my Meta Ads be reset to the learning phase?
Yes, editing UTMs on active ads resets the ad to the learning phase, which may temporarily affect performance.
Our recommendation:
- Update all your Meta Ads at once to minimize disruptions and start benefiting from Northbeam tracking immediately.
- Alternatively, you can wait for a low-traffic period or your next creative refresh to make changes. (Note: Ads without Northbeam UTMs won't be fully tracked.)
3. Can Northbeam ingest UTMs from other tracking platforms?
Yes! Northbeam can ingest UTMs from other tracking platforms, including Triple Whale, Hyros, Rockerbox, and Wicked Reports. If your ads already use UTMs from these platforms, you may not need to manually implement Northbeam's UTMs, helping you avoid sending ads back into the learning phase.
For details on supported UTM structures, check out our guide: 🔗 Using Legacy Meta UTMs with Northbeam
4. Can you track conversions from Meta Shops?
For Shopify:
No action needed here! We've got you covered when it comes to tracking conversions from Meta Shops. By utilizing Shopify's data, we meticulously identify and record all completed orders through Meta Shop.
For All Other Platforms:
It's important for us to understand which order(s) were placed via Meta Shops.
Step 1: Within the Orders API, please insert a unique Order Tag ("order_tags" in API Docs) and resend the orders.
Step 2: Please notify our team and let us know the name of the tag associated with Meta Shops
Step 3: Our team will notify you when we're good to go!
5. How can I see Meta Shops credit?
Your Attributed Revenue and Transactions will seamlessly incorporate this credit, whether you're using the Clicks Only attribution model or the Clicks + Modeled Views attribution model.
Note:The Northbeam Pixel doesn't fire on Meta Shops, so we don't track Visits. Consequently, the Visits count won't be recorded, and CPCs (Cost Per Clicks) may appear inflated for any Campaigns, Ad Sets, or Ads running Meta Shops.
6. Why do I see a data discrepancy?
Discrepancies in Revenue and Orders are expected. Here’s why:
- Northbeam's attribution: Divides credit across all touchpoints and channels, with an emphasis on upper-funnel contributions.
- Meta's attribution: Typically relies on Last Click within a 7-Day Click/1-Day View window.
Northbeam's Clicks-Only model divides credit across all touchpoints and tries to push credit to your upper funnel channels. Let's say your in-platform model uses Last Click, which gives credit to the last touchpoint in the journey. This is going to cause a discrepancy.
To take it one step further, let's say both Northbeam and in-platform are using Last Click. Northbeam is unique in that we recognize all touchpoints from every single channel. Whereas most platforms only recognize touchpoints from that same platform.
In addition, there's often a difference in the attribution window. By default, Northbeam leverages a 1-Day window, which is different than many other platforms' default.
To get the most apples to apples comparison, be sure to compare data using same Attribution Model and Attribution Window. But keep in mind, it will never be exact.
Attribution Models and Windows
Meta:
- Attribution Model: Last Click
- Attribution Window: 7-Day Click/1-Day View
Northbeam:
- Attribution Model: Varies (default is Clicks-Only)
- Attribution Window: 1-Day (default, can extend to an infinite lifetime value)
For more details on discrepancies, review the articles below:
Why are my metrics different in Northbeam than in-platform reporting?
7. Why doesn't Meta-reported Purchases in Northbeam match in-platform?
Northbeam pulls purchase conversion volume and value by individual attribution models directly from your Meta Ads Manager (via API):
- 1D Click
- 1D View
- 7D Click
- 7D Click + 1D View
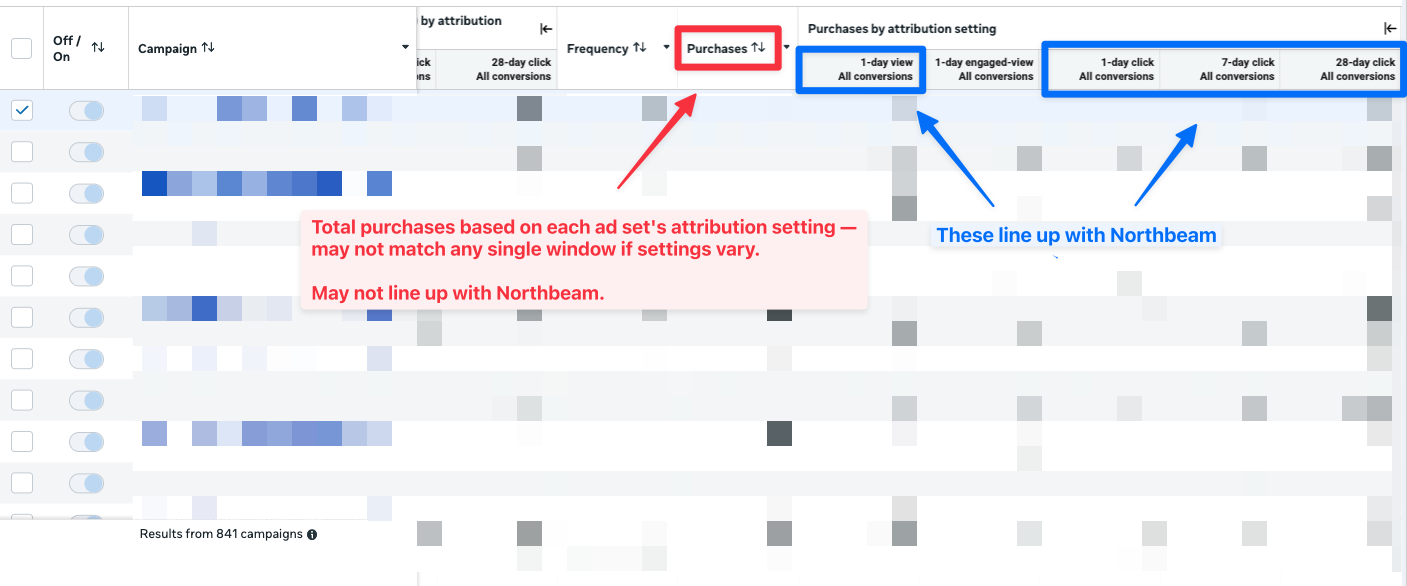
The standard Purchase metric, in Meta Ad manager, reflects each ad set's conversion total based on its own attribution setting.
If you're seeing a difference in value and/or volume, a few things could cause this:
- Mixed Attribution Settings - Meta's default purchase total reflects each ad set's individual attribution setting. If ad sets are on different windows, the total won't match any single window.
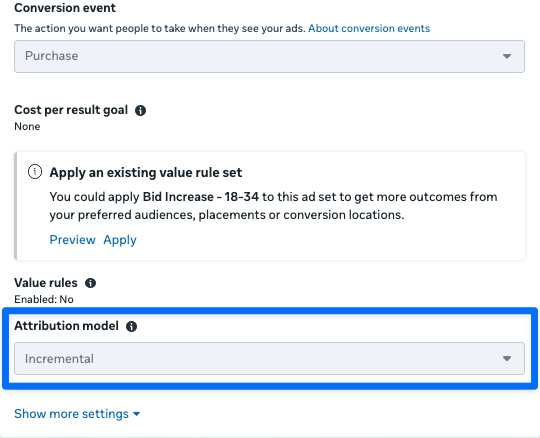
- Incremental Model - If any ad sets are on Meta's "Incremental" model (found under Attribution model in ad set settings), those conversions use a holdout-based methodology that Northbeam doesn't ingest — we only pull standard click and view windows.
- Attribution window columns aren't additive - The breakdown columns overlap — 7-day click is inclusive of 1-day click, so adding them double counts. Meta deduplicates in the default metric, which is why the parts don't sum to the total.
If any ad sets are using Meta's Incremental attribution model, Northbeam will not be able to match in-platform purchase totals.
What to do:
- Compare Northbeam to Meta's purchases by attribution setting, not the default total — this ensures an apples-to-apples comparison.
- Check for ad sets on Meta's Incremental model.
8. I think there's an issue with tracking. Please help!
Please reference our Troubleshooting Tracking Issues FAQ.
- Connection: Make sure your Ad Account is still connected. Go to Settings > Connections and check for any errors. Connections could break for a variety of reasons, but most commonly, the User losing access to the Ad Account.
- UTMs: Ensure all your Meta Ads contain Northbeam UTMs, listed above under Step 2.
- Northbeam Pixel: Ensure the Northbeam Pixel is firing on your landing page. Note that some site themes may not automatically transfer to landing pages on certain third-party apps, necessitating manual pixel placement.
- Purchase Pixel: Confirm that the Purchase Pixel is firing on your checkout page.
- A-Record Setup: Verify that the A-Record is correctly configured in your DNS Settings.
Updated 3 months ago