Optimize your Meta ads against first-party Northbeam data with this new integration.
What is Northbeam Apex?
Northbeam Apex is a direct integration between Northbeam and our advertising platform partners that lets the partner fold Northbeam's first-party, multi-touch attribution signal directly into how they optimize ad delivery.
With Apex, participating platform partners can integrate Northbeam's MTA-derived performance into their algorithm's optimization process — so ad delivery is optimized against the data you already trust, instead of platform-default last-click.
With a more informed, cross-channel signal built from your actual orders and the touchpoints leading to them, the platform's algorithm can better understand how your ads affect the entire customer journey and optimize more effectively than ever before.
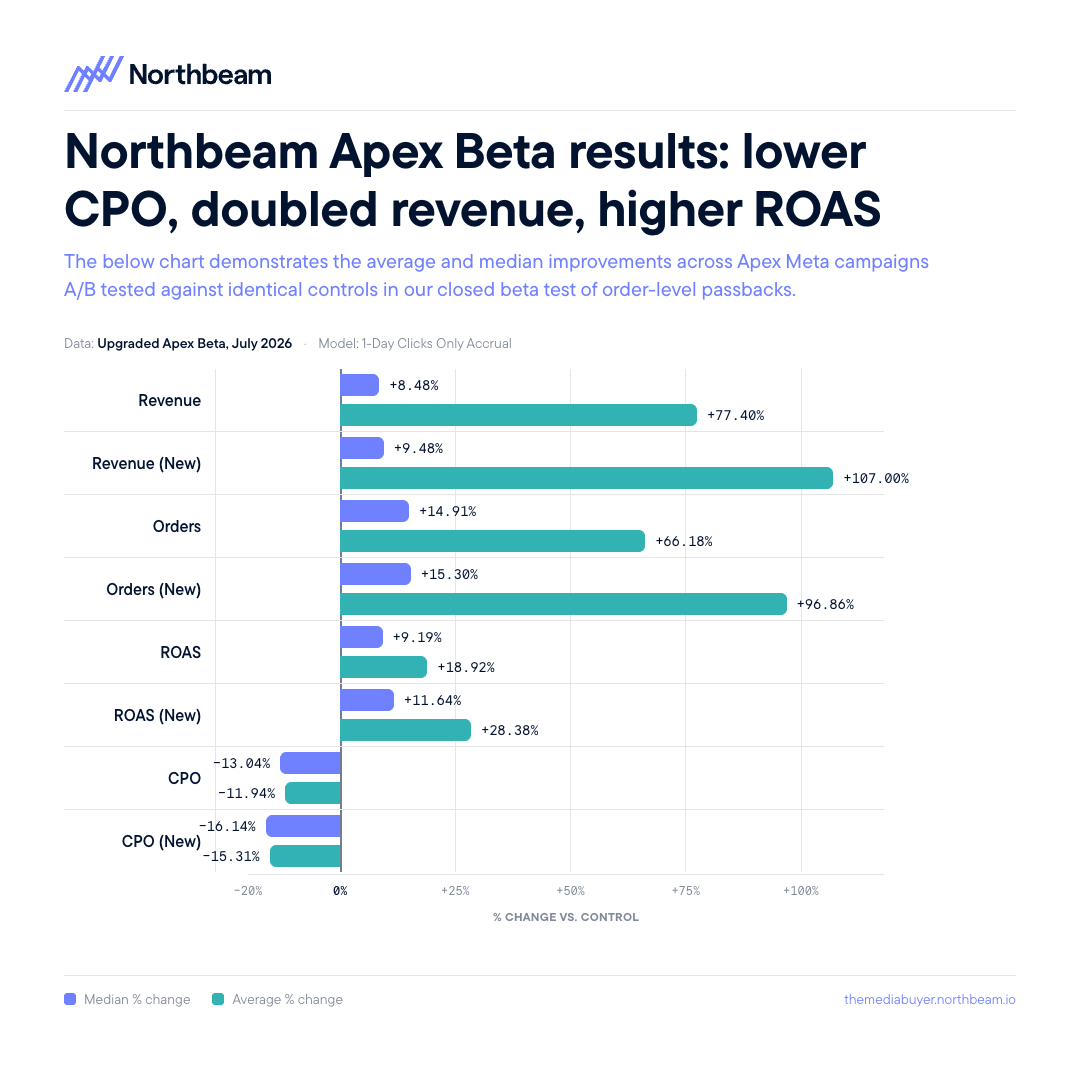
In short: activating Apex could help you find as much as +25% ROAS with the press of a button.
These are the results of our most recent A/B testing of Apex-empowered campaigns versus controls.
How does Apex work?
Apex flips the standard model: instead of sending the platform more raw events for it to attribute itself, Northbeam does the attribution first and sends the platform the result.
Northbeam captures first-party events via its own pixel and your order feed.
Northbeam's ML-based MTA model splits credit across every touchpoint in the customer journey.
Apex sends the Northbeam-attributed performance for each ad to the partner platform.
The partner uses that signal to optimize ad delivery against the outcomes you actually care about.
The result is the platform's auction aligning to how you measure success — not how it measures it by default.
💡
Apex is additive.
It does not replace your existing pixel or CAPI connections. Your existing setup keeps working exactly as it does today. Apex adds a parallel, attributed signal the platform uses to optimize differently.
Apex: two pieces to understand
There are two distinct components to Apex, and it's important to understand them separately:
1. The data connection
This is what you set up in Northbeam. Turning this on starts sending Northbeam's order-level MTA data to the platform. It trains the platform's model. It does not turn on live optimization.
2. The optimization layer
This is how the platform actually uses Apex data to optimize your campaigns.
On Meta, this is called Custom Attribution and is configured at the ad-set level in Meta Ads Manager. This layer is currently in invite-only beta for Meta, with broader rollout planned for June 2026.
Supported platforms
Platform
Status
Meta
All customers can set up Apex data sharing today. Live ad optimization (Meta's "Custom Attribution") is in invite-only beta, with broader rollout planned for June 2026.
Snap
Closed beta; no timeline on broader rollout.
AppLovin
Available.
Pinterest
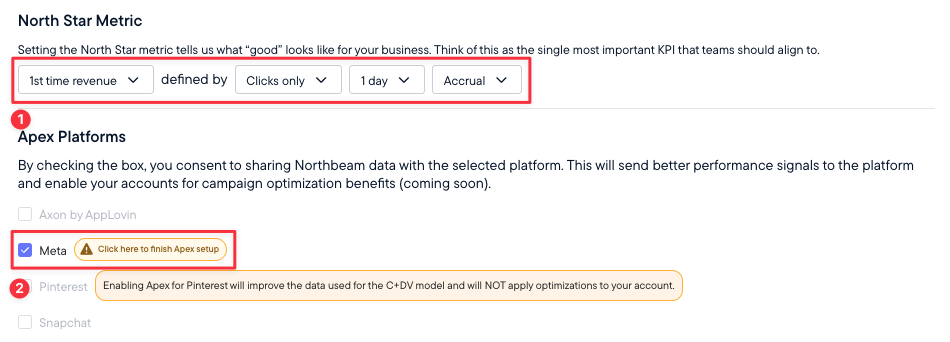
Apex consent is required to access Clicks + Deterministic Views (C+DV). Apex is not currently used for Pinterest optimization.
Others
Additional platform integrations are on the roadmap.
Setting up Apex
Before you start
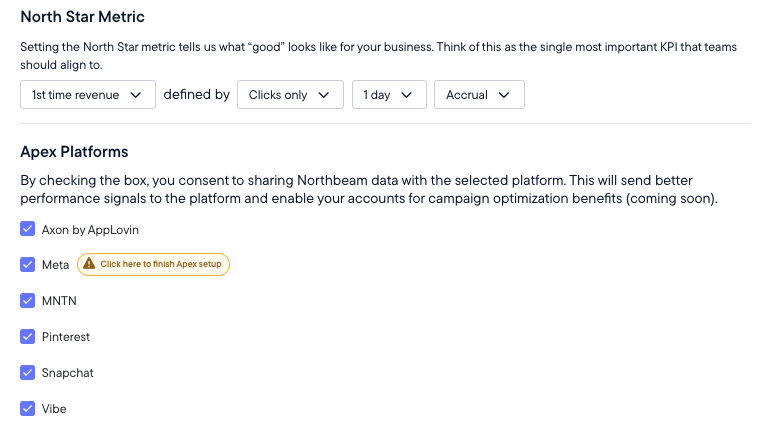
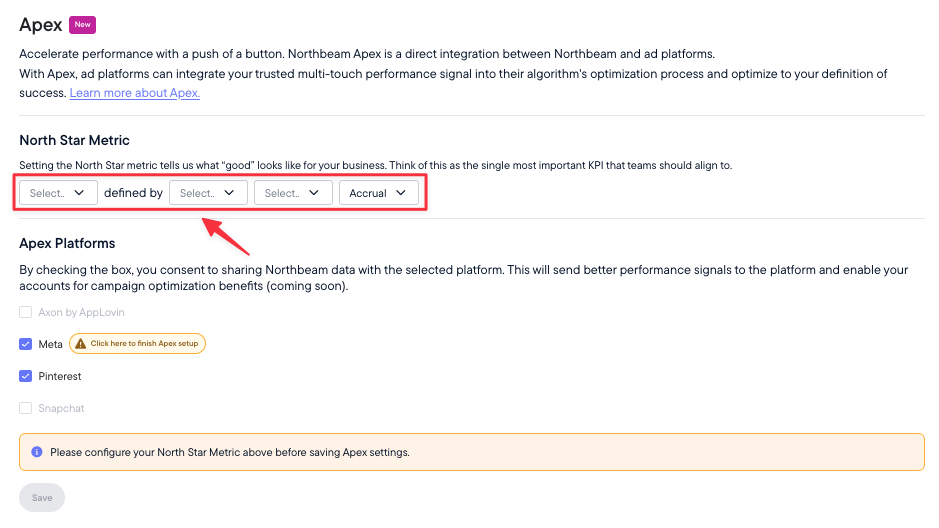
Regardless of platform, setup begins in the same place: Settings → Apex in your Northbeam dashboard. You'll define your North Star metric — the signal Apex sends to the platform to optimize toward:
Revenue type: First-Time, Returning, or Blended
Attribution model: Clicks-Only, Clicks + Deterministic Views (CDV), Last Touch, Linear, or First Touch
Attribution window: 1 / 3 / 7 days
Accounting mode: Accrual
Once your North Star is set, enable Apex consent for your desired platform(s) in the same settings page.
⚠️
Changing your North Star after setup resets the model's calibration period.
Plan for approximately two weeks before the model is fully re-warmed. Coordinate with your CSM before making changes if you have active optimization campaigns running.
Meta
Meta is the most fully featured Apex integration today and the most common starting point. The setup below is specific to Meta.
Legacy vs. current version
The current version of Apex sends order-level data to Meta via CAPI and is the foundation for active Meta-side optimization.
Legacy Apex
Enhanced Apex (current)
Account-level data passback
✅
❌
Order-level data passback
❌
✅
Order-level algorithm optimization
❌
✅
Set a North Star metric
✅
✅
Meta optimizes campaigns vs. North Star
❌
✅ (gated beta)
A/B test performance at Meta ad-set level
❌
✅ (gated beta)
✅
Enhanced Apex sends richer signal.
Legacy Apex passed back aggregated ad-level totals. Enhanced Apex sends touchpoint-level data — giving Meta a multi-touch picture of what drove every sale.
How to enable Apex for Meta
Everything happens inside the Northbeam dashboard. You do not need to configure anything in Meta Business Manager — Northbeam handles the Meta-side setup (Custom Attribution Source, CAPI dataset, passback pixel) automatically on your behalf.
Before you start
Before setting up Apex for Meta, make sure you have the following ready:
Northbeam Access — any user on the account can enable Apex, so you don't need to be the account owner.
Meta Business Manager admin permissions — the Meta Ads connection in Northbeam must have been made with a login that has business_management permission for every business whose pixels you want to use. Agency-managed accounts typically only have ads_management and will need the brand to reconnect with the correct login.
An active Meta pixel — at least one pixel must have been receiving Purchase events in the last 28 days. This is Meta's eligibility check and cannot be bypassed.
Your North Star metric — have a decision made (or be ready to decide) on your revenue type, attribution model, attribution window, and accounting mode before starting setup.
Step 1 — Configure your North Star and enable Meta consent
Define your North Star metric — attribution model, attribution window, and accounting mode are the three settings that directly drive Meta's auction.
Toggle on Apex consent for Meta.
Any user on your Northbeam account can complete this step — it does not require the account owner.
💡
Recommended: Use Accrual as your accounting mode
We've consistently seen better performance with Accrual as the North Star. The reason: Meta has no native visibility into accrual-based revenue, which means you're giving its algorithm two genuinely new signals at once — MTA attribution and accrual revenue. This setting is independent of how you report internally, so you can keep making decisions on Cash while Apex trains on Accrual — and better accrual performance drives cash.
✅
Your North Star is what Meta's algorithm trains to maximize.
Choose carefully — your North Star tells Meta what to optimize toward based on Northbeam's attribution data, not Meta's. For example, if you set it to 1st time revenue, Meta trains against Northbeam's revenue from new customers — not Meta's own definition of a new customer.
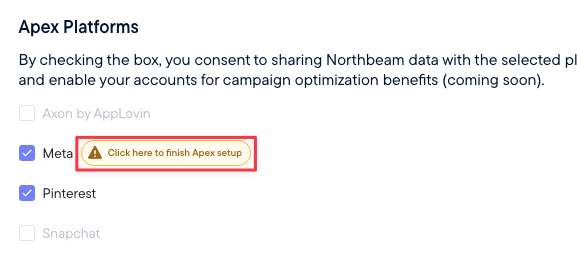
Step 2 — Connect, Configure, and Validate
Toggling on consent launches a three-step in-app wizard. You can return to it from the Apex page if you don't finish in one session.
⚠️
The user completing this step must have Meta Business Manager admin permissions.
Agency-managed accounts typically only have ads management permission and will need a brand-side user to complete this step.
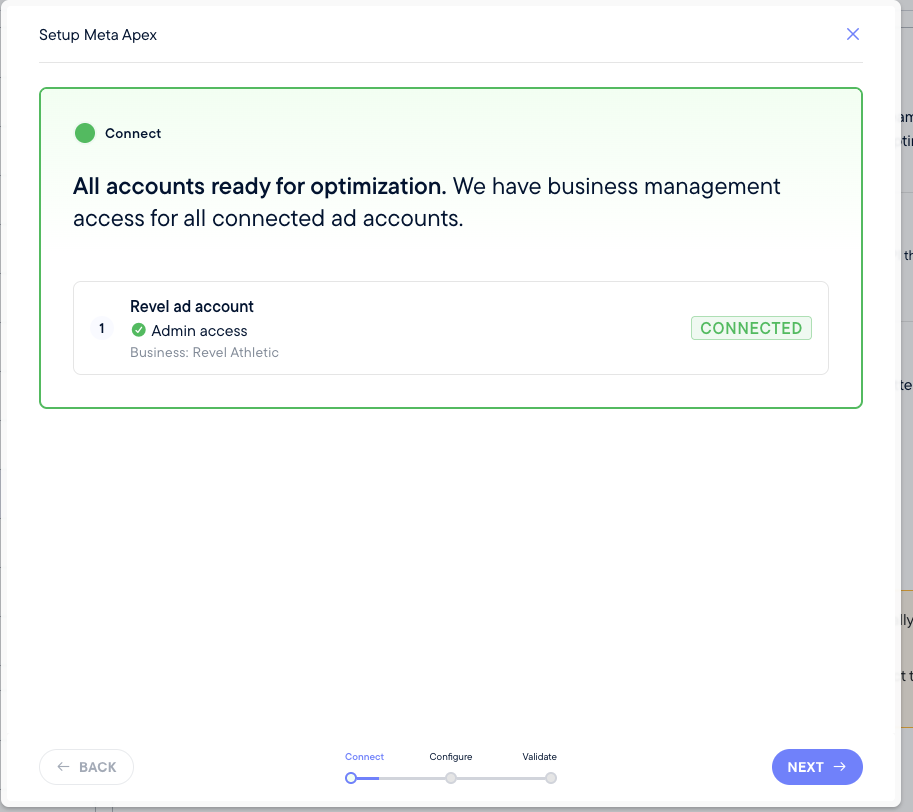
1. Connect your Ad Account(s)
Northbeam lists every Meta ad account connected to your dashboard and flags whether the active connection has business_management permission for the owning business. Accounts with the correct permission are ready to proceed; accounts without it show a reconnect prompt.
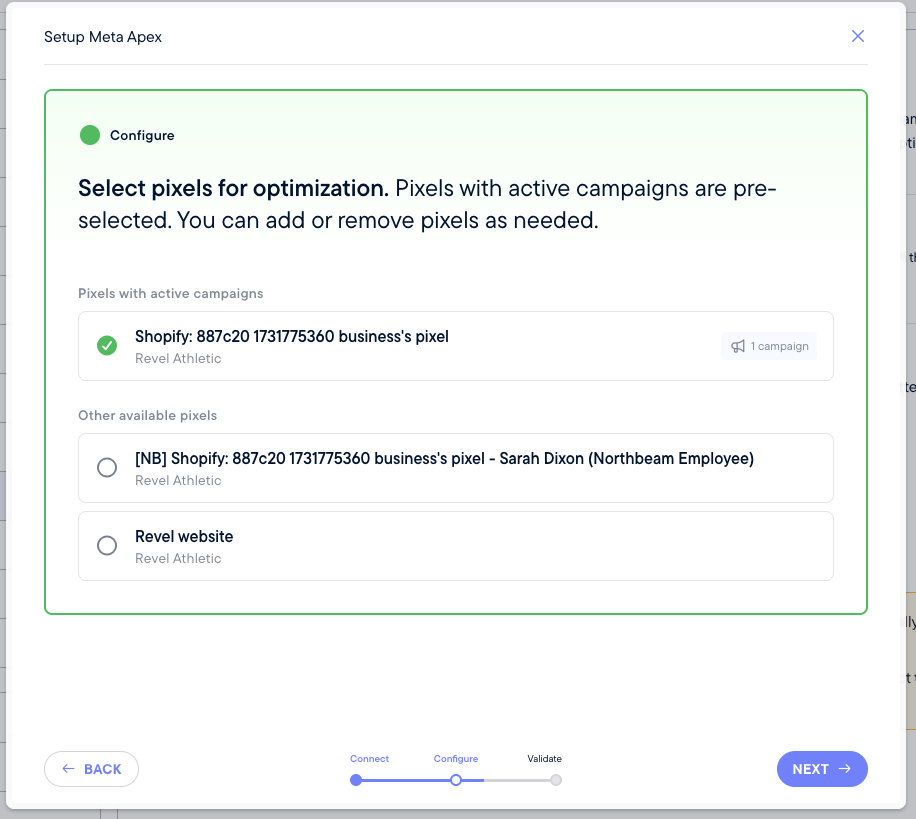
2. Configure Pixel(s)
For each account with the right permission, Northbeam displays the pixels available in that business. Pixels currently in use by active ad sets are pre-selected. Choose which pixels to enable for Apex.
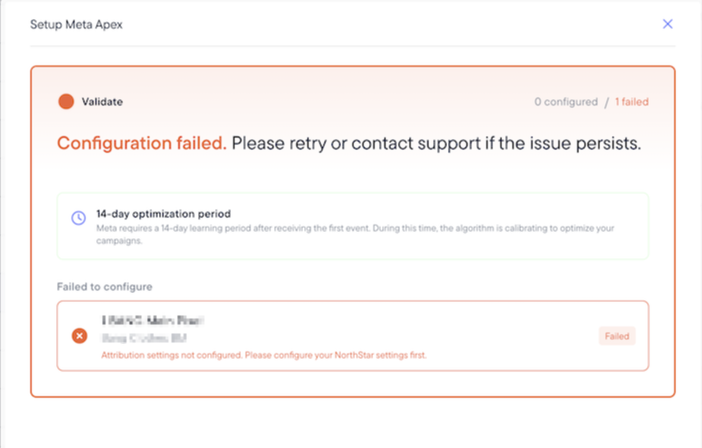
3. Validate Events
Northbeam runs the per-pixel setup with Meta and surfaces any errors inline. The most common issue: a pixel with no Purchase events in the last 28 days will fail Meta's eligibility check. You can de-select failing pixels and proceed with the ones that pass.
⚠️
Validation failing with "Configuration failed."?
Your North Star hasn't been saved. On the Apex page, the North Star Metric dropdowns will show empty "Select.." placeholders when nothing is configured — make your selections and click Save, then re-run validation.
Seeing this error? Your North Star isn't saved.
Select your North Star Metric and click Save, then re-run validation.
Step 3 — Verify
After setup, verify your Enhanced Apex configuration using the following three checks:
1. Northbeam UI verification
You'll see a badge on the Northbeam Apex page and Connections page confirming how many pixels are configured.
Pixel Configuration badge -- setup complete.
Note: Some early Enhanced Apex customers are on our legacy setup flow and may see the legacy Enhanced Apex badge. If this applies to you, your Apex setup is still working as expected.
Enhanced Apex badge -- setup complete.
2. Meta connection verification
Within 48 hours, a new Custom Attribution experience will appear in Meta Events Manager on your dataset.
You'll see a test event called NorthbeamApexConnectionTest (or NorthbeamTestEvent) in Events Manager — this is expected and confirms the connection. No action required.
3. Meta readiness verification
A readiness indicator on the Custom Attribution quality page will climb toward High over approximately 14 days. The campaign creation option in Ads Manager is grayed out until this training period completes. During that time, you can prepare your test campaign, but you cannot launch it yet.
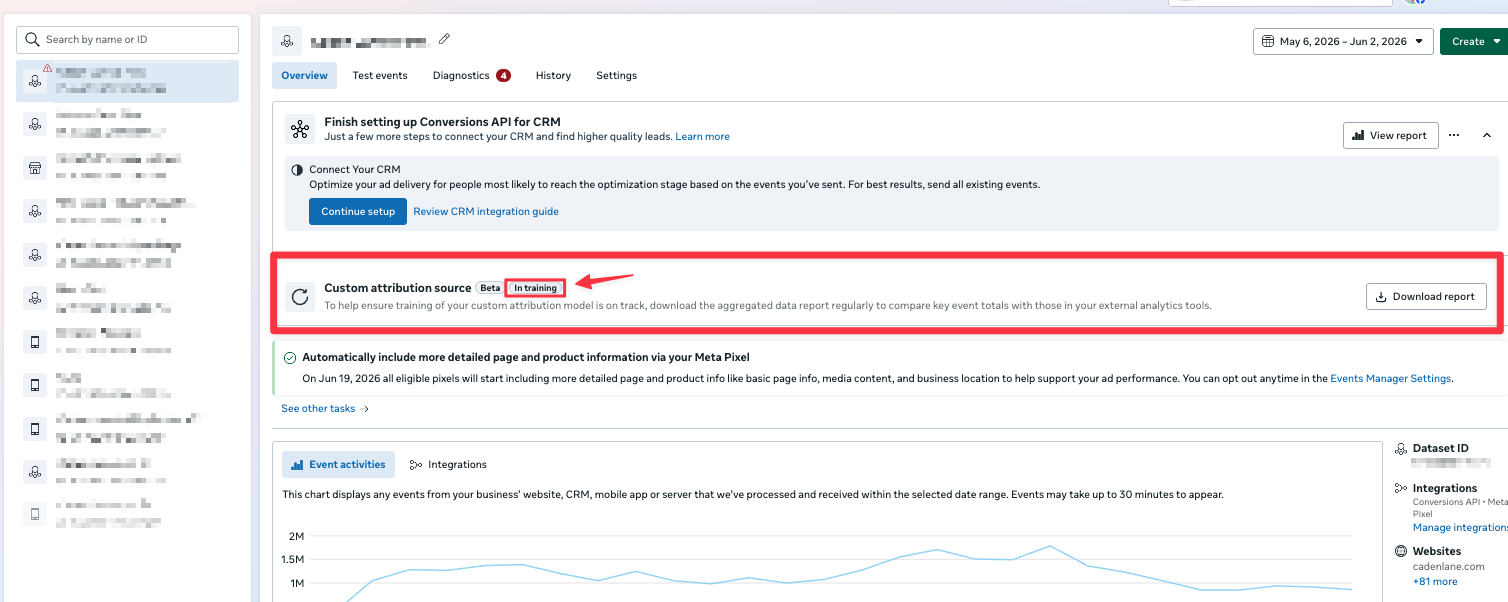
In Events Manager, your Custom attribution source carries a status badge that reflects where Meta is in the training process. It moves through two states:
In training — Meta is still warming up the model on your Apex data. This is the expected state for approximately the first 14 days after setup. The campaign creation option in Ads Manager is grayed out during this period — you can prepare your test campaign, but you cannot launch it yet.
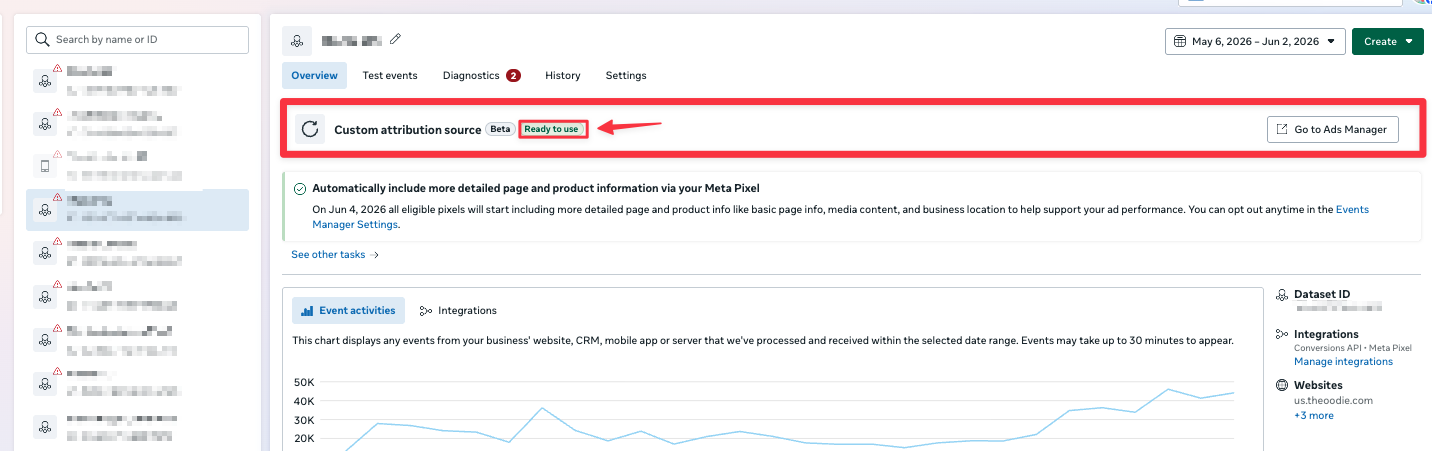
Ready to use — training is complete and Custom Attribution is selectable in Ads Manager.
In Training
Ready to Use
Step 4 — Set up a Custom Attribution campaign
Once Meta's readiness indicator shows High (approximately 14 days after setup), you can run a Custom Attribution campaign. This is the Meta-side optimization layer — the step that actually puts Apex data to work in your ad delivery.
⚠️
Custom Attribution is currently in invite-only beta.
Reach out to your Customer Success Manager or Support Team if you're not sure whether you're on the list or want to be added ahead of the broader rollout planned for June 2026.
If your Apex connection is set up, your data is already flowing and training Meta's model — you'll be ready to launch as soon as access opens up.
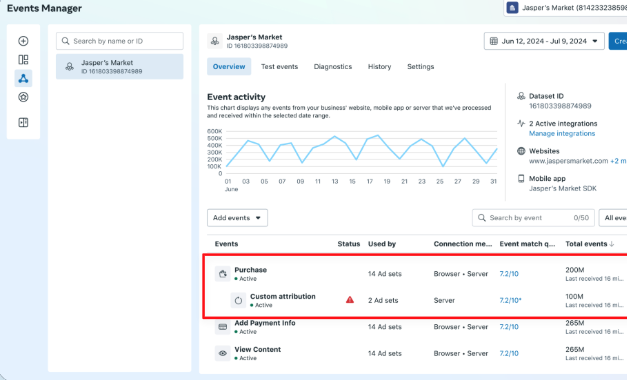
What you'll see in Events Manager
After Apex setup completes, a new Custom Attribution signal will appear under your Purchase event in Events Manager within 48 hours.
A few things to know about it:
Isolated signal - The Custom Attribution signal is fully isolated from your standard Purchase event. Behind the scenes it is not even a Purchase event — it's an AppendAttribution event. You do not need to worry about deduplication with Elevar, your existing CAPI, or any other standard Meta events.
No EMQ impact - This event does not affect Event Match Quality. EMQ is built for a different use case.
Data quality issues will be surfaced in both Events Manager and Ads Manager. If they arise, Northbeam will work with Meta to resolve them.
Export data. Events Manager has an export function that lets you download the raw signal Northbeam is sending at the ad-set level. Note: this may differ slightly from your Northbeam dashboard due to data delays.
Eligibility requirements
To use Custom Attribution in Ads Manager, your account must:
Be running Sales-objective campaigns optimizing for Purchase events
Use Highest volume or Highest value bid strategy (autobid only)
Have at least ~50 Northbeam-attributed orders per day at the account level, based on your selected North Star settings, for best results. The technical minimum is 10 events in 7 days, but model performance improves significantly at higher volume.
For example, if your North Star is set to 1-day Clicks-Only, Blended Revenue, Accrual accounting, the account should have roughly 50 orders per day under that same Northbeam view.
Have website or website + app as the conversion destination
Not compatible with: Value Rules, non-autobid bid strategies.
Campaign setup
In Ads Manager, create a new (or duplicate an existing) Sales-objective campaign. At the ad-set level, you'll configure:
Conversion location — Website (or Website + App)
Performance goal — Maximize number of conversions or Maximize ROAS
Dataset — select the pixel configured for Apex (it will show a green indicator when ready)
Conversion event — Purchase
Attribution model — select Custom
Custom attribution source — select your Northbeam Apex source
Custom Attribution is configured at the ad-set level — the same level as Incremental Attribution. The two are mutually exclusive on the same ad set, though both can exist within the same campaign.
Change one variable at a time. The only thing you're changing in this test is the attribution model. Keep everything else identical to your BAU setup:
Performance goal — use whatever you normally run. Don't switch goals alongside Apex or the test won't be clean. Note: even if your primary KPI is ROAS, Maximize Conversions sometimes drives better ROAS in practice — stick with what you use today.
Audience targeting — keep your existing inclusion, exclusion, and lookalike audiences. Setting "new customers" as your North Star in Northbeam does not automatically make Meta target new customers — you still need the appropriate exclusion audiences in the campaign itself.
Reporting
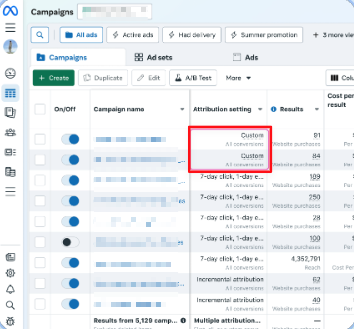
The Results column in Ads Manager for Custom Attribution campaigns reflects Northbeam-provided credit and value at the ad ID level — not Meta's standard attribution.
Use Northbeam as your source of truth. Custom, Standard, and Incremental attribution in Ads Manager each use a completely different counting mechanism — comparing them there is apples-to-oranges. In Northbeam, they're all apples — always compare there.
48-hour reporting lag. Custom Attribution conversions appear in Northbeam immediately but show as – in Ads Manager for the first 48 hours. Use Compare Attribution Settings to view Meta standard attribution alongside Custom during that window.
Don't compare against your account average. The channel average mixes campaigns at different stages, budgets, and optimization histories — it's a noisy baseline that will make results look worse than they are.
Running the A/B test
Use Meta's Conversion Lift experimentation tool to set up the test — not a manual campaign split. Meta uses the Conversion Lift harness behind the scenes to divide audiences cleanly and prevent cannibalization. Without it, you'll likely run into audience overlap that makes results unreliable.
💡
You're not using Conversion Lift to measure lift — just to set up the clean experiment structure.
Meta's A/B test tool is coming soon, but cross-attribution model testing is not yet supported there, so Conversion Lift is the current path.
Before setting up the Conversion Lift study, create your Custom Attribution campaign in Ads Manager first (following the campaign setup steps above). You'll assign that campaign to Cell 1 in the study. Your existing BAU campaign becomes Cell 2.
How to set up a Conversion Lift
Name your study clearly — e.g. "Custom Attribution vs BAU Q2 2026."
Create two cells — Cell 1 is your Custom Attribution test group, Cell 2 is your BAU group. Name them clearly (e.g. "Meta Custom Attribution — [Campaign Name]" and "Meta BAU — [Campaign Name]").
Assign campaigns to each cell — assign your Custom Attribution campaign to Cell 1 and your BAU campaign to Cell 2. Double-check this before moving on.
Set your conversion objective — select Purchases as the primary objective and choose the relevant dataset.
Set your schedule — start date one day before the campaign start date, end date one day after. This buffer ensures the full campaign flight is captured.
Set holdout size to the minimum allowed — for a standard two-cell study that's 2% total (1% per cell). You're splitting audiences here, not measuring lift in the traditional sense, so keep the holdout small to maximize your test group size.
Review the summary carefully before publishing. Publishing the study is what kicks everything off.
Test duration: Run for two weeks. One week is not enough to account for seasonality and variance.
In-Flight Best Practices:
Avoid making changes to creative, audiences, or budgets mid-test. If changes are unavoidable, apply them to both cells simultaneously to maintain test integrity.
Check for anomalies like duplicated events that could skew results.
Avoid competing ads — similar ads outside the test that reach the same audience will pollute results.
Keep campaigns in one cell only — the same campaign can't appear in multiple cells.
Aim for at least $5K spend per cell and a 10K+ holdout for reliable results.
After a successful test: scaling
Recommended: Run a 50/50 account-level A/B test to scale with confidence.
Minimum: Move at least 20% of budget to Custom Attribution for at least two weeks before drawing conclusions.
📘
Avoid running Custom Attribution at a very small budget share (1–3%).
The model learns from the traffic it generates — at low budget it doesn't get enough signal to improve, results will be misleading, and you'll underrealize the gains even if the A/B test already showed it wins.
FAQs
What is Meta Custom Attribution, and how does it relate to Apex?
Custom Attribution is Meta's official way of letting advertisers optimize campaigns against an outside attribution model instead of Meta's default. Apex is the data connection that feeds Northbeam's attribution into Meta's Custom Attribution system.
When will Custom Attribution be available to me?
All customers can enable Apex and start sending data to Meta today. Live optimization is in an invite-only beta, with broader rollout expected in June 2026. Setting up Apex now means Meta is already training on your data when broader access opens up.
Do I need to set anything up in Meta Business Manager?
No. Northbeam handles all Meta-side configuration as part of the in-app setup — we attach a Custom Attribution Source to your selected pixel(s) and configure the CAPI connection automatically. Your existing pixel and CAPI connection are unchanged.
Will this affect my current CAPI connection or attribution?
No. Apex runs in parallel. It uses a custom event type (Passback / AppendAttribution) that does not conflict with your standard Purchase events and will not cause double-counting or affect Event Match Quality in Ads Manager.
I'm already using an enrichment tool (ex. Elevar). Should I turn it off?
No. Do not turn off or change your existing pixel or CAPI setup. Enrichment tools push more raw events into Meta's pixel-driven attribution. Apex sends Northbeam's already-attributed, cross-channel performance to Meta so its algorithm can optimize against the same numbers you trust in Northbeam. They are complementary, not redundant.
Is this data passed as standard CAPI events?
No. Apex uses custom event types (Passback and AppendAttribution events) specifically requested by Meta for improved signal quality. They are not Purchase events, do not appear as such in Ads Manager, and do not affect EMQ.
What data does Meta actually see about my customers?
Ad-level attributed performance — transactions, spend, revenue, custom metrics — plus your attribution model, window, accounting mode, and breakdowns. At the order level, events include IP address and user agent (which Meta requires for any server-side CAPI event), but no emails, names, phone numbers, or device IDs.
My North Star is Clicks + Deterministic Views (C+DV). Can I use it with Custom Attribution?
Not yet — Custom Attribution does not currently support C+DV. To run a Custom Attribution test today, set your North Star to Clicks-only. If you switch from C+DV to Clicks-only, wait at least 10 days after the change before starting the test, and evaluate results under the Clicks-only model.
I changed my North Star — do I need to wait again?
Yes. Changing your North Star resets the model's calibration period. Plan for approximately two weeks before running a new test. The model will still function during that period but will be re-learning from the new signal.
My results in Meta Ads Manager don't match my Northbeam dashboard. Why?
Two main reasons: (1) Meta's Ads Manager renders results as blended even when your North Star isn't, and (2) there is a 48-hour reporting lag for Custom Attribution data in Ads Manager. Use Northbeam as your source of truth for all budget and performance decisions.
Meta's reported ROAS went down after I turned on Apex. Is something wrong?
No — this is expected. When Apex is on, Meta's algorithm optimizes against Northbeam's attribution data, but Meta's surface reporting in Ads Manager still uses its own last-click model. The two are now misaligned by design. Evaluate performance in Northbeam, not Ads Manager, where all attribution is consistent.
I turned on Apex but Meta still isn't optimizing. Why?
Three possible causes:
Meta is still warming up. It takes approximately 14 days of high-quality signal before Custom Attribution becomes selectable in Ads Manager. Check the readiness indicator in Events Manager — it needs to show High before you can proceed.
You haven't created a Custom Attribution campaign yet. Turning on Apex does not automatically apply to existing campaigns. Custom Attribution must be selected on a new (or duplicated) Sales-objective campaign at the ad-set level.
You're not on the beta whitelist yet. Apex setup is available to all customers, but Meta-side optimization is invite-only. If you're not on the list, model training is happening but live optimization is not. Reach out to your CSM or Support Team to be added.
My pixel isn't showing up in the Apex setup wizard. Why?
Two possible causes:
The Meta login used to connect your Ads account in Northbeam is missing business_management permission for the business that owns that pixel. Reconnect using a login that has it. Agency-managed accounts typically only have ads_management — the brand side will need to reconnect with the correct login.
The pixel may belong to a business that the connected user doesn't have access to administer. Confirm the pixel's owning business is one the connected user can manage.
Can I run Apex and Incremental Attribution at the same time?
Yes, but not on the same ad set. Custom Attribution and Incremental Attribution are mutually exclusive at the ad-set level. You can run both within the same campaign by using different ad sets for each.
I have multiple Meta ad accounts connected to Northbeam. Does my North Star apply to all of them?
Yes. All Meta ad accounts connected to a single Northbeam dashboard inherit the same North Star settings. If you need different settings for different accounts, those would need to be on separate Northbeam dashboards.
I just had a positive test — what's next?
Scale as quickly as you can with confidence. The ideal next step is a 50/50 account-level A/B test on Custom Attribution. If that's not feasible, move at least 20% of budget to Custom Attribution for at least two weeks to confirm sustained performance before going broader.
Avoid letting it sit at a small budget share (1–3%). The model learns from the traffic it generates — at low spend it can't improve fast enough, results will be misleading, and you'll underrealize the gains even if your A/B test already showed it wins.
Will Apex affect my Meta performance immediately?
No. Apex currently supports Meta model training. Live optimization begins once you create a Custom Attribution campaign and the 14-day warm-up period is complete.
Will Apex eventually support TikTok, Google, or other channels?
Yes — additional platform integrations are on the roadmap.
Can Meta's access to my data be audited?
Yes. Northbeam logs every data export. We can deactivate or revoke a partner's access and reconstruct exactly what was accessed and when.
Please reach out to your Customer Success Manager, Media Strategist, or Support if you have any questions.