Subscription Analytics
Subscription Analytics offers powerful insights that will help you optimize campaigns to capture subscribers and increase revenue for faster, sustained growth.
You can now:
- Optimize marketing campaigns for New Subscriptions and see associated efficacy metrics
- Understand your Take Rate, or "% of customers that convert into New Subscriptions"
- Distinguish between your Subscriptions and One-Time Orders
How do I set up my Subscription Analytics?
Order Tags are the most important part of setup.Tags allow us to understand which orders are First-Time Subscriptions and Recurring Subscriptions -- which ultimately inform our Subscription metrics.
Step 1: Preparing your Order Tags
Two order tags are needed:
- Order Tag for First-Time Subscription Orders
- Order Tag for Recurring Subscription Orders
The process in which Order Tags are set up depends on your eCommerce platform.
For Shopify StoresMany subscription apps (ex. Recharge) automatically tag your First Time and Recurring Subscriptions.
How to double check your tags:
- In Shopify: Find a Subscription Order and check the order tags for First Time and Recurring tags.
- In Northbeam: In the Orders page, use the Order Tag filter and check for First Time and Recurring tags (See video for a walkthrough)
If order tags are missing, please make sure tags are set up. Many customers use automation apps likeShopify Flow or SC Order Tags & Flows to do so
For Custom StoresOrder tags will need to be sent through
order_tagsfield using the Orders APIOnce sent, please make sure they are in Northbeam: In the Orders page, use the Order Tag filter and check for your tags.
Please use unified order tags for your First Time and Recurring Subscriptions.
| Order Tag Method | Pass / Fail |
|---|---|
| All First Time Subscriptions tagged with "First Time Subscription" | ✅ |
| All Recurring Subscriptions tagged with "Recurring Subscription" | ✅ |
| Different tags are used: "First Time #1001"; "First Time #1002", "First Time #1003" | ❌ |
| Different tags are used: "First Time"; "First Time Sub"; "First Time Subscription" | ❌ |
Step 2: Assigning the Tags
- Click Settings in the bottom left corner
- Click Subscription Order Tags
- Please ensure:
- Your First Time tag is assigned to the First Time subscription category
- Your Recurring tag is assigned to the Recurring subscription category
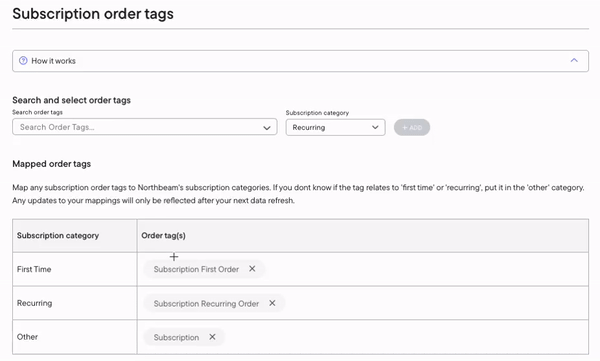
How to assign a Subscription Order Tag
Note: We pre-populate all dashboards with the tag assignments:
- First Time: "Subscription First Order"
- Recurring: "Subscription Recurring"
- Other: "Subscription"
We've found that these are the most common Order Tags created by common Shopify Subscription apps.
Step 3: Set up your Subscription Analytics
You're all set! Find your Subscription Metrics metrics under Subscriptions in the Customize Table pop-out.

First Time vs Other vs RecurringWe offer 3 types of every Subscription Metric:
- First Time
- Other
- Recurring
These correspond to the order tags from Step 2.
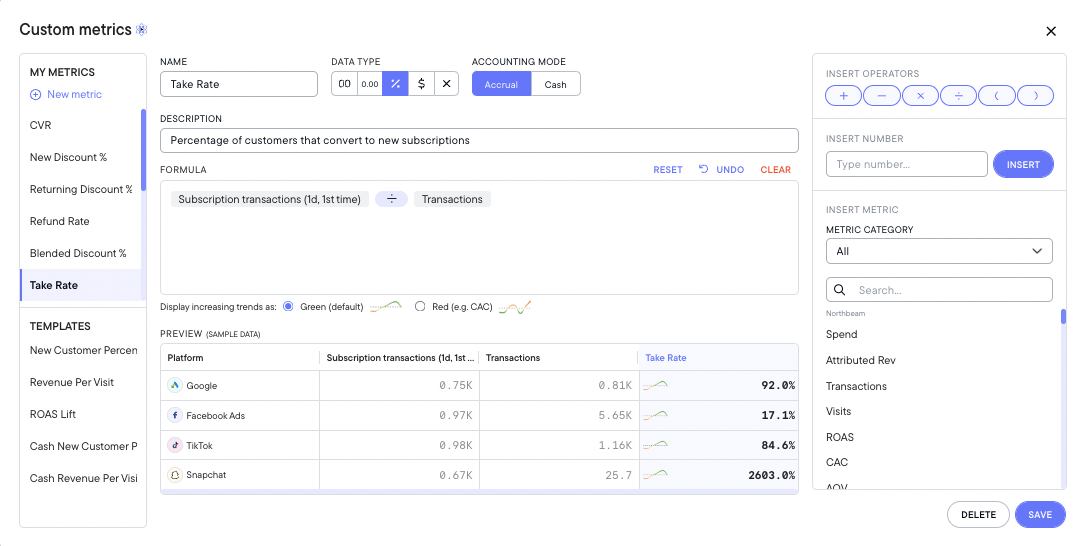
Want to calculate your Take Rate?
Take Rate refers to the percentage of customers that convert into new subscriptions. This is a useful metric to understand channels driving incremental growth for your business.
We could create Take Rate using a Custom Metric.
- Navigate to the Sales page
- On the right side, click Custom Metrics
- Click Create New Metric
- Enter the following formula: Subscription Transactions (1d, 1st time) ÷ Transactions
- Click Save