
Shopify Checkout Extensibility
Upgrading your Thank You page and Order Status pages WILL impact tracking in NorthbeamOur Purchase Event script is placed on the Order Status page to track conversions on Shopify’s native checkout. You'll need to add a new script to the Customer Events.
If you've upgraded your Thank You and Order Status pages, please add our new script (firePurchaseEvent). See directions below.
Adding the firePurchaseEvent in Shopify
The firePurchaseEvent script tracks purchase conversions in Northbeam. It is triggered by Shopify’s checkout_completed event.
Not sure if your Thank You and Order Status pages are upgraded?If Additional Scripts in the Order Status Page section is missing or greyed out, this means your Thank You and Order Status pages are upgraded.
- Log into your Shopify account
- Click Settings
- Click Checkout
- Find the section called Order Status Page and reference the Additional Scripts field
- If this field is missing or greyed out, your Thank You and Order Status pages are upgraded.
Checkout Extensibility Overview
As of February 2023, Shopify began phasing out checkout.liquid in favor of a more modern and secure framework called Checkout Extensibility. This new approach is app-based, upgrade-safe, and designed to improve performance and flexibility across the checkout experience.
Key Upgrade Deadlines:
Shopify Plus Stores (Official Shopify Documentation)
- August 28, 2025- Deadline to upgrade your Thank You and Order Status pages. This includes migrating any customizations made with script tags or additional scripts to the new Checkout Extensibility framework.
Non-Plus Shopify Stores (Official Shopify Documentation)
- August 26, 2026 - Deadline to upgrade Thank You and Order Status pages to their extensible versions for stores on standard (non-Plus) Shopify plans.
Have you ONLY upgraded your Information, Shipping, and Payment Pages?No action needed! Your Order Status Page field should still be available. If so, keep using our legacy Order Status Page script.
If your Thank You and Order Status pages are upgraded...
Step 1: Find a new script in your Northbeam Dashboard
- Click on Settings
- Click on Northbeam Pixel and Event Tracking
- Find the script called Shopify: Customer Events
Step 2: Insert the script in your Customer Events
- Log into your Shopify account, click Settings
- In the side navigation, click Customer Events
- In the top right, click Add Custom Pixel
- Name the pixel anything you'd like (e.g. "Northbeam”), then click Add Pixel
- In your Northbeam dashboard, go to Settings > Northbeam Pixel and Event Tracking
- Copy the script under Shopify: Customer Events and paste it into the code editor
- Under Data sale settings, select Data collected does not qualify as data sale
- In the top right corner, click Save
- In the modal, click Connect to give the pixel secure access to your online store, checkout, and order confirmation.
Step 3: Change data access settings
- From your Shopify admin, go to Settings > Customer events.
- Click the App pixels tab.
- For the Northbeam pixel, click the pixel's current data access setting in the Data column.
- In the dialog, select Always on, and then click Apply.
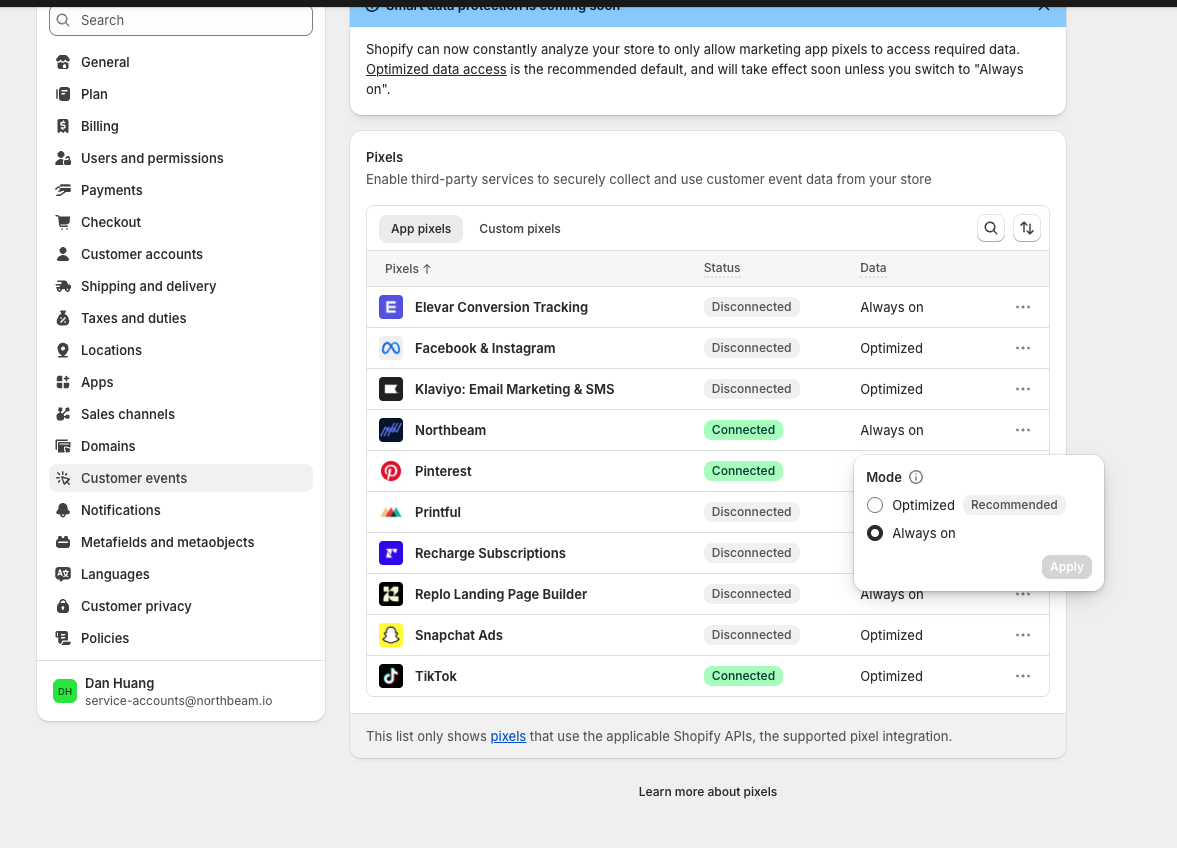
Shopify: Data access settings
Step 4: Remove the Pixel from Google Tag Manager (if applicable)
If you’re using Google Tag Manager (GTM) to run your Northbeam Pixel, follow these steps. If not, move to Step 4.
- Disable the tag associated to the Northbeam Pixel in GTM
- Add the same pixel script directly into your Shopify theme.liquid file
- This helps prevent the pixel from firing twice — once from GTM and once from our Checkout Script
- We’ll remotely disable page view tracking from theme.liquid to avoid duplication, while still allowing for custom event tracking
- Note: If certain pages aren’t controlled by theme.liquid, keep the GTM tag active only for those pages and update the trigger settings accordingly.
- For example, if a subdomain (ex. blog.northbeam.io) is not part of the main theme, enable the GTM tag and adjust the trigger so it only fires on blog.northbeam.io.
- The goal is to make sure the Northbeam Pixel fires once per page, no more.
Step 5 Reach out to our team and confirm the following:
- Your Thank You Page and Order Status Pages HAVE been upgraded
- The Customer Event HAS been placed
- Our team will make an adjustment to your backend to ensure proper tracking.
When the script is added, reach out to our team.We’ll need to make a slight adjustment to your backend for proper tracking.