
Orders API
Learn how to send order data to Northbeam using the Orders API, with steps for setup, validation, backfilling, and monitoring.
The Northbeam Orders API is a customizable solution specific to your businessTo setup appropriately, you will utilize this API to actively push order data to Northbeam by making POST requests to this endpoint:
Full API Reference: https://docs.northbeam.io/reference/post_orders-1.
Table of Contents
- Step 1. Get API Credentials
- Step 2. Build Your Payload (All Required Fields)
- Step 3. Verify Your Payload
- Step 4. Backfill Historical Orders
- Step 5. Set Up Ongoing Batches
- Step 6. Test in Sandbox (Optional)
- Step 7. Data Diagnostics
Step 1. Get API Credentials
- In your Northbeam dashboard go to Settings → API Keys
- Click Create new API key to generate:
- Authorization (API Key)
- Data-Client-ID (Client ID)
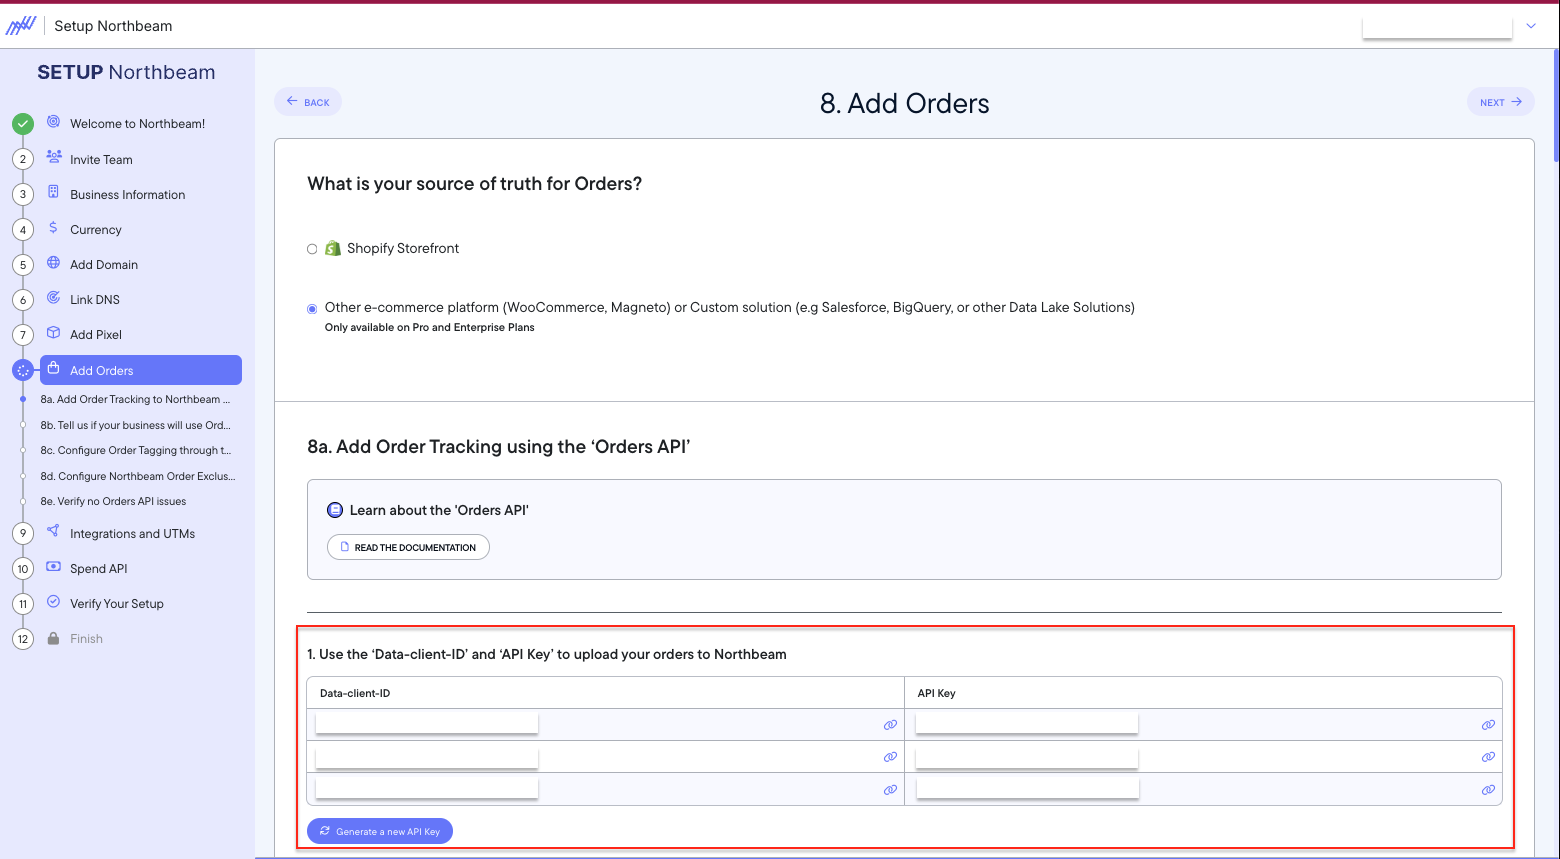
Onboarding Flow: Add Orders > Other E-Commerce Platform
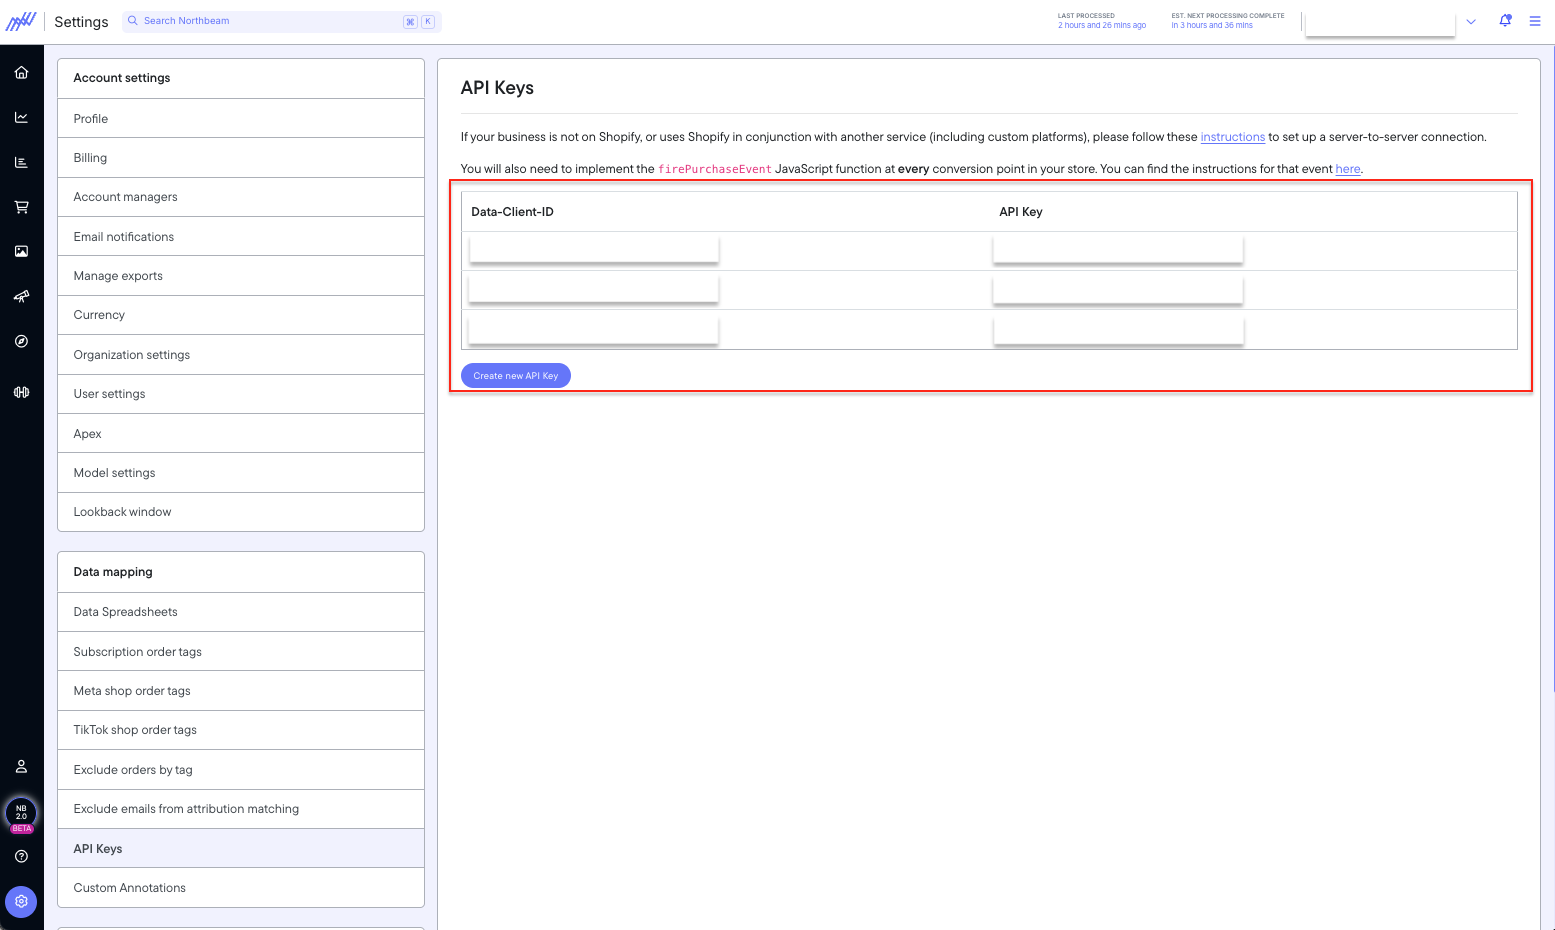
Dashboard: Settings > API Keys
| Header | Value | Description |
|---|---|---|
Authorization | <API_KEY> | Your Northbeam API key |
Data-Client-ID | <CLIENT_ID> | Your Northbeam client ID |
Content-Type | application/json | Tells the API you’re sending JSON |
Production Endpoint:https://api.northbeam.io/v2/orders
Example (cURL):
curl --request POST \
  --url https://api.northbeam.io/v2/orders \
  --header 'Authorization: <API_KEY>' \
  --header 'Data-Client-ID: <CLIENT_ID>' \
  --header 'Content-Type: application/json' \
  --data @orders.json
These headers are required for every request.Without them, the Orders API will reject your call.
Step 2. Build Your Payload (All Required Fields)
All these fields are required for full functionality in Northbeam.
Full API reference: https://docs.northbeam.io/reference/post_orders-1.
| Field | Type | Description |
|---|---|---|
order_id | string | Unique identifier for the order. Must match the |
customer_id | string | Must be unique per customer in your OMS. |
customer_email | string | The email associated with the customer. |
time_of_purchase | date-time (ISO-8601) | Must be in ISO-8601 format. Must occur AFTER the frontend firePurchaseEvent. Include a timezone offset if not reporting in UTC. Example: ❌ ✅ ✅ |
currency | string | ISO-4217 currency code (e.g., USD). All monetary fields assume this currency. |
purchase_total | number | Total collected including tax, shipping, and fees. |
tax | number | Amount paid as tax. Required if you want taxes deducted from revenue in reporting. |
shipping_cost | number | Amount paid for shipping. Required if you want shipping deducted from revenue in reporting. |
products | array of objects | Must contain at least one product. Required objects: Optional objects: |
order_tags | array of strings | Required for offline orders. Used to mark subscription stage or exclude orders from attribution. |
refunds | array of objects | Used to keep revenue calculations correct Required objects: If you want refunds broken out in reporting, you must also include an |
customer_shipping_address | object | Enables Customer LTV reporting by region and state. Required fields if included: |
discount_codes | array of strings | Enables Customer LTV by discount code. |
discount_amount | number | Required if you want discounts broken out in dashboard reporting. |
Example Payload
[
  {
    "order_id": "abc-123",
    "customer_id": "def-456",
    "customer_email": "[email protected]",
    "time_of_purchase": "2025-09-29T15:31:00Z",
    "currency": "USD",
    "purchase_total": 110.99,
    "tax": 5.00,
    "shipping_cost": 10.99,
    "products": [
      {
        "id": "prod-1",
        "name": "Sample Product",
        "quantity": 1,
        "price": 95.00,
        "variant_id": "var-1",
        "variant_name": "Size M"
      }
    ],
    "order_tags": [
      "Online Order",
      "Subscription First"
    ],
    "refunds": [
      {
        "product_id": "prod-1",
        "quantity": 1,
        "refund_amount": 10.00,
        "refund_made_at": "2025-09-30T10:00:00Z"
      }
    ],
    "customer_shipping_address": {
      "address1": "123 Main St.",
      "address2": "Apt. 1A",
      "city": "San Francisco",
      "state": "CA",
      "zip": "94112",
      "country_code": "USA"
    },
    "discount_codes": [
      "WELCOME10"
    ],
    "discount_amount": 10.00
  }
]
Step 3. Verify Your Payload
Before sending the orders, confirm your payload structure and values are valid. Most issues come from malformed payloads or missing fields.
Common Validation Checks:
- ✅
order_idmust be unique per order and match theidused infirePurchaseEvent. - ✅
time_of_purchasemust be AFTER the correspondingfirePurchaseEventtimestamp and in proper ISO-8601 format with timezone offset. - ✅
productsarray must include at least one product withid,name,quantity, andprice. - ✅
currencymust be a valid ISO-4217 code (e.g.,USD,EUR). - ✅
customer_emailmust match the email on the actual order in your OMS (case-sensitive in some systems). - ✅
customer_idaccuracy is critical – this is what Northbeam uses to distinguish between new and returning customers. If it’s inconsistent (e.g., mixing Shopify IDs and internal IDs), customer LTV and new/returning logic will be incorrect. - ✅
order_tagsare required and used for two main purposes:- Subscriptions – Use distinct tags to separate:
- First-time subscription orders (subscription starts)
- Recurring subscription renewals (auto-charges that happen in the backend)
- Offline Orders – Tag any orders not placed through your live production website (and therefore without frontend pixel events). Our team excludes these from diagnostics monitoring.
- Subscriptions – Use distinct tags to separate:
Order tags are very important for our data validation phase.We cross-check pixel events against raw order data. If tags are missing or incorrect and large discrepancies appear, we’ll need to investigate further — which can prolong the implementation process.
- ✅
refundsobjects must includeproduct_id,quantity,refund_amount, andrefund_made_at. - ✅ If including
customer_shipping_address, all required subfields (address1,city,state,zip,country_code) must be present.
🚧 Common Mistakes to Avoid
- ❌ Using inconsistent
customer_ids (e.g., switching between Shopify and internal IDs) - ❌
time_of_purchaseset BEFORE the frontend pixel fire - ❌ Untagged subscription orders, which prevents Subscription Analytics from working correctly
- ❌ Untagged offline orders, leading to large discrepancies in pixel vs. order data. This prolongs our data validation process.
- ❌ Missing
productsarray or leaving it empty - ❌ Currency not set as a valid ISO-4217 code (e.g., using “US Dollars” instead of
USD)
Step 4. Backfill Historical Orders
Backfilling your historical data is extremely important. This ensures your Customer LTV is complete. This is also key for accurate New and Returning Data.
Accurate New and Returning DataNorthbeam determines whether a customer is new or returning based on the
customer_idattached to each order.Without historical orders, someone who purchased in the past but buys again today will be counted as a new customer — because their first order isn’t in the system.
Backfilling ensures repeat customers are recognized correctly.
What to Send
- Send all historical orders you want in Northbeam (recommended: up to 5 years).
- Use the same payload format from Step 2.
- Keep
order_idstable; resending the sameorder_idoverwrites the prior record.
How to Send
- Batch up to 1000 orders per request.
- Backfill in time windows (for example, month by month).
Backfilling data is only required for new onboards!If your historical orders already exist for any reason (e.g., transition from Shopify to the Orders API), this step isn’t needed..
Step 5. Set Up Ongoing Batches
After history is loaded, keep Northbeam up to date with regular batches.
Cadence
- Northbeam processes on your plan frequency, not in real time.
- Send at least 2× more frequently than your plan’s processing cadence.
- Example: on a 4× per day plan, send 8× per day.
Batching
- Up to 1000 orders per request.
- Include new and changed orders since the last run.
- Resend modified orders using the same
order_id.
Operational Notes
- Retries: if a request fails, retry the same batch; using the same
order_ids is safe. - Idempotency: the latest record for an
order_idtakes priority.
Implementation TipMost teams set this up as a scheduled job (e.g., cron, Airflow, or a serverless function like AWS Lambda).
Step 6. Test in Sandbox (Optional)
Use the UAT endpoint to validate payloads before sending real data to production.
Sandbox Endpoint:
https://api-uat.northbeam.io/v2/orders
Sandbox Testing Notes
- The sandbox does not save orders— it only checks that your payload is valid.
- A “pass” response confirms the request structure is correct, but it does not validate the actual numbers.
For full validation of values (totals, tax, discounts, etc.), send test data to the production endpoint. We can remove those test orders for you afterward if needed.
Step 7. Data Diagnostics
Northbeam provides a diagnostics tool to help you monitor Orders API activity in production.
If there are any issues with your API upserts, errors will appear here with details to help you debug.
Common causes include malformed payloads or missing required fields.
Where to Find the Diagnostics Tools:
In the Northbeam dashboard:
- Go to Settings
- Select Data Diagnostics (bottom of the left-hand column)
Error Table
Each error entry includes:
- Request ID
- Error message
- Error type (e.g.,
payload_validation_error) - Timestamp of error
- Link to request for deeper inspection
TipMost errors are due to missing required fields or invalid payload format.
Fix the payload and resend with the sameorder_id— the latest record will take priority.
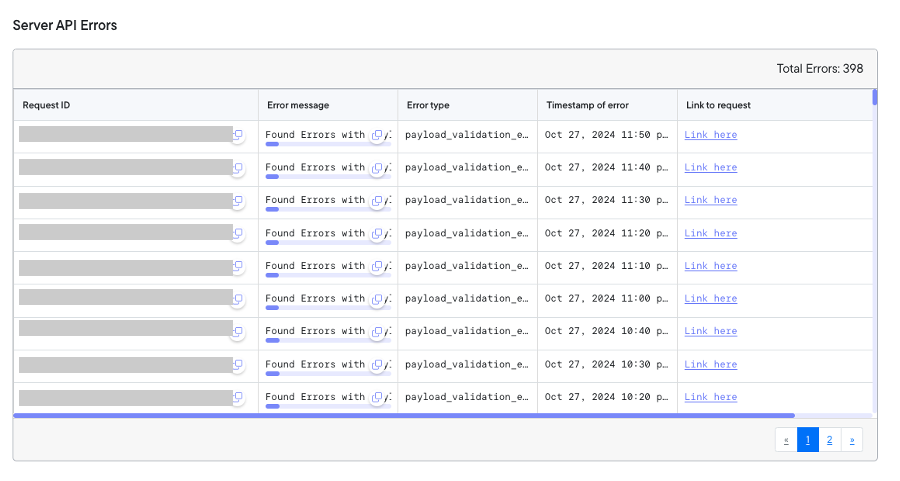
Dashboard: Settings > Data Diagnostics
Error Trends
- A chart shows API error counts over time (1–30 day ranges available).
- Errors typically appear within 1–3 minutes after they occur.
- Use this view to identify spikes or recurring issues.
- Errors typically appear within 1–3 minutes after they occur.
MonitoringThis view is most helpful for spotting systemic issues (e.g., a bad deploy or recurring field mismatch) rather than one-off errors.
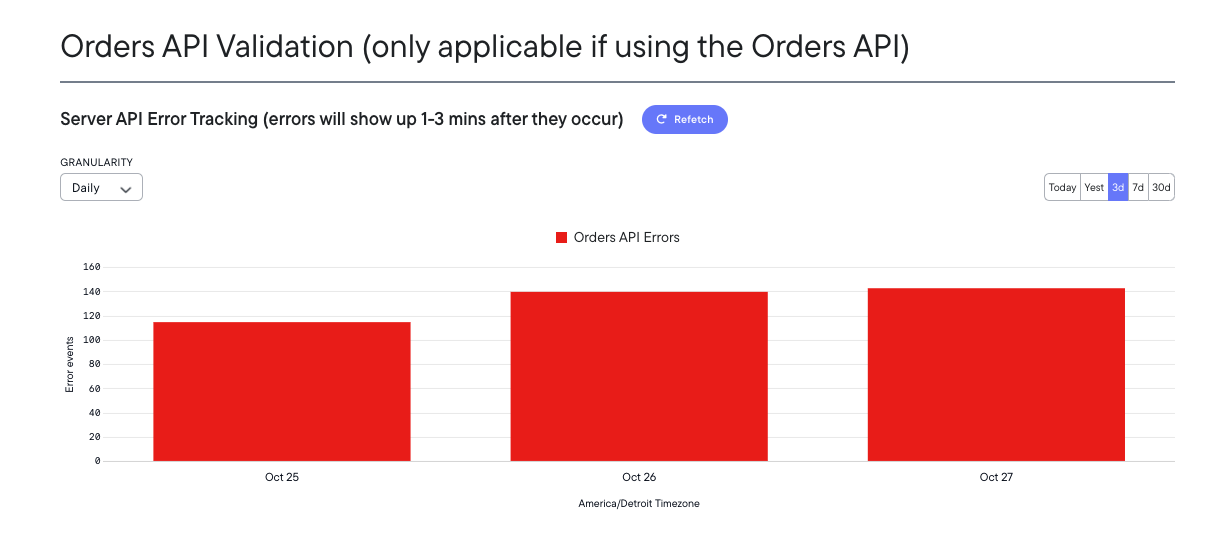
Dashboard: Settings > Data Diagnostics