

What you’ll see in Events Manager
After Apex setup completes, a new Custom Attribution signal will appear under your Purchase event in Events Manager within 48 hours.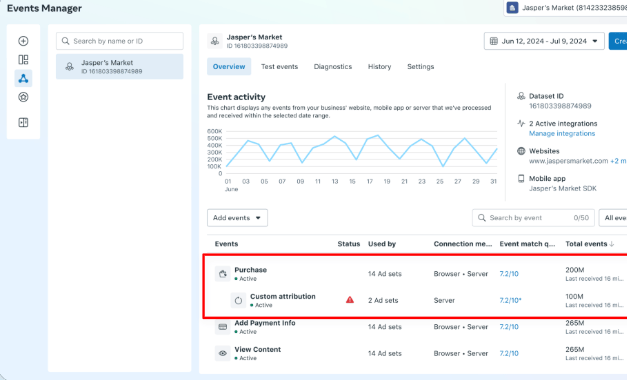
A few things to know about it:
- Isolated signal - The Custom Attribution signal is fully isolated from your standard Purchase event. Behind the scenes it is not even a Purchase event — it’s an AppendAttribution event. You do not need to worry about deduplication with Elevar, your existing CAPI, or any other standard Meta events.
- No EMQ impact - This event does not affect Event Match Quality. EMQ is built for a different use case.
- Data quality issues will be surfaced in both Events Manager and Ads Manager. If they arise, Northbeam will work with Meta to resolve them.
- Export data. Events Manager has an export function that lets you download the raw signal Northbeam is sending at the ad-set level. Note: this may differ slightly from your Northbeam dashboard due to data delays.
Eligibility requirements
To use Custom Attribution in Ads Manager, your account must:- Be running Sales-objective campaigns optimizing for Purchase events
- Use Highest volume or Highest value bid strategy (autobid only)
- Have at least ~50 Northbeam-attributed orders per day at the account level, based on your selected North Star settings, for best results. The technical minimum is 10 events in 7 days, but model performance improves significantly at higher volume.
- For example, if your North Star is set to 1-day Clicks-Only, Blended Revenue, Accrual accounting, the account should have roughly 50 orders per day under that same Northbeam view.
- Have website or website + app as the conversion destination
Campaign setup
- Conversion location — Website (or Website + App)
- Performance goal — Maximize number of conversions or Maximize ROAS
- Dataset — select the pixel configured for Apex (it will show a green indicator when ready)
- Conversion event — Purchase
- Attribution model — select Custom
- Custom attribution source — select the Custom Attribution Source (CAS) you would like to use for the ad set. Your CAS MUST match the pixel you are using for the ad set.
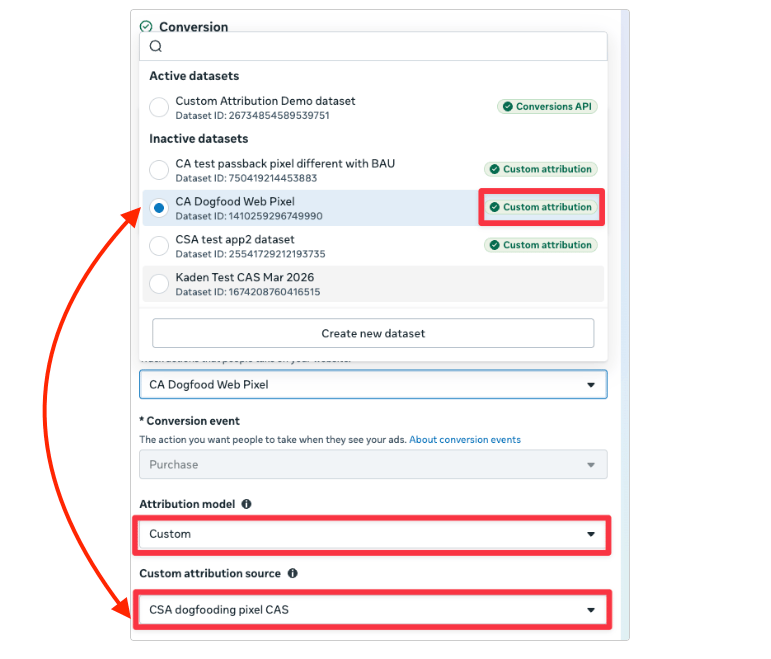
Custom Attribution is configured at the ad-set level — the same level as Incremental Attribution. The two are mutually exclusive on the same ad set, though both can exist within the same campaign. Change one variable at a time. The only thing you’re changing in this test is the attribution model. Keep everything else identical to your BAU setup:
- Performance goal — use whatever you normally run. Don’t switch goals alongside Apex or the test won’t be clean. Note: even if your primary KPI is ROAS, Maximize Conversions sometimes drives better ROAS in practice — stick with what you use today.
- Audience targeting — keep your existing inclusion, exclusion, and lookalike audiences. Setting “new customers” as your North Star in Northbeam does not automatically make Meta target new customers — you still need the appropriate exclusion audiences in the campaign itself.
Reporting
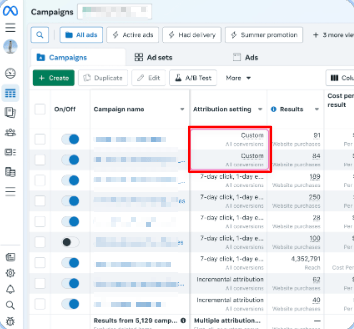
The Results column in Ads Manager for Custom Attribution campaigns reflects Northbeam-provided credit and value at the ad ID level — not Meta’s standard attribution.- Use Northbeam as your source of truth. Custom, Standard, and Incremental attribution in Ads Manager each use a completely different counting mechanism — comparing them there is apples-to-oranges. In Northbeam, they’re all apples — always compare there.
- 48-hour reporting lag. Custom Attribution conversions appear in Northbeam immediately but show as
–in Ads Manager for the first 48 hours. Use Compare Attribution Settings to view Meta standard attribution alongside Custom during that window. - Don’t compare against your account average. The channel average mixes campaigns at different stages, budgets, and optimization histories — it’s a noisy baseline that will make results look worse than they are.
Running the A/B test
A/B test setup
- In Experiments, click Create an A/B test.
- Select the campaigns you want to compare:
- Campaign A: Select your Custom Attribution campaign. This is the test campaign.
- Campaign B: Select your BAU campaign. This is the control campaign.
- For more complex tests, such as a 3-cell test, add additional campaigns as needed.
- Set the test dates:
- Start date: One day before the campaign starts.
- End date: One day after the campaign ends.
- Turn off End test early if a winner is found so the test runs for the full scheduled period.
- Give the test a clear name, such as
Custom Attribution vs BAU - Q3 2026. - Select Cost per purchase as the key metric for determining the winner.
- Add other business-specific KPIs if needed.
- Click Review test details and confirm the campaigns, dates, and metrics are correct.
- Click Create a test to start the experiment.
- Use your own source of truth to determine the final campaign winner.
In-Flight Best Practices
- Avoid changing creative, audiences, or budgets during the test. If a change is required, make the same change in both cells.
- Check for issues, such as duplicate events, that could affect results.
- Avoid similar ads outside the test that target the same audience.
- Keep each campaign in only one test cell.
- Aim for at least $5K in spend per cell and a 10K+ holdout for more reliable results.
After a successful test: scaling
- Recommended: Run a 50/50 account-level A/B test to scale with confidence.
- Minimum: Move at least 20% of budget to Custom Attribution for at least two weeks before drawing conclusions.
Avoid running Custom Attribution at a very small budget share (1–3%).
The model learns from the traffic it generates — at low budget it doesn’t get enough signal to improve, results will be misleading, and you’ll underrealize the gains even if the A/B test already showed it wins.Please reach out to your Customer Success Manager, Media Strategist, or Support if you have any questions.