> ## Documentation Index
> Fetch the complete documentation index at: https://docs.northbeam.io/llms.txt
> Use this file to discover all available pages before exploring further.
# Touchpoints Export
> A step-by-step guide to our touchpoints export.
## Interested in the Touchpoints Export?
The Touchpoints Export feature is available for select service plans. To explore access options for your account, **please contact your Customer Success Manager**.
If you don’t have a representative assigned, please [reach out to our Support Team](https://www.northbeam.io/submit-a-support-ticket) for assistance.
***
## What is the Touchpoints Export?
The **Touchpoints Export** provides a detailed, row-level view of every marketing touchpoint contributing to an order.
Each row represents a single touchpoint and includes attribution credit, order and customer identifiers, and campaign metadata such as platform, category, campaign, ad set, and ad.
It also shows the transactional and revenue credit assigned to that touchpoint across every click-based attribution model.
This export is designed for teams that want to analyze customer journeys, measure channel performance, or feed attribution data directly into their warehouse or BI environment.
If you want aggregated performance data rather than individual touchpoints, use the [Sales page export](/docs/sales-page-export) or the [Data Export API](/docs/northbeam-api-data-export-1). See [Which export should I use?](/docs/exporting-data) to compare all options.
***
## How to Create a Touchpoints Export
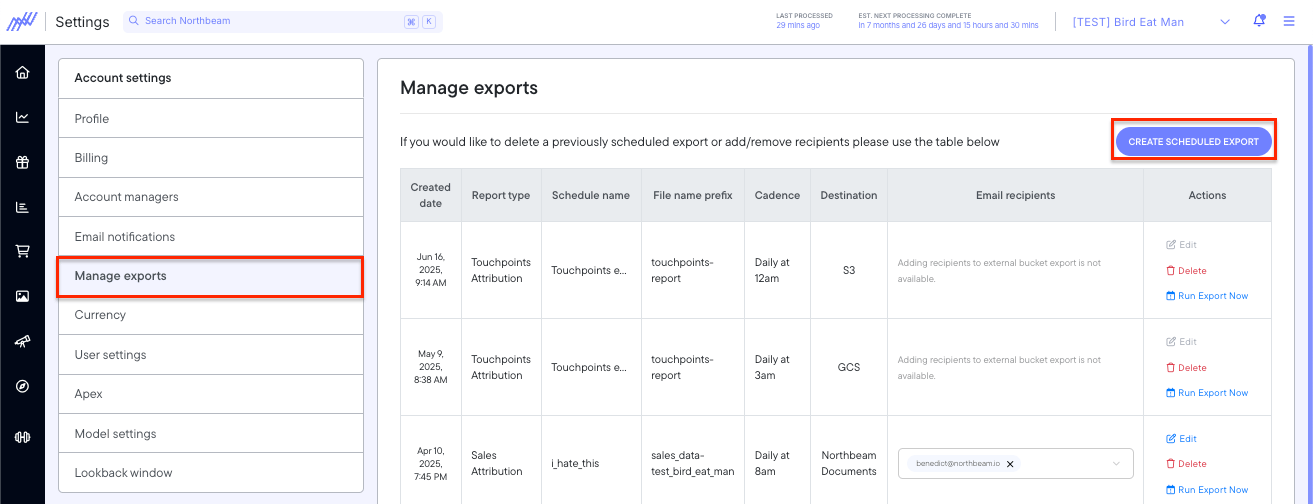
Creating a Touchpoints Export takes just a couple minutes.
1. Click **Settings**
2. Click **Manage Exports**
3. Click **Create Scheduled Exports**
***
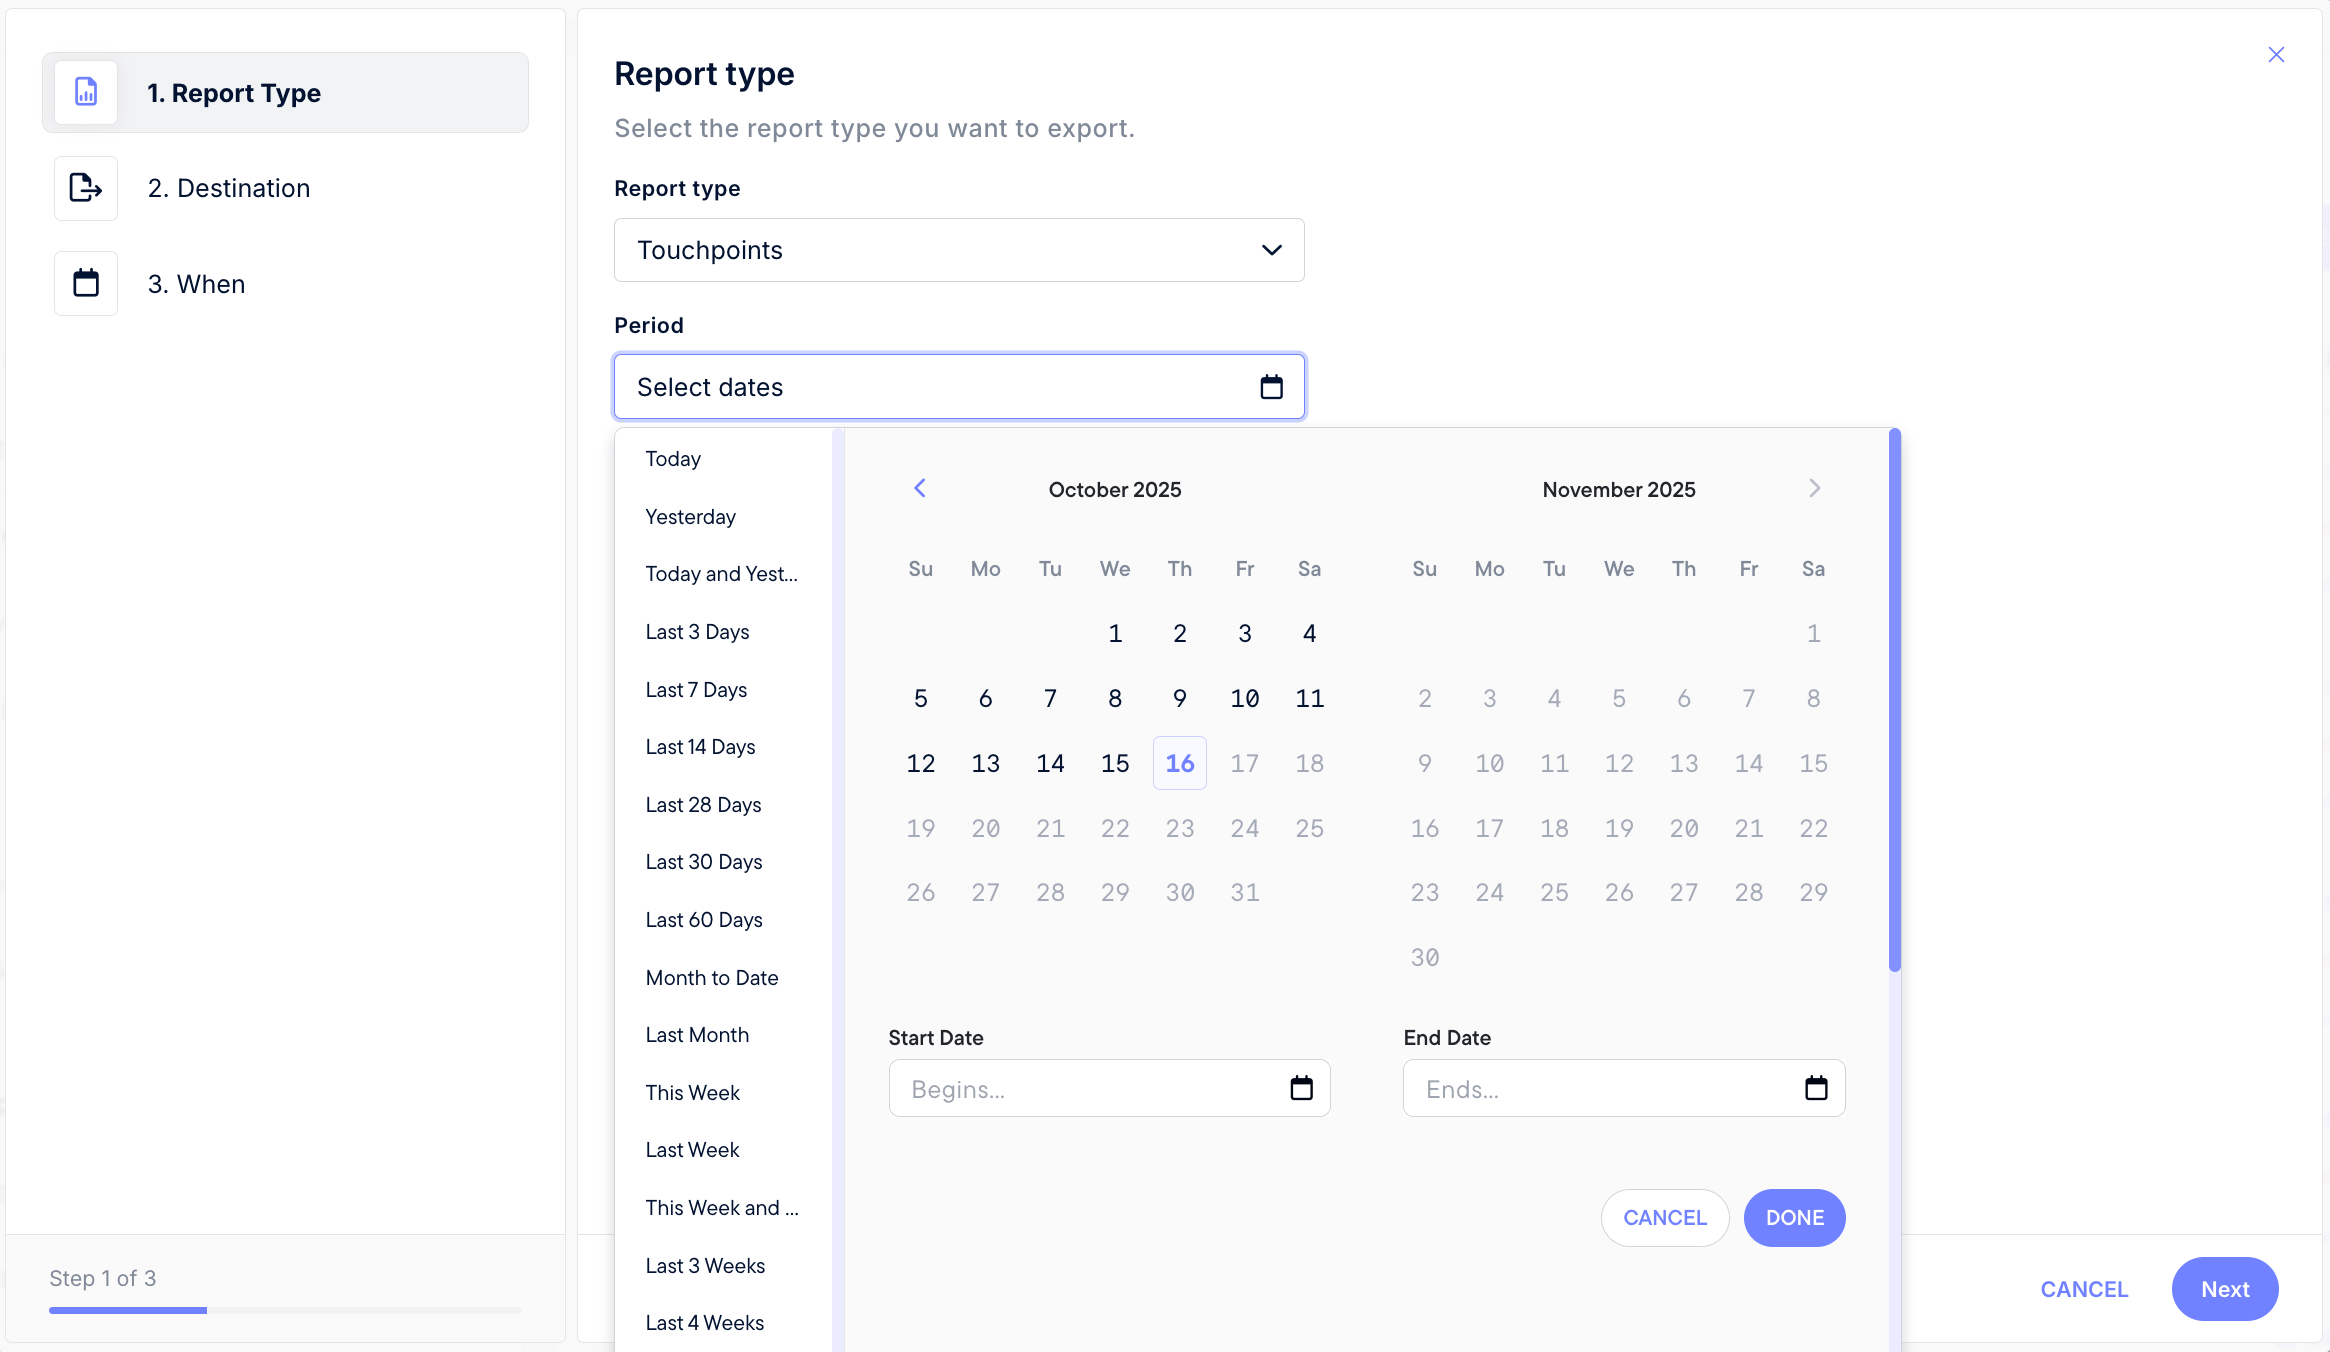
### Step 1: Select Report Type
**Report type:** `Touchpoints`
(Currently the only available option — more to come soon!)
**Select period:**
You can choose from a variety of date presets such as:
* Today / Yesterday
* Last 7, 14, 30, or 60 days
* This Month / Last Month
* Custom date range
This defines the time range of data included in your export.
 ***
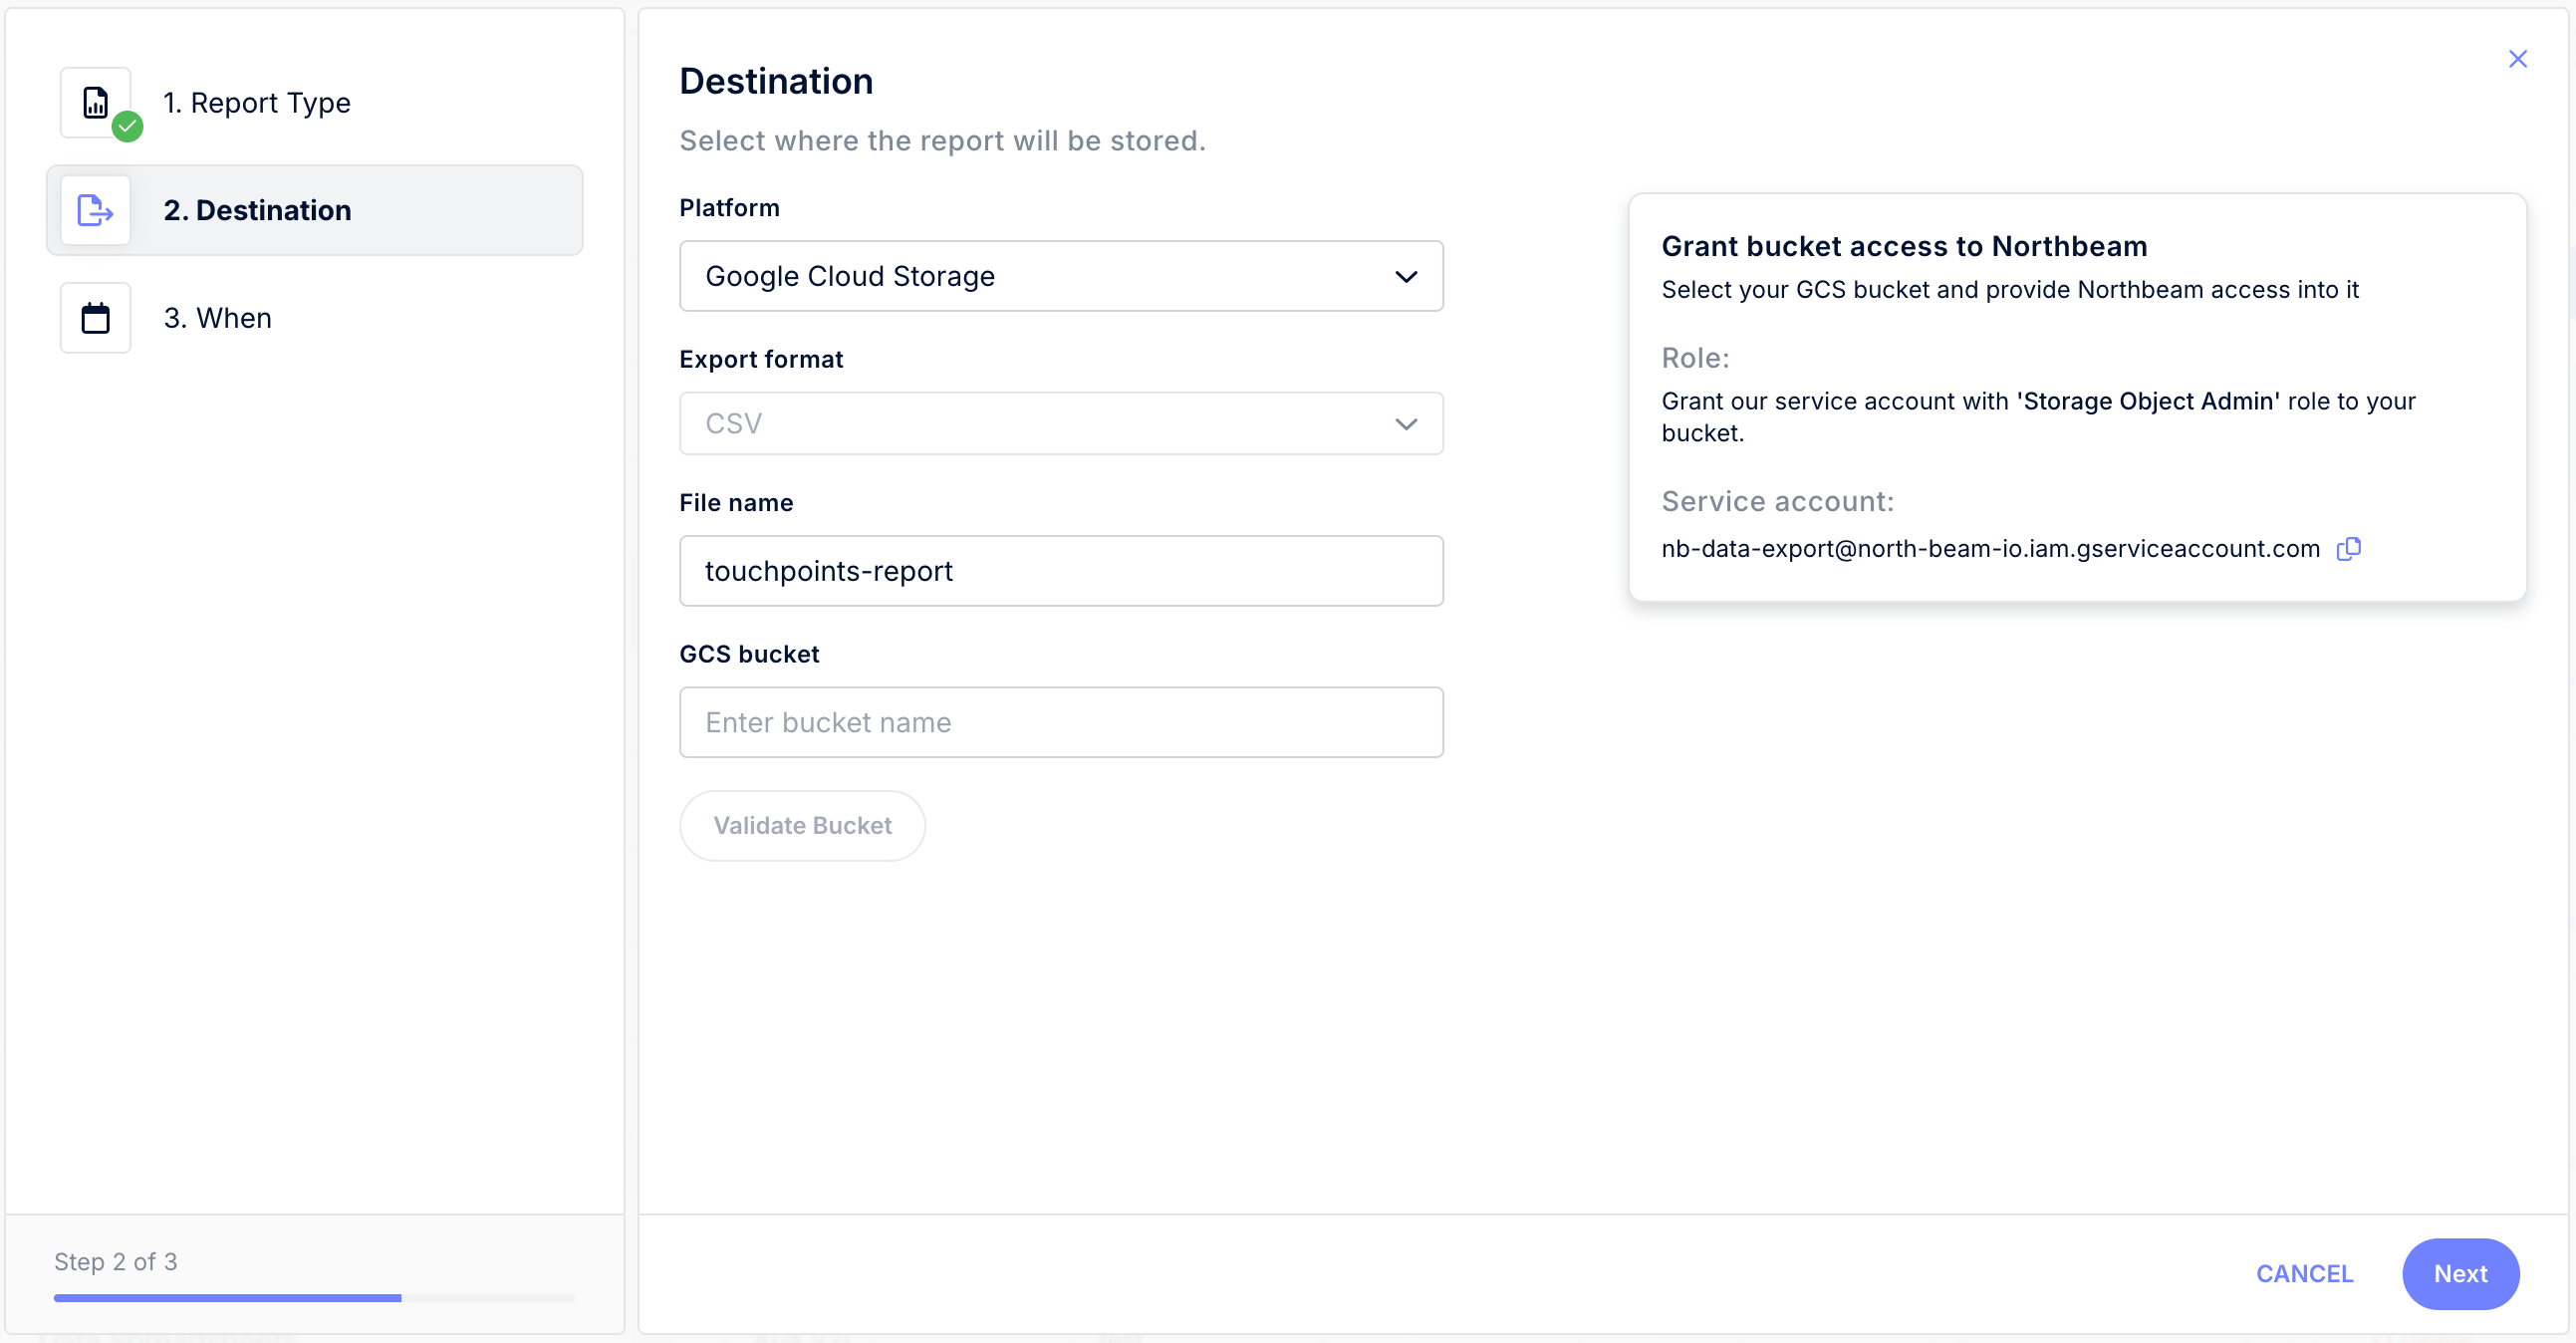
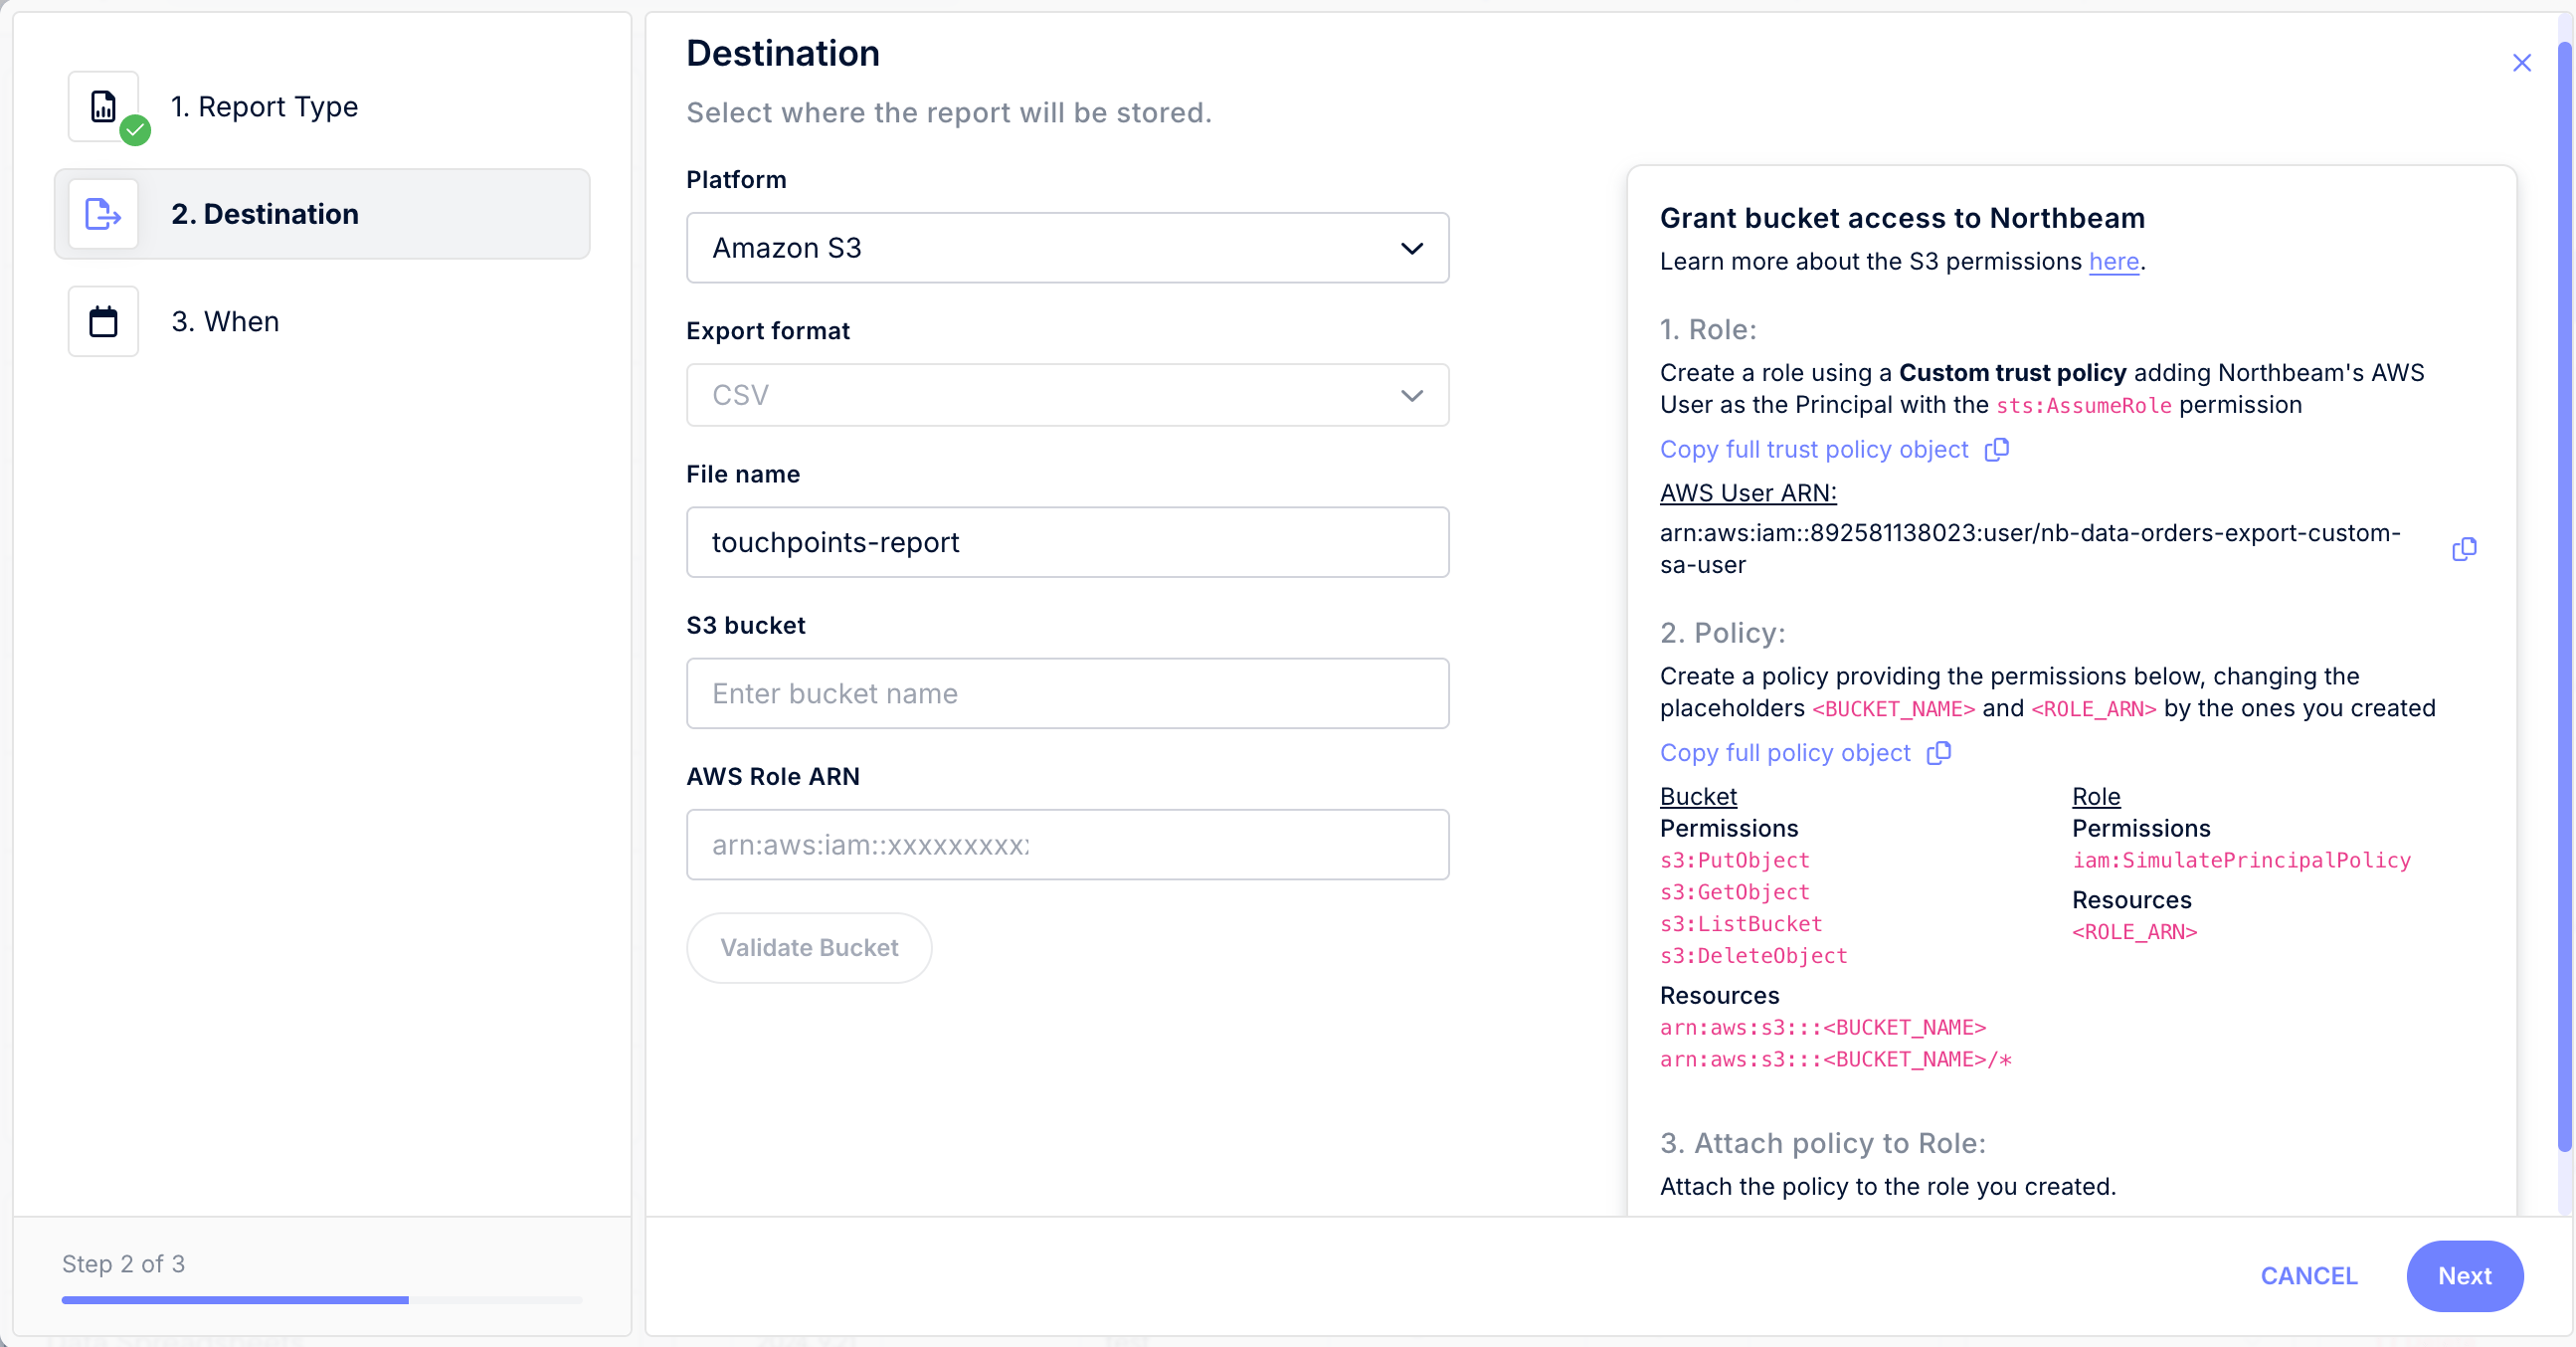
### Step 2: Select Destination
Choose where the export file will be delivered.
**Supported destinations:**
* **Google Cloud Storage (GCS)**
* Grant **Storage Object Admin** to this service account:
`nb-data-export@north-beam-io.iam.gserviceaccount.com`
* **Amazon S3**
* Create a role that allows Northbeam to write to your bucket.
* The export setup UI displays the exact trust policy, role permissions, and Northbeam principal to use — follow those on-screen values rather than copying them from elsewhere in these docs.
All exports are delivered in **CSV format**.
***
### Step 2: Select Destination
Choose where the export file will be delivered.
**Supported destinations:**
* **Google Cloud Storage (GCS)**
* Grant **Storage Object Admin** to this service account:
`nb-data-export@north-beam-io.iam.gserviceaccount.com`
* **Amazon S3**
* Create a role that allows Northbeam to write to your bucket.
* The export setup UI displays the exact trust policy, role permissions, and Northbeam principal to use — follow those on-screen values rather than copying them from elsewhere in these docs.
All exports are delivered in **CSV format**.
 ***
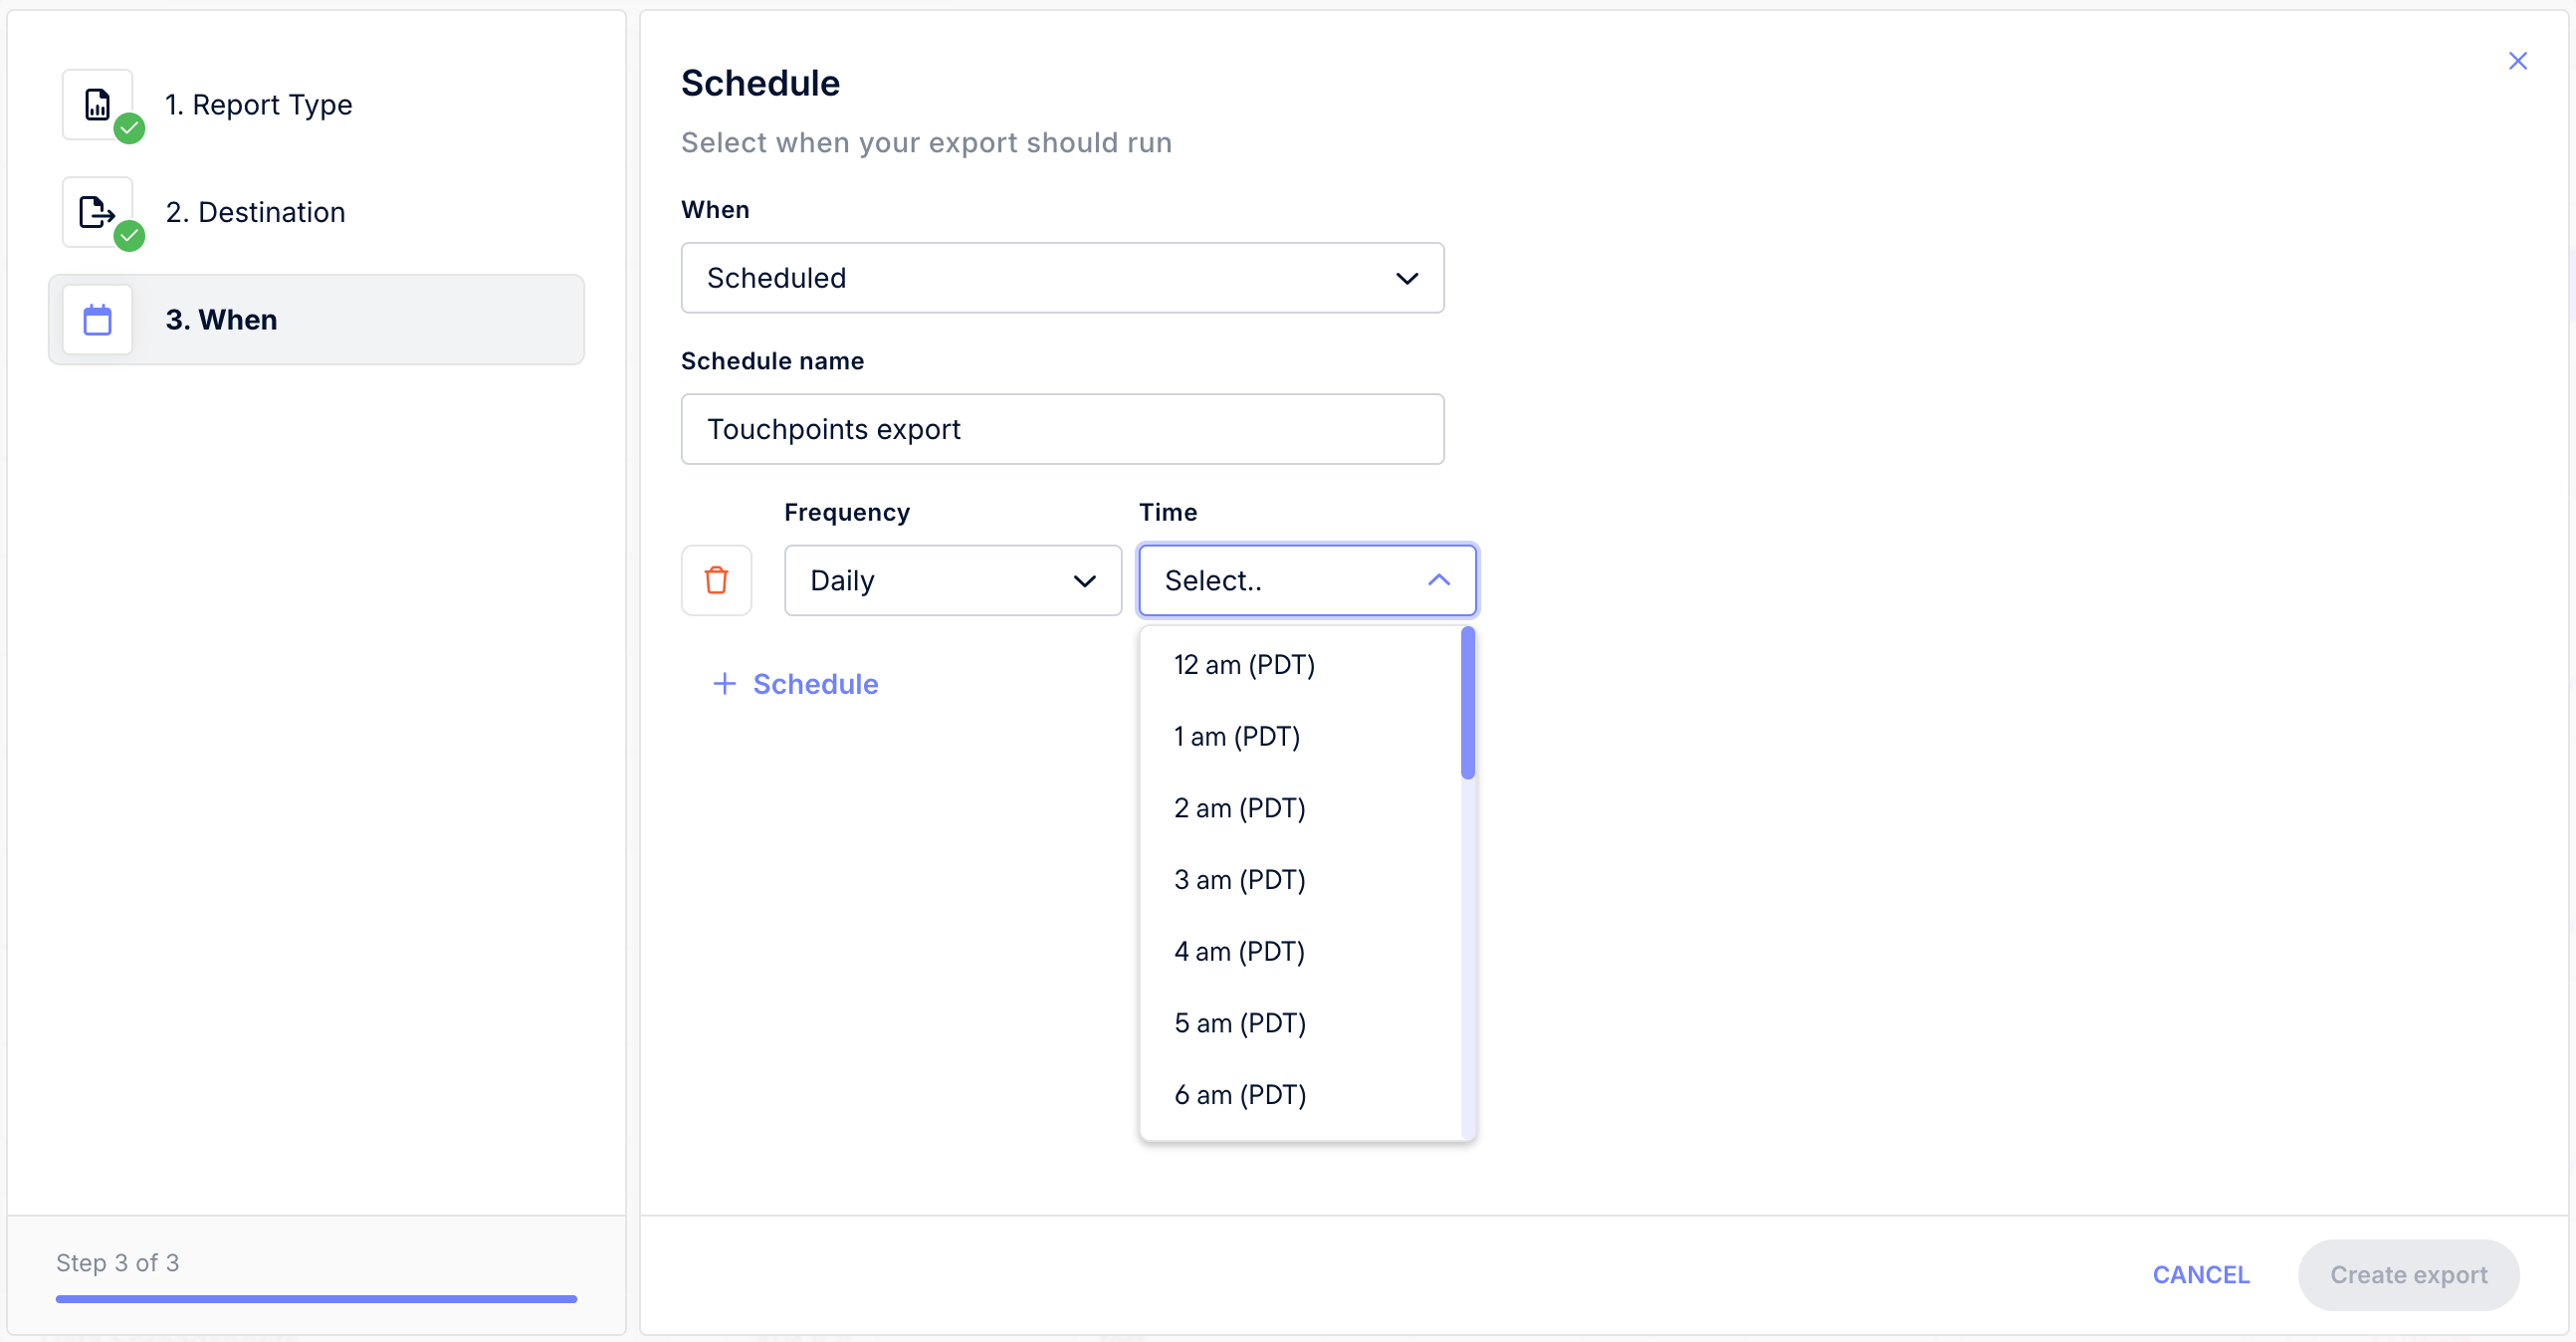
### Step 3: Select Frequency
Choose when your export should run.
You can run exports **once** (one-time) or **on a schedule**:
* **One-time export:** Ideal for historical backfills.
* **Scheduled export:** Choose:
* **Frequency:** Daily, Weekly, or Monthly
* **Time:** Any hour (in your account’s time zone)
This is helpful for seeding your warehouse or rebuilding full historical journeys.
***
### Step 3: Select Frequency
Choose when your export should run.
You can run exports **once** (one-time) or **on a schedule**:
* **One-time export:** Ideal for historical backfills.
* **Scheduled export:** Choose:
* **Frequency:** Daily, Weekly, or Monthly
* **Time:** Any hour (in your account’s time zone)
This is helpful for seeding your warehouse or rebuilding full historical journeys.
 ***
## Available Attribution Models
Touchpoints exports include all **click-based attribution models** available in your account.
* First Touch
* Last Touch
* Last Non-Direct Touch
* Linear
* Clicks-Only
***
## **Touchpoints Export – Field Reference**
| **Field** | **Description** |
| - | - |
| **order\_source** | E-commerce platform where the order was placed (e.g., Shopify, Custom). |
| **order\_number** | Unique identifier for the order. |
| **customer\_id** | Unique ID for the customer who placed the order. |
| **lag\_days** | Number of days between the touchpoint and the purchase. |
| **purchase\_time** | Timestamp when the order was completed. |
| **ad\_interaction\_time** | Timestamp when the ad click occurred. |
| **order\_value** | Total value of the order. |
| **platform** | Ad platform (matches *Platform (Northbeam)* in the dashboard). |
| **category** | Campaign category (matches *Category (Northbeam)* in the dashboard). |
| **campaign\_name** | Campaign name. For non-integrated channels, value in `utm_campaign`. |
| **campaign\_id** | Campaign ID. For non-integrated channels, value in `utm_campaign`. |
| **adset\_name** | Ad set name. For non-integrated channels, value in `utm_term`. |
| **adset\_id** | Ad set ID. For non-integrated channels, value in `utm_term`. |
| **ad\_name** | Ad name. For non-integrated channels, value in `utm_content`. |
| **ad\_id** | Ad ID. For non-integrated channels, value in `utm_content`. |
| **attribution\_model** | Attribution model (e.g., First Touch, Last Touch, LNDT, Linear, Clicks-Only). |
| **transaction\_credit** | Transaction credit assigned to this touchpoint. Will be fractional if the attribution model distributes credit (e.g., Linear or Clicks-Only). |
| **revenue\_credit** | Revenue credit assigned to this touchpoint. Will be fractional if the attribution model distributes credit (e.g., Linear or Clicks-Only). |
***
## FAQs
**What data is included?**
* Each export includes every marketing touchpoint that contributed to an order, along with attribution credit, campaign metadata, and customer identifiers. Each row represents a single touchpoint.
**How often can we export?**
* You can run exports daily, weekly, or monthly — scheduled to start at the top of any hour in your time zone.
**Can we backfill history?**
* Yes! Use a one-time export with custom dates for historical data, or set a rolling window (for example, the last 30 days) to keep things automatically up to date.
**Where do the files go?**
* Exports are delivered to **Google Cloud Storage (GCS)** or **Amazon S3**.
If you use **Snowflake**, just land files in GCS or S3 and move them through your existing data pipeline.
**Who needs access to our GCS bucket?**
* Grant **Storage Object Admin** access to `nb-data-export@north-beam-io.iam.gserviceaccount.com`.
Optionally, you can also add `bqdt-runner@nb-bq-adhoc.iam.gserviceaccount.com`.
**Can I manage exports myself?**
* Yes! You can create, edit, and delete exports anytime from the Data Exports UI or API — no engineering help needed.
**What time zone does the export use?**
* All timestamps (like `purchase_time` and `ad_interaction_time`) follow your Northbeam account’s configured time zone *(Settings > Profile)*.
**Does the export include direct traffic?**
* Yes — direct traffic is included when it’s part of a customer journey. Only orders with *no* touchpoints at all (fully unattributed) are excluded.
**Can I include view-based attribution models?**
* Touchpoints Exports currently include **click-based models only**.
**Can I change the file format?**
* Not right now — all exports are delivered as **CSV files**.
**How large can an export be?**
* Exports could include millions of rows depending on your order volume. If you’re working with very large data sets, it’s best to use shorter date ranges and schedule recurring exports instead of one big pull.
**Can I filter by platform or campaign before exporting?**
* Exports include all touchpoints for your selected date range, regardless of platform or campaign. You can still filter or segment by platform, campaign, or other fields directly in the CSV once it’s delivered.
**How can I check if my export ran successfully?**
* You can track export status under **Settings → Manage Exports**.
***
## Available Attribution Models
Touchpoints exports include all **click-based attribution models** available in your account.
* First Touch
* Last Touch
* Last Non-Direct Touch
* Linear
* Clicks-Only
***
## **Touchpoints Export – Field Reference**
| **Field** | **Description** |
| - | - |
| **order\_source** | E-commerce platform where the order was placed (e.g., Shopify, Custom). |
| **order\_number** | Unique identifier for the order. |
| **customer\_id** | Unique ID for the customer who placed the order. |
| **lag\_days** | Number of days between the touchpoint and the purchase. |
| **purchase\_time** | Timestamp when the order was completed. |
| **ad\_interaction\_time** | Timestamp when the ad click occurred. |
| **order\_value** | Total value of the order. |
| **platform** | Ad platform (matches *Platform (Northbeam)* in the dashboard). |
| **category** | Campaign category (matches *Category (Northbeam)* in the dashboard). |
| **campaign\_name** | Campaign name. For non-integrated channels, value in `utm_campaign`. |
| **campaign\_id** | Campaign ID. For non-integrated channels, value in `utm_campaign`. |
| **adset\_name** | Ad set name. For non-integrated channels, value in `utm_term`. |
| **adset\_id** | Ad set ID. For non-integrated channels, value in `utm_term`. |
| **ad\_name** | Ad name. For non-integrated channels, value in `utm_content`. |
| **ad\_id** | Ad ID. For non-integrated channels, value in `utm_content`. |
| **attribution\_model** | Attribution model (e.g., First Touch, Last Touch, LNDT, Linear, Clicks-Only). |
| **transaction\_credit** | Transaction credit assigned to this touchpoint. Will be fractional if the attribution model distributes credit (e.g., Linear or Clicks-Only). |
| **revenue\_credit** | Revenue credit assigned to this touchpoint. Will be fractional if the attribution model distributes credit (e.g., Linear or Clicks-Only). |
***
## FAQs
**What data is included?**
* Each export includes every marketing touchpoint that contributed to an order, along with attribution credit, campaign metadata, and customer identifiers. Each row represents a single touchpoint.
**How often can we export?**
* You can run exports daily, weekly, or monthly — scheduled to start at the top of any hour in your time zone.
**Can we backfill history?**
* Yes! Use a one-time export with custom dates for historical data, or set a rolling window (for example, the last 30 days) to keep things automatically up to date.
**Where do the files go?**
* Exports are delivered to **Google Cloud Storage (GCS)** or **Amazon S3**.
If you use **Snowflake**, just land files in GCS or S3 and move them through your existing data pipeline.
**Who needs access to our GCS bucket?**
* Grant **Storage Object Admin** access to `nb-data-export@north-beam-io.iam.gserviceaccount.com`.
Optionally, you can also add `bqdt-runner@nb-bq-adhoc.iam.gserviceaccount.com`.
**Can I manage exports myself?**
* Yes! You can create, edit, and delete exports anytime from the Data Exports UI or API — no engineering help needed.
**What time zone does the export use?**
* All timestamps (like `purchase_time` and `ad_interaction_time`) follow your Northbeam account’s configured time zone *(Settings > Profile)*.
**Does the export include direct traffic?**
* Yes — direct traffic is included when it’s part of a customer journey. Only orders with *no* touchpoints at all (fully unattributed) are excluded.
**Can I include view-based attribution models?**
* Touchpoints Exports currently include **click-based models only**.
**Can I change the file format?**
* Not right now — all exports are delivered as **CSV files**.
**How large can an export be?**
* Exports could include millions of rows depending on your order volume. If you’re working with very large data sets, it’s best to use shorter date ranges and schedule recurring exports instead of one big pull.
**Can I filter by platform or campaign before exporting?**
* Exports include all touchpoints for your selected date range, regardless of platform or campaign. You can still filter or segment by platform, campaign, or other fields directly in the CSV once it’s delivered.
**How can I check if my export ran successfully?**
* You can track export status under **Settings → Manage Exports**.