> ## Documentation Index
> Fetch the complete documentation index at: https://docs.northbeam.io/llms.txt
> Use this file to discover all available pages before exploring further.
# Shopify
> Set up Northbeam tracking on a store that uses Shopify's checkout.
Use this guide if your store uses **Shopify's checkout**. If it doesn't, follow the [Custom](/docs/non-shopify-installation) guide.
**Headless storefront?** Use this guide too. Only [step 1](#1-install-the-northbeam-pixel-and-metadata-script) is different. Pick the **Headless storefront** tab there. Steps 2 to 5 are the same, because checkout still runs on Shopify.
## What you'll set up
| Step | What it tracks | Needed? |
| :- | :- | :- |
| [1. Add the pixel to your storefront](#1-install-the-northbeam-pixel-and-metadata-script) | Visits and page views on your storefront | **Required**. Headless stores: use the Headless tab. |
| [2. Add the Custom Pixel](#2-set-up-the-northbeam-custom-pixel) | Checkout pages and purchases | **Required** |
| [3. Turn on the App Pixel](#3-set-the-northbeam-app-pixel-to-always-on) | Data from Northbeam's Shopify app | **Required** |
| [4. Add the post-purchase script](#4-add-post-purchase-tracking-optional) | Post-purchase upsell pages | Only if you use a post-purchase upsell |
| [5. Let Northbeam know](#5-let-northbeam-know) | We finish your setup | **Required** |
## Before you start
* **Connect Shopify to Northbeam.** Step 3 needs it. If you haven't yet, follow the [Shopify Order Sync guide](/docs/shopify-order-sync) first.
* **Open your scripts.** Go to [Settings → Northbeam Pixel and Event Tracking](https://dashboard.northbeam.io/settings/tracking-script-tags). Every script in this guide is there, already filled in with your Client ID:
| Script in your dashboard | Where it goes | Step |
| :- | :- | :- |
| **Northbeam Pixel** | `` of your storefront | [1](#1-install-the-northbeam-pixel-and-metadata-script) |
| **Metadata Script** | `` of your storefront, above the pixel | [1](#1-install-the-northbeam-pixel-and-metadata-script) |
| **firePurchaseEvent** | Shopify **Customer events** (as a Custom Pixel) | [2](#2-set-up-the-northbeam-custom-pixel) |
| **Post-purchase upsell page** | Shopify **Settings → Checkout**. Optional. | [4](#4-add-post-purchase-tracking-optional) |
***
## 1. Install the Northbeam Pixel and Metadata Script
These scripts run on every page of your storefront. The **Northbeam Pixel** records visits, where visitors came from, and the pages they view. The **Metadata Script** records your store's region and currency.
Where they go depends on your storefront:
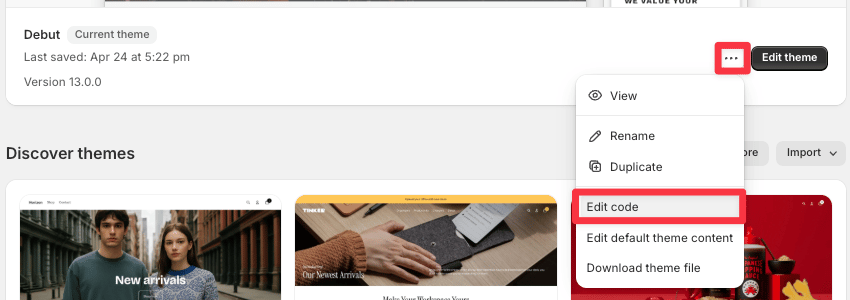
In Shopify, go to **Online Store → Themes**. Click **⋮ → Edit code**.
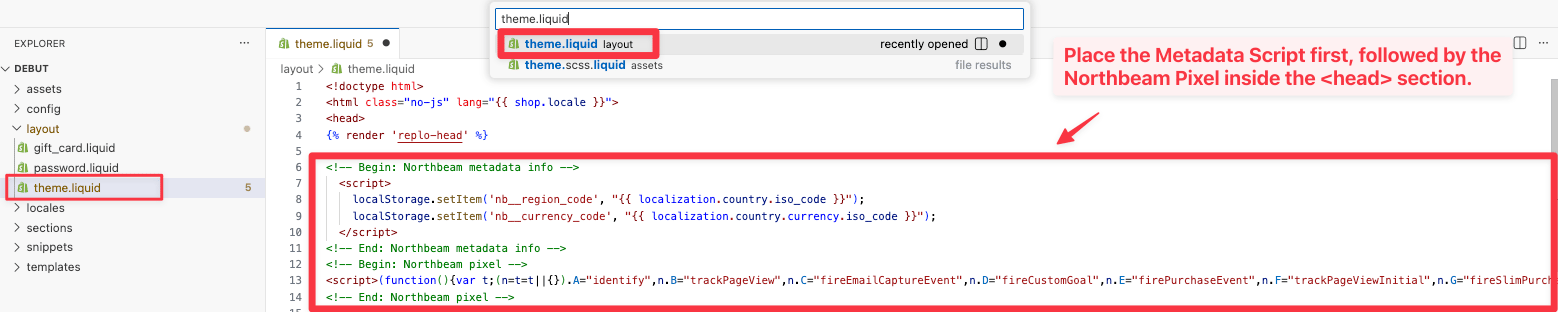
 Open **Layout → theme.liquid** and find the `` section. Paste the **Metadata Script** first, then the **Northbeam Pixel** directly below it.
 Click **Save**.
A headless storefront doesn't use `theme.liquid`. Add the scripts to your storefront's own code instead.
Add the **Metadata Script** first, then the **Northbeam Pixel** directly below it, in the `` of every page on your storefront. You can do this in your site's code or through Google Tag Manager. See [Custom, step 1](/docs/non-shopify-installation#1-install-the-northbeam-pixel) for how.
Deploy your storefront, or publish your Google Tag Manager container.
**Is your storefront a single-page app?** Some headless storefronts change pages without a full reload (for example, Hydrogen). If yours does, the pixel only records the first page view. Also set up [Page View Events](/docs/page-view-events) to track the rest.
Not sure? Ask your developer. Many headless storefronts aren't single-page apps and don't need this.
Steps 2 to 5 below are the same for headless stores, because checkout still runs on Shopify.
***
## 2. Set up the Northbeam Custom Pixel
Shopify's checkout doesn't run your theme, so the pixel from step 1 can't see it. The Custom Pixel covers checkout instead. It records the checkout pages customers view and **tracks completed purchases** using Shopify's `checkout_completed` event.
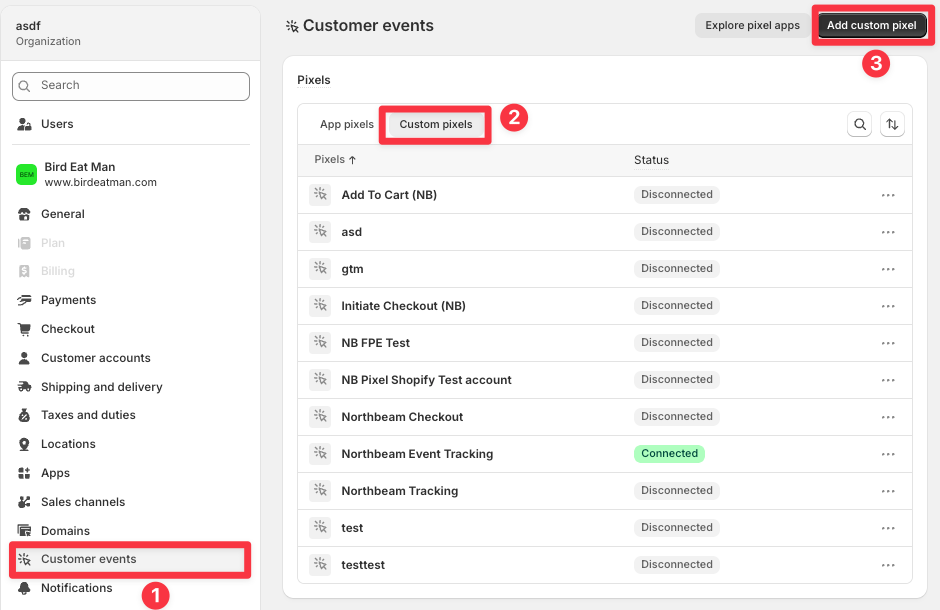
In Shopify, go to **Settings → Customer events**. Open the **Custom pixels** tab and click **Add custom pixel**.
Click **Save**.
A headless storefront doesn't use `theme.liquid`. Add the scripts to your storefront's own code instead.
Add the **Metadata Script** first, then the **Northbeam Pixel** directly below it, in the `` of every page on your storefront. You can do this in your site's code or through Google Tag Manager. See [Custom, step 1](/docs/non-shopify-installation#1-install-the-northbeam-pixel) for how.
Deploy your storefront, or publish your Google Tag Manager container.
**Is your storefront a single-page app?** Some headless storefronts change pages without a full reload (for example, Hydrogen). If yours does, the pixel only records the first page view. Also set up [Page View Events](/docs/page-view-events) to track the rest.
Not sure? Ask your developer. Many headless storefronts aren't single-page apps and don't need this.
Steps 2 to 5 below are the same for headless stores, because checkout still runs on Shopify.
***
## 2. Set up the Northbeam Custom Pixel
Shopify's checkout doesn't run your theme, so the pixel from step 1 can't see it. The Custom Pixel covers checkout instead. It records the checkout pages customers view and **tracks completed purchases** using Shopify's `checkout_completed` event.
In Shopify, go to **Settings → Customer events**. Open the **Custom pixels** tab and click **Add custom pixel**.
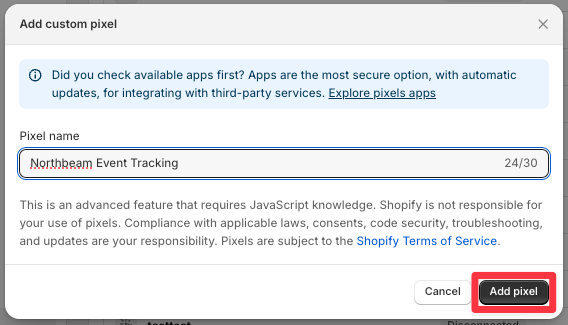
 Name the pixel **Northbeam Event Tracking**, then click **Add pixel**.
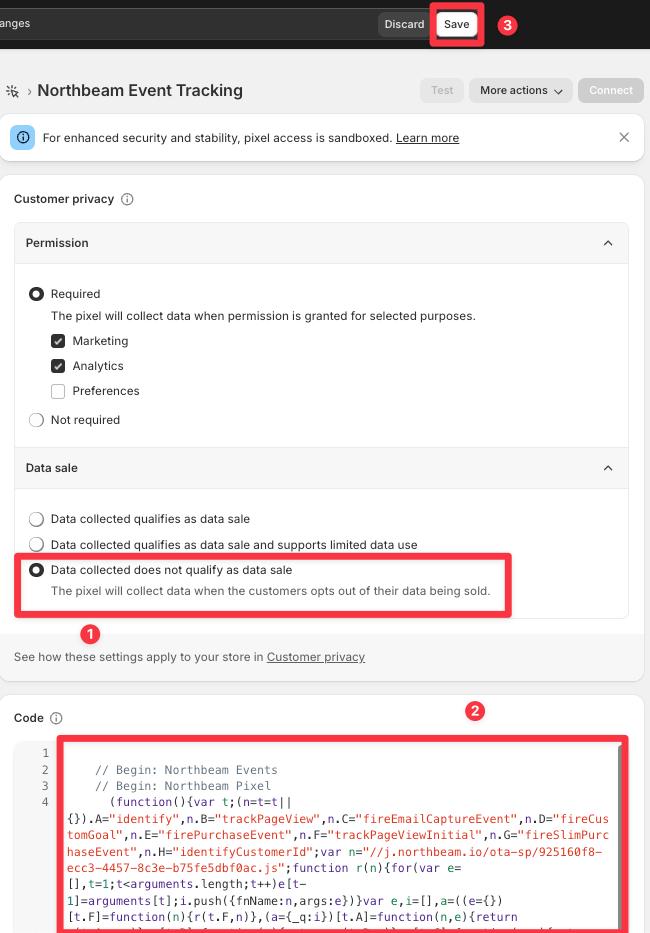
 Set **Permission** to **Data collected does not qualify as data sale**. Paste the **firePurchaseEvent** script from Northbeam into the code editor, then click **Save**.
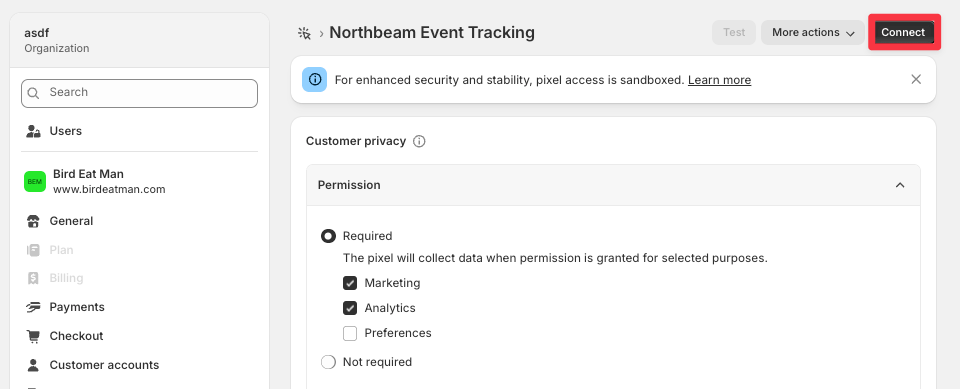
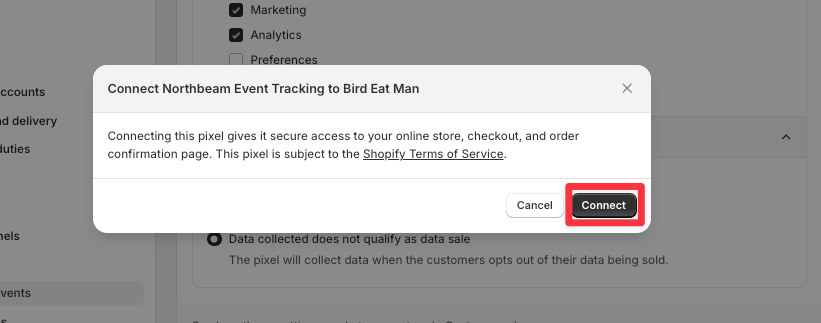
 Click **Connect**, then click **Connect** again to confirm.
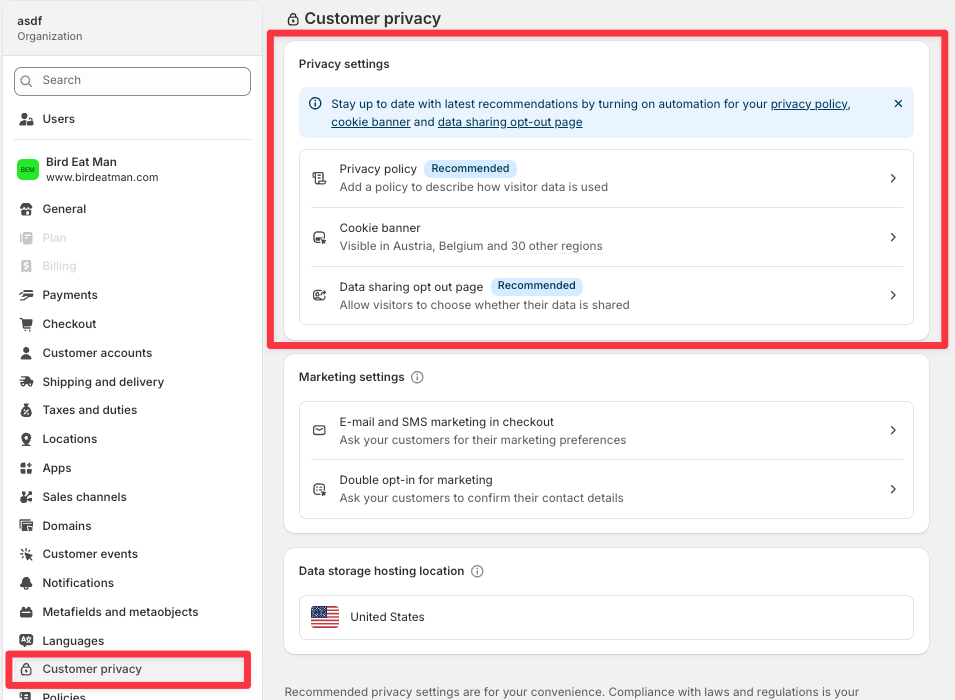
 Go to **Settings → Customer privacy** and confirm a cookie consent banner is turned on. Without one, customers can't opt in to tracking, and the Custom Pixel may not run.
 ***
## 3. Set the Northbeam App Pixel to Always on
The App Pixel was added to Shopify automatically when you connected your store. You don't need to create it or paste anything. Just change one setting.
In Shopify, go to **Settings → Customer events** and open the **App pixels** tab. Click **Northbeam**.
***
## 3. Set the Northbeam App Pixel to Always on
The App Pixel was added to Shopify automatically when you connected your store. You don't need to create it or paste anything. Just change one setting.
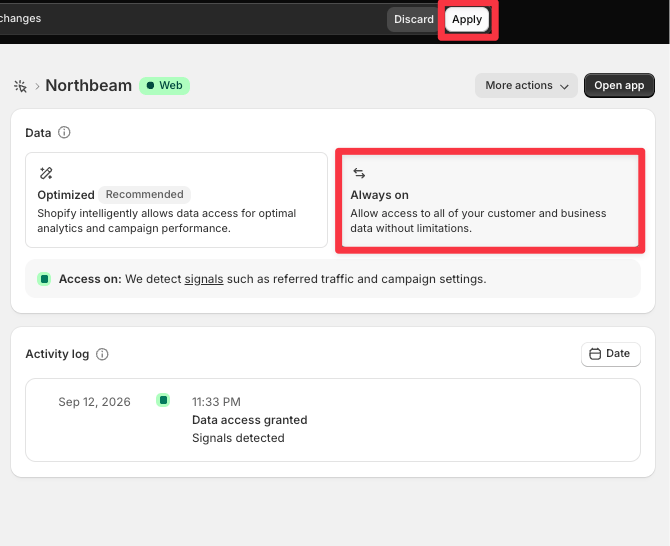
In Shopify, go to **Settings → Customer events** and open the **App pixels** tab. Click **Northbeam**.
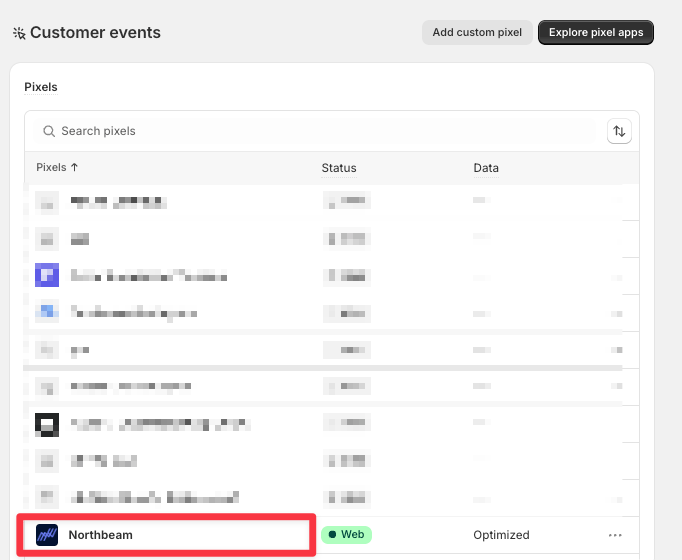 Select **Always on**, then click **Apply**.
 **Don't see Northbeam under App pixels?** Your store isn't connected yet. Follow the [Shopify Order Sync guide](/docs/shopify-order-sync).
***
## 4. Add post-purchase tracking (optional)
**Skip this step** unless your store shows a post-purchase upsell page after checkout. This script lets Northbeam attribute those extra purchases.
In Shopify, go to **Settings → Checkout**.
**Don't see Northbeam under App pixels?** Your store isn't connected yet. Follow the [Shopify Order Sync guide](/docs/shopify-order-sync).
***
## 4. Add post-purchase tracking (optional)
**Skip this step** unless your store shows a post-purchase upsell page after checkout. This script lets Northbeam attribute those extra purchases.
In Shopify, go to **Settings → Checkout**.
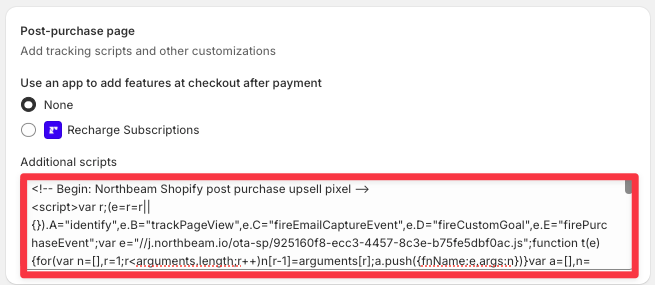
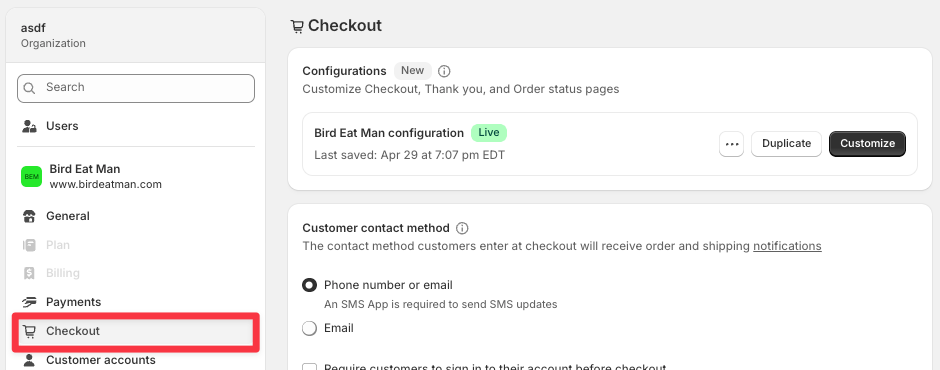 Scroll to **Post-purchase page**. Paste the Northbeam post-purchase script into **Additional scripts**, then click **Save**.
 ***
## 5. Let Northbeam know
When your scripts are installed, [submit a support ticket](https://www.northbeam.io/submit-a-support-ticket) to tell our team. We'll finish your setup so page views are tracked correctly.
**Don't skip this step.** If we don't hear from you, page view tracking may be incorrect. Page views are the foundation of Northbeam's tracking, so attribution can be incomplete without them.
***
## Test your setup
Check that you have:
* The **Metadata Script** and **Northbeam Pixel** in the `` of your storefront, in that order (in `theme.liquid` for standard themes)
* The **Northbeam Custom Pixel** connected under **Customer events → Custom pixels**
* The **Northbeam App Pixel** set to **Always on** under **Customer events → App pixels**
* The **post-purchase script** in your checkout settings (only if you use a post-purchase upsell)
Then [test that the pixel is firing](/docs/add-pixel#how-to-test-for-the-northbeam-pixel).
## Optional tracking
Add these only if they apply to your store.
Track other actions, like sign-ups, add-to-carts, or form submissions.
Only for headless storefronts that are single-page apps (for example, Hydrogen). Most stores don't need this.
## FAQ
After setup, you'll see **two Northbeam entries** under **Settings → Customer events**. This is expected. They're not duplicates, and **you need both**.
| Pixel | Where it appears | How it's added |
| :- | :- | :- |
| **Custom Pixel** | Customer events → **Custom pixels** | You create it in step 2 |
| **App Pixel** | Customer events → **App pixels** | Added automatically when you connect Shopify |
Don't delete either one.
Check both tabs under **Settings → Customer events**.
* **Custom Pixel missing:** complete [step 2](#2-set-up-the-northbeam-custom-pixel).
* **App Pixel missing:** connect your store using the [Shopify Order Sync guide](/docs/shopify-order-sync).
For example, an external order management system sends your orders to Northbeam through the [Orders API](/docs/orders-api) instead of the Shopify connector. Follow this guide as normal, but change one line in the Custom Pixel. See [Shopify + Custom](/docs/shopify-custom-backend).
**Standard Shopify themes:** no. Install the scripts directly in Shopify using the steps above.
**Headless storefronts:** you can add the Northbeam Pixel to your storefront through Google Tag Manager (see the Headless tab in step 1). Steps 2 to 4 are always done in Shopify.
***
## 5. Let Northbeam know
When your scripts are installed, [submit a support ticket](https://www.northbeam.io/submit-a-support-ticket) to tell our team. We'll finish your setup so page views are tracked correctly.
**Don't skip this step.** If we don't hear from you, page view tracking may be incorrect. Page views are the foundation of Northbeam's tracking, so attribution can be incomplete without them.
***
## Test your setup
Check that you have:
* The **Metadata Script** and **Northbeam Pixel** in the `` of your storefront, in that order (in `theme.liquid` for standard themes)
* The **Northbeam Custom Pixel** connected under **Customer events → Custom pixels**
* The **Northbeam App Pixel** set to **Always on** under **Customer events → App pixels**
* The **post-purchase script** in your checkout settings (only if you use a post-purchase upsell)
Then [test that the pixel is firing](/docs/add-pixel#how-to-test-for-the-northbeam-pixel).
## Optional tracking
Add these only if they apply to your store.
Track other actions, like sign-ups, add-to-carts, or form submissions.
Only for headless storefronts that are single-page apps (for example, Hydrogen). Most stores don't need this.
## FAQ
After setup, you'll see **two Northbeam entries** under **Settings → Customer events**. This is expected. They're not duplicates, and **you need both**.
| Pixel | Where it appears | How it's added |
| :- | :- | :- |
| **Custom Pixel** | Customer events → **Custom pixels** | You create it in step 2 |
| **App Pixel** | Customer events → **App pixels** | Added automatically when you connect Shopify |
Don't delete either one.
Check both tabs under **Settings → Customer events**.
* **Custom Pixel missing:** complete [step 2](#2-set-up-the-northbeam-custom-pixel).
* **App Pixel missing:** connect your store using the [Shopify Order Sync guide](/docs/shopify-order-sync).
For example, an external order management system sends your orders to Northbeam through the [Orders API](/docs/orders-api) instead of the Shopify connector. Follow this guide as normal, but change one line in the Custom Pixel. See [Shopify + Custom](/docs/shopify-custom-backend).
**Standard Shopify themes:** no. Install the scripts directly in Shopify using the steps above.
**Headless storefronts:** you can add the Northbeam Pixel to your storefront through Google Tag Manager (see the Headless tab in step 1). Steps 2 to 4 are always done in Shopify.