> ## Documentation Index
> Fetch the complete documentation index at: https://docs.northbeam.io/llms.txt
> Use this file to discover all available pages before exploring further.
# Set up a Meta Custom Attribution Campaign
> Get started with Meta's Custom Attribution using Northbeam Apex.
Once Meta's readiness indicator shows **High** (approximately 10 days after setup), you can run a Custom Attribution campaign. This is the Meta-side optimization layer — the step that actually puts Apex data to work in your ad delivery.
### Custom Attribution is currently in beta.
Reach out to your Customer Success Manager or [Support Team](https://www.northbeam.io/submit-a-support-ticket) if you're not sure whether you're on the list or want to be added ahead of the broader rollout planned for **August 2026**.
If your Apex connection is set up, your data is already flowing and training Meta's model — you'll be ready to launch as soon as access opens up.
### What you'll see in Events Manager
After Apex setup completes, a new Custom Attribution signal will appear under your Purchase event in Events Manager within 48 hours.
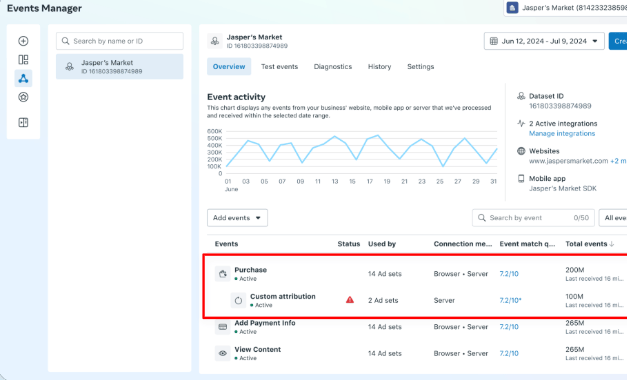
A few things to know about it:
* **Isolated signal** - The Custom Attribution signal is fully isolated from your standard Purchase event. Behind the scenes it is not even a Purchase event — it's an AppendAttribution event. You do not need to worry about deduplication with Elevar, your existing CAPI, or any other standard Meta events.
* **No EMQ impact** - This event does not affect Event Match Quality. EMQ is built for a different use case.
* **Data quality issues** will be surfaced in both Events Manager and Ads Manager. If they arise, Northbeam will work with Meta to resolve them.
* **Export data.** Events Manager has an export function that lets you download the raw signal Northbeam is sending at the ad-set level. Note: this may differ slightly from your Northbeam dashboard due to data delays.
### Eligibility requirements
To use Custom Attribution in Ads Manager, your account must:
* Be running Sales-objective campaigns optimizing for Purchase events
* Use **Highest volume** or **Highest value** bid strategy (autobid only)
* Have at least **\~50 Northbeam-attributed orders per day** at the account level, based on your selected **North Star settings**, for best results. The technical minimum is 10 events in 7 days, but model performance improves significantly at higher volume.
* For example, if your North Star is set to 1-day Clicks-Only, Blended Revenue, Accrual accounting, the account should have roughly 50 orders per day under that same Northbeam view.
* Have website or website + app as the conversion destination
**Not compatible with:** Value Rules, non-autobid bid strategies.
### Campaign setup
In Ads Manager, create a new (or duplicate an existing) Sales-objective campaign. At the ad-set level, you'll configure:
1. **Conversion location** — Website (or Website + App)
2. **Performance goal** — Maximize number of conversions or Maximize ROAS
3. **Dataset** — select the pixel configured for Apex (it will show a green indicator when ready)
4. **Conversion event** — Purchase
5. **Attribution model** — select **Custom**
6. **Custom attribution source** — select the Custom Attribution Source (CAS) you would like to use for the ad set. **Your CAS MUST match the pixel you are using for the ad set.**
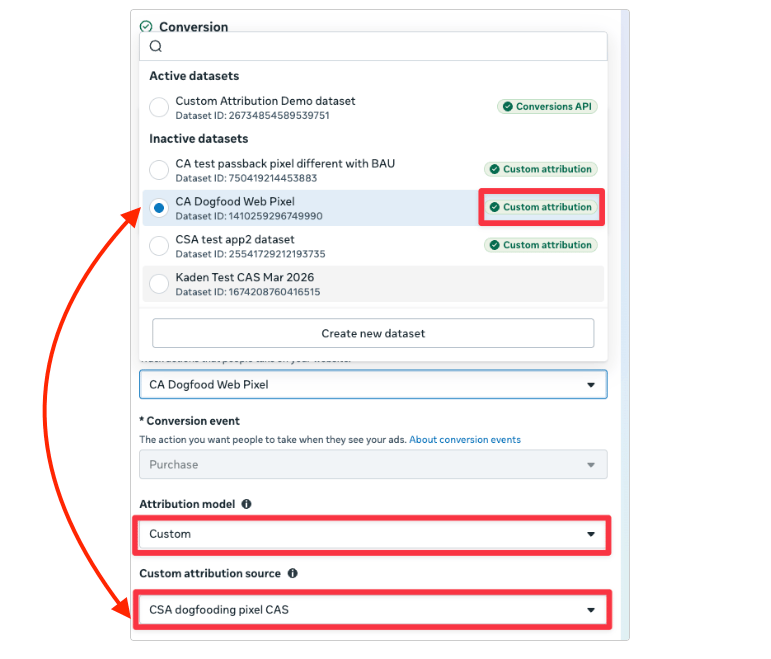
Custom Attribution is configured at the **ad-set level** — the same level as Incremental Attribution. The two are mutually exclusive on the same ad set, though both can exist within the same campaign.
**Change one variable at a time.** The only thing you're changing in this test is the attribution model. Keep everything else identical to your BAU setup:
* **Performance goal** — use whatever you normally run. Don't switch goals alongside Apex or the test won't be clean. Note: even if your primary KPI is ROAS, Maximize Conversions sometimes drives better ROAS in practice — stick with what you use today.
* **Audience targeting** — keep your existing inclusion, exclusion, and lookalike audiences. Setting "new customers" as your North Star in Northbeam does not automatically make Meta target new customers — you still need the appropriate exclusion audiences in the campaign itself.
### Reporting
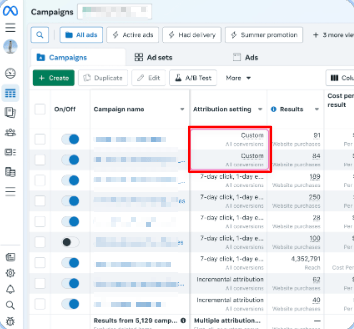
The Results column in Ads Manager for Custom Attribution campaigns reflects Northbeam-provided credit and value at the ad ID level — not Meta's standard attribution.
* **Use Northbeam as your source of truth.** Custom, Standard, and Incremental attribution in Ads Manager each use a completely different counting mechanism — comparing them there is apples-to-oranges. In Northbeam, they're all apples — always compare there.
* **48-hour reporting lag.** Custom Attribution conversions appear in Northbeam immediately but show as `–` in Ads Manager for the first 48 hours. Use **Compare Attribution Settings** to view Meta standard attribution alongside Custom during that window.
* **Don't compare against your account average.** The channel average mixes campaigns at different stages, budgets, and optimization histories — it's a noisy baseline that will make results look worse than they are.
## Running the A/B test
### Set up the experiment before launching campaigns
Create the A/B test in Experiments **before** launching the BAU or Apex campaigns. Adding live campaigns later can create audience overlap and weaken the test.
Use Meta's **Experiments** tool to compare your Custom Attribution campaign against your BAU campaign.
### A/B test setup
* In **Experiments**, click **Create an A/B test**.
* Select the campaigns you want to compare:
* **Campaign A:** Select your Custom Attribution campaign. This is the test campaign.
* **Campaign B:** Select your BAU campaign. This is the control campaign.
* For more complex tests, such as a 3-cell test, add additional campaigns as needed.
* Set the test dates:
* **Start date:** One day before the campaign starts.
* **End date:** One day after the campaign ends.
* Turn off **End test early if a winner is found** so the test runs for the full scheduled period.
* Give the test a clear name, such as `Custom Attribution vs BAU - Q3 2026`.
* Select **Cost per purchase** as the key metric for determining the winner.
* Add other business-specific KPIs if needed.
* Click **Review test details** and confirm the campaigns, dates, and metrics are correct.
* Click **Create a test** to start the experiment.
* Use your own source of truth to determine the final campaign winner.
### In-Flight Best Practices
* Avoid changing creative, audiences, or budgets during the test. If a change is required, make the same change in both cells.
* Check for issues, such as duplicate events, that could affect results.
* Avoid similar ads outside the test that target the same audience.
* Keep each campaign in only one test cell.
* Aim for at least **\$5K in spend per cell** and a **10K+ holdout** for more reliable results.
### After a successful test: scaling
* **Recommended:** Run a 50/50 account-level A/B test to scale with confidence.
* **Minimum:** Move at least **20% of budget to Custom Attribution for at least two weeks** before drawing conclusions.
### Avoid running Custom Attribution at a very small budget share (1–3%).
The model learns from the traffic it generates — at low budget it doesn't get enough signal to improve, results will be misleading, and you'll underrealize the gains even if the A/B test already showed it wins.
***
Please reach out to your Customer Success Manager, Media Strategist, or [Support](https://www.northbeam.io/submit-a-support-ticket) if you have any questions.