> ## Documentation Index
> Fetch the complete documentation index at: https://docs.northbeam.io/llms.txt
> Use this file to discover all available pages before exploring further.
# Non-Integrated Channel Setup: Spend API + UTMs
### Overview
For platforms with native integrations (e.g., Meta, Adwords, TikTok, Pinterest, Snapchat), Northbeam fetches all your Campaign, Adset, and Ad data through our Standard API integration and reports it in your dashboard. We ingest all your metadata (e.g., Campaign, Adset, Ad IDs) to tie those sessions back to the ad that drove it — along with any conversions that occurred in that session.
But if you're using channels without a native integration — like Affiliates, Podcasts, Newsletters, Influencers, or Email — you can still achieve the same accurate, campaign-level reporting in Northbeam. It just takes a little extra setup.
***
### Expectation Setting
* **No view-through conversions** — only click-based models will be available (First Touch, Last Touch, LNDT, Clicks-Only)
***
### This is a 3-Step Process
1. **Send us your spend data** using the **Spend API**
2. **Attach UTM parameters** on your ad links that match the spend data
3. **Create a custom label in Northbeam to align the spend and revenue data**
This guide walks you through each of those steps.
***
## Step 1: Setting Up the Spend API
#### 1A: What is the Spend API?
The **Spend API** is how you **automatically send daily ad spend** to Northbeam from platforms we don’t connect with directly.
It lets you **send your own ad spend data** from your internal database (or your client’s) into Northbeam. It’s most commonly used for:
* Podcasts
* Newsletters
* Influencer campaigns
* Affiliate or email programs
* Any non-integrated channel
### Important Note!
This is *not* a plug-and-play integration. It’s an API endpoint — you’ll need a **developer** to set up automated POST requests that deliver your spend data.
***
#### 1B: How Do I Set Up The Spend API?
**Important Links:**
* [Spend API Docs](/reference/post_spend)
* Endpoint: `https://api.northbeam.io/v1/spend`
**Required Credentials** (find these under [API Keys](https://dashboard.northbeam.io/settings/api-keys) in the Northbeam dashboard):
* API Key
* Client ID

Settings > API keys
***
#### 1C: Required Fields in Your Payload
Each spend record must include the following fields:
* `date`
* `platform_name`
* `campaign_id`
* `campaign_name`
* `spend`
* `spend_currency`
### Impression and Clicks
Do *not* send `impressions` or `clicks`. These fields are reserved for future use and currently ignored.
***
#### 1D: Structuring `campaign_name`
If your goal is to measure performance beyond just the platform level — like **campaign-level**, **influencer-level**, or any custom grouping — then `campaign_name` is essential.
**It’s important to use the same values in `campaign_name` and `utm_campaign` (Step 2).**
This is how Northbeam ties your **spend** (via the Spend API) to your **traffic and conversions** (via UTMs).
The labels (Step 3) will match the spend and revenue by linking…
`campaign_name` from your Spend API payload
to
`utm_campaign` from your UTM parameters
***
#### 1E: What Values Should I Use?
You can technically use any values for `campaign_name`, but we **strongly recommend using a clean numeric ID** like `12345`.
##### Why Numeric Values Are Better Than Names
Using human-readable names like `Spring_Sale_2025` might feel more intuitive, but they often include **special characters** like spaces, `%`, `$`, or `#`.
When used in URLs (UTMs), those characters get **automatically encoded**, which creates mismatches — even if the values look visually similar.
For instance, a campaign named Holiday Sale \$50 CPA might be encoded as:\
utm\_campaign=holiday%20sale%20%2450%20cpa
This leads to:
* Broken label rules
* Unmerged Spend + Revenue rows — making it very challenging to see any metric that includes revenue and spend (ex. CAC, ROAS, etc.) at the campaign-level in the dashboard.
Our priority is clean, reliable data. While numeric IDs might not be the most user-friendly naming convention, they ensure your spend and revenue merge correctly — which is far more valuable than a broken report. That said, it’s ultimately your call.
**Example Payload Schema**
```json theme={null}
[
{
"date": "2025-07-20",
"platform_name": "email_marketing",
"campaign_id": "12345",
"campaign_name": "12345",
"spend": 135.50,
"spend_currency": "USD"
}
]
```
***
### 1F: Spend API Responses
| Status Code | Meaning |
| - | - |
| **201** | ✅ The spend records were successfully upserted. |
| **401** | ❌ Authentication failed (API key or Client ID is missing/incorrect). |
| **422** | ❌ Invalid request body — required fields may be missing or misformatted. |
| **4XX** | ❌ A generic client-side error occurred. |
| **5XX** | ❌ A server-side error occurred — contact Northbeam support. |
### If your request returns a `201` status, your spend data has been received and stored.
It will become visible in your Northbeam dashboard after the next data processing run.
You can always test your payload in a tool like Postman or with `curl` before setting up automated jobs — and confirm that you're receiving a `201` success response.
***
## Step 2: Setting up UTM Parameters
In Northbeam, UTMs are captured in real-time at the moment a visitor lands on your site. This tracking is handled by our pixel and **cannot be changed after the fact**, so it’s important to get your UTM setup right from the start.
#### 2A: **Required UTM Parameters**
* `utm_source`
* `utm_medium`
* `utm_campaign`
As long as `utm_campaign` matches the `campaign_name` from the Spend API, your spend and revenue will align correctly.
You can use any values for `utm_source` and `utm_medium`, but we recommend using the **platform name** for one or both fields to clearly indicate where the traffic came from. While not required, keeping these values consistent makes it easier to group and label performance data in Northbeam.
That said, if you already follow a specific structure for tools like Google Analytics, it’s totally fine to keep using it — as long as **each platform’s traffic can be uniquely identified** (e.g. with a distinct source + medium combo), you’ll be in good shape.
#### 2B: Other Requirements
* Make sure the [Northbeam Pixel](/docs/add-pixel#how-to-test-for-the-northbeam-pixel) is firing on your landing page
* Your landing page must be on the **same top-level domain** as the domain connected to Northbeam (for first-party tracking).
* Subdomains (like `shop.example.com` if `example.com` is connected) are fully supported
* To check your connected domain, open [Profile](https://dashboard.northbeam.io/settings/profile) in the Northbeam dashboard.
***
#### **UTM & Spend Field Mapping Example**
| **Source** | **Field** | **Example Value** | **Required?** | **Notes** |
| - | - | - | - | - |
| **Spend API** | `platform_name` | `influencer` | Yes | No strict match required, but aligning with `utm_source` if possible, is best practice |
| **Spend API** | `campaign_name` | `12345` | Yes, for campaign-level reporting | Must match `utm_campaign` exactly for spend + revenue to merge |
| **UTM** | `utm_source` | `influencer` | Recommended | Use platform name to help identify the traffic source |
| **UTM** | `utm_medium` | `affiliate` | Recommended | Helps distinguish traffic type (e.g. organic, paid, referral) |
| **UTM** | `utm_campaign` | `12345` | Yes, for campaign-level reporting | Must match `campaign_name` exactly for spend + revenue to merge |
***
## Step 3: Creating Custom Labels
Once your spend and UTM data are both flowing into Northbeam, you’ll see them appear in the dashboard — but initially, they will show up as **separate rows** in the Sales table.
This happens because spend data (from the Spend API) and revenue data (from UTMs) come in through different sources and aren't automatically grouped. As a result, performance metrics like ROAS and CAC will be split across rows and calculated incorrectly.
**Example of of Separate Rows:**
| Campaign Name | Spend | Visits | Revenue | Transactions | ROAS | CAC |
| - | - | - | - | - | - | - |
| influencer\_1 | \$100.00 | 0 | \$0.00 | 0 | 0.00 | \$0.00 |
| influencer\_1 | \$0.00 | 100 | \$500.00 | 5 | 0.00 | \$0.00 |
To consolidate spend and revenue into **one row**, you’ll need to create a **custom label** that groups them under a **shared identifier**. Once applied to your view, this label will allow you to see **merged metrics** — like ROAS and CAC — correctly.
***
#### 3A: Creating a New Breakdown Label
Follow these steps to build the label:
1. Open the [Sales page](https://dashboard.northbeam.io/sales) in your Northbeam dashboard.
2. Click the **three dots (…)** next to **Breakdown By**, then click **Manage Breakdowns**. You can also open [Breakdowns](https://dashboard.northbeam.io/breakdowns) directly.
3. Click **Add Breakdown**.
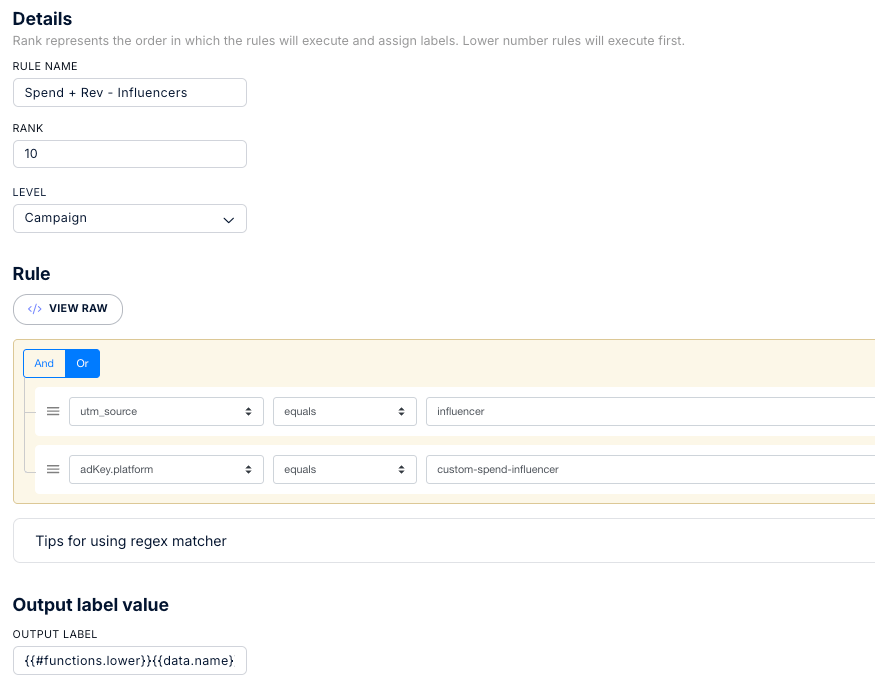
The rule logic depends on your data structure, but in most cases, you can use a single rule to group both spend and revenue sources.
**Here’s an example to show how to set it up:**
#### **📊 Example Data Structure**
| **Source** | **Field** | **Value** | Breakdown Field | Notes |
| - | - | - | - | - |
| **Spend API** | `campaign_name` | `12345` | `name` | Comes through as submitted |
| **UTM** | `utm_campaign` | `12345` | `name` | Comes through as submitted |
| **UTM** | `utm_source` | `influencer` | `utm_source` | Comes through as submitted |
| **UTM** | `utm_medium` | `affiliate` | `utm_medium` | Comes through as submitted |
| **Spend API** | `platform_name` | `influencer` | `adKey.Platform` | Formatted as `custom-spend-influencer` |
| | | | | |
#### 3B: Breakdown Rule Logic
Use **OR logic** to group matching revenue and spend sources:
| Field | Condition | Value | Purpose |
| - | - | - | - |
| `utm_source` | equals | `influencer` | Captures Influencer revenue |
| `adKey.platform` | equals | `custom-spend-influencer` | Captures Influencer spend |
#### 3C: Output Label Logic
The Output Label Rule is **how** the matching criteria will be labeled.
```
{{#functions.lower}}{{data.adKey.campaign}}{{/functions.lower}}
```
| **Part** | **Meaning** |
| - | - |
| `{{#functions.lower}}` | This opens a Handlebars block helper that applies the `lowercase` function |
| `{{data.adKey.campaign}}` | This pulls the value from the `adkey.campaign` field — which is matched from either: • `utm_campaign` (revenue) • `campaign_name` (spend) |
| `{{/functions.lower}}` | Closes the `lowercase` function block |
#### 🧾 Example Output (After Label Applied)
Based on the example logic above, once your label is applied, your data will be grouped like this in the **Sales** page:
| **Label** | **Spend** | **Visits** | **Revenue** | **Transactions** | **ROAS** | **CAC** |
| - | - | - | - | - | - | - |
| `12345` | \$100.00 | 100 | \$500.00 | 5 | 5.00 | \$20.00 |
Spend (from the Spend API) and Revenue (from UTMs) are now merged into a single row using the name value: 12345.
**Example in the UI**
***
### Optional: Make Your Breakdown Rule Logic More Flexible
`equals` requires an exact match — including case and spacing — which can be too strict for UTMs.
Instead, feel free to use use:
* **`contains`** – Matches if the value includes a substring\
*Example:* `utm_campaign contains 12345` matches `nb_12345_email_blast`
* **`matches regex`** – Best for case-insensitive and flexible matching\
*Example:*
```
(?i)influencer
```
This matches any version of `influencer` (e.g., `Influencer`, `influencer_campaign_1`)
Use "(?i)" for case-insensitive matching
***
## Step 4: Viewing Your Merged Data
Once you've created and applied your custom breakdown, you can now view your unified spend and revenue data in the Sales dashboard.
Here’s how to do it using the “Spend + Rev – Influencers” breakdown as an example:
1. Open the [Sales page](https://dashboard.northbeam.io/sales) in your Northbeam dashboard.
2. Click the dropdown next to **Breakdown By**, then **select your breakdown** (ex. "Spend + Rev – Influencers")
3. Click into the Influencer platform (or any relevant platform you're labeling).
4. Toggle the view to **Campaign-level.**
5. You should now see merged rows that align spend (from the Spend API) and revenue (from UTMs) under the same campaign name.
Your performance metrics — like ROAS, CAC, and Revenue — will now reflect accurate, fully merged data at the campaign level.