> ## Documentation Index
> Fetch the complete documentation index at: https://docs.northbeam.io/llms.txt
> Use this file to discover all available pages before exploring further.
# Neon Pixel: Confirm tracking
## Verify the integration
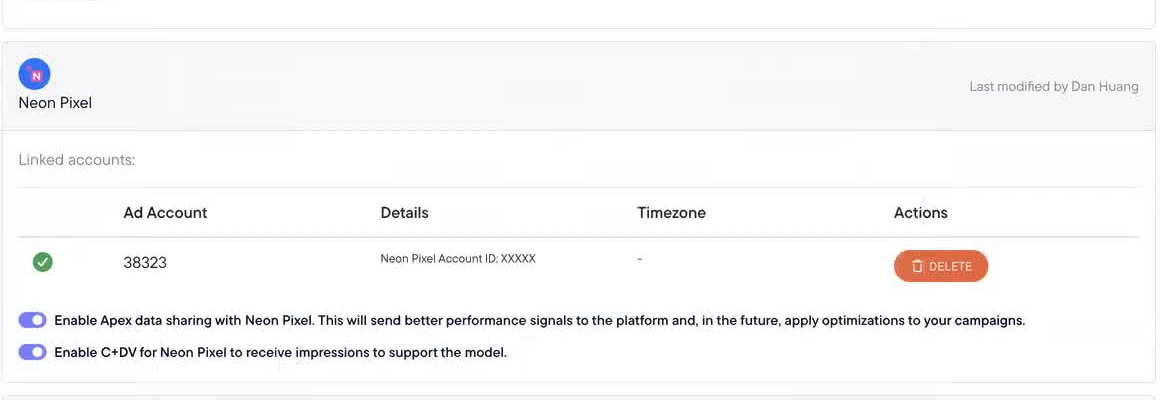
Return to [**Settings > Connections > Neon Pixel**](https://dashboard.northbeam.io/settings/connections) and confirm that:
* The connection card displays a green confirmation icon.
* The correct Neon Pixel ad account ID is linked.
* **Enable C+DV for Neon Pixel** is turned on.
* Apex data sharing reflects your preferred setting.
 Then complete these checks:
* Confirm that **Clicks + Deterministic Views** and **Neon Pixel** are both enabled in Model Settings.
* Confirm with your Neon Pixel representative that impression setup is complete.
* Allow approximately 48 hours for data to begin flowing.
* Open Sales Attribution and select the **Clicks + Deterministic Views** model.
* Confirm that Neon Pixel spend appears for the expected date range.
* Confirm that revenue and ROAS populate when eligible impressions are matched to orders.
## After switching: items to review
Historical data from the previous connection is not deleted. However, Northbeam automatically updates only built-in platform references — it does not rewrite user-created configurations.
Review the following after switching, since saved views and columns that reference the inactive platform may appear blank:
* Custom metrics
* Breakdowns
* Saved views
* Scheduled exports
* Marketing Mix Modeling mappings
If either check fails, see [Troubleshooting tracking issues](/docs/troubleshooting-tracking-issues).
Then complete these checks:
* Confirm that **Clicks + Deterministic Views** and **Neon Pixel** are both enabled in Model Settings.
* Confirm with your Neon Pixel representative that impression setup is complete.
* Allow approximately 48 hours for data to begin flowing.
* Open Sales Attribution and select the **Clicks + Deterministic Views** model.
* Confirm that Neon Pixel spend appears for the expected date range.
* Confirm that revenue and ROAS populate when eligible impressions are matched to orders.
## After switching: items to review
Historical data from the previous connection is not deleted. However, Northbeam automatically updates only built-in platform references — it does not rewrite user-created configurations.
Review the following after switching, since saved views and columns that reference the inactive platform may appear blank:
* Custom metrics
* Breakdowns
* Saved views
* Scheduled exports
* Marketing Mix Modeling mappings
If either check fails, see [Troubleshooting tracking issues](/docs/troubleshooting-tracking-issues).